
Operator`s manual


9” CHIPPER SERVICE
FEED WHEEL MOTOR
91
When the motor assembly is off the
machine, move it to a workbench for easier
access. Then, remove the 1” nut that is
inside the coupling. You may need to use a
vise to hold the motor steady while you
break the nut loose since it was put on with
LocTite® 262 and then tightened to 150 ft.
lbs. CAUTION: Always wear eye
protection when working on hydraulic
components.
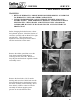
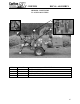
There is a special tool required to
separate the motor and coupling once it is
off the machine, contact J. P. Carlton or
your local dealer to purchase the puller.
Attach the separating tool to the coupler as
shown and screw the three bolts from the
bushing into the tool in the outside holes.
Screw the bolts into the coupling as far as
they will go. Now turn the bolt in the center
of the tool to pull the coupling off the feed
wheel motor.
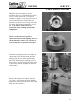
Remove the torque arm held on with two
1/2” bolts. (The torque arm looks slightly
different on the lower feed motor, but is still
held on with two bolts.)