
Operator`s manual


9” CHIPPER SERVICE
CUTTER SYSTEM
76
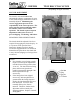
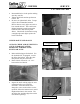
• Loosen the nuts on the adjustment bolts
that are on the far side of the plate (as
shown). There are two adjustment bolts.
• Using the nuts on the inside of the plate,
turn the nuts up toward the machine to
move the anvil closer to the knife. This
will shorten the clearance if it was too
wide. Make slight adjustments as the
clearance is being checked.
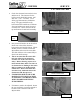
• Or, you will need to loosen the nuts on
the inside of the plate and turn the
outside nuts down if the clearance is too
narrow for the feeler gage to go in
easily. This will move the anvil farther
away from the knife.
• After the clearance has been set, tighten
the anvil bolts (1/2”-13) and torque to
75 ft. lbs.
• Retighten the nuts on the adjustment
bolts that were loosened earlier.
• Recheck the anvil/knife clearance to
make sure nothing changed when
tightening the bolts.
• Checking and setting the clearance by
the knife that is the closest to the anvil
will be the best place to start. Check
clearance at the top and bottom of all
knives.
• Clearance should be .045” - .065” (1.14
– 1.65 mm).
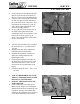
• ALWAYS REMEMBER TO CLOSE
THE CUTTER DISK HOOD AFTER
SERVICING CUTTER DISK.
• INSTALL THE HOOD LOCK PIN
AND PADLOCK.
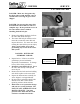
• Check condition of cutter disk hood.
Make sure the hinges are not damaged
and that the hood closes completely with
no gaps or openings; check both sides.
If there are any problems go to Servicing
Cutter Disk Hood later in this section.
NO GAPS OR OPENINGS
ADJUSTMENT BOLTS & NUTS