
Manual

BRHTR20
BROODER
HEATER
INSTRUCTIONS
HEATER OPERATION
Model BRHTR20 uses a a 250 Watt Cal Rod with a reflector shield to transfer the heat to the floor of
the brooder. It is thermostatically controlled. The heater uses 2 Model R7 7.5 Watt light bulbs. The bulb
in the center of the brooder always stays on. The bulb near the thermostat at the rear of the brooder
is the heating indicator bulb. It is on when the Cal Rod is heating. The heater assembly can be easily
removed for thorough cleaning of the brooder. The heater uses our Model AT10 Adjustable Thermostat.
Pertinent information about the thermostat is as follows:
UL recognized and CSA Approved (CSA-120 Volt A. C. only)
Ratings: 120 Volt A.C. 16.7 Amperes/240 Volt A.C. 8.3 Amperes
Description: HT open on rise. Controls heating applications by keeping contacts closed
below the set point temperature.
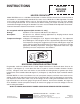
Temperature Ranges: 70 degrees to 120 degrees F (21 degrees to 49 degrees C). The adjustment
turns 180 degrees. Three degrees of turn is approximately equal to one degree
F of temperature change. We suggest that you find the 180 degrees range and
set the switch at about the halfway point. Then adjust as necessary to find the
appropriate brooding temperature. Turning the adjustment knob to the right
(clockwise) increases temperature. See Exhibit A.
BROODING OPERATING INSTRUCTIONS
Plug brooder cord into 110-220 volt A.C. circuit. Adjust thermostat as discussed above. Start at 95
degrees F (36 degrees C) 1 inch above the floor at a point in center of brooder chamber. Reduce
heat by 5 degrees each week until chicks are transferred to finishing battery or growout pen. Keep
temperatures of the brooder above 60 degrees F (16 degrees C) and provide ample ventilation without
drafts.
PLEASE NOTE: In event of insufficient heat, call your power company and have them check the line
voltage. A drop of ten volts will result in the loss of more than 20% of the heating power of your heater.
Our experience shows that in most cases of low voltage, the line leading into the brooder house is too
light and needs to be of heavier gauge. The greater the distance, from meter to brooder, the larger the
wires should be. Consult your power company for correct wire gauges to insure full voltage of 110-115
volts reaching the brooder.
WHILE CLEANING, DISCONNECT POWER SOURCE AND REMOVE HEATER ASSEMBLY.
EXHIBIT A
Warmer-Turn Clockwise
PO BOX 2000 • HOUGHTON, IOWA 52631 USA
PHONE 319-469-4141 • FAX 319-469-4402
E-mail: broweriowa@aol.com • Web: www.browerequip.com
EQUIPMENT FOR POULTRY • LIVESTOCK • PETS
COPYRIGHT © 2010
ALL RIGHTS RESERVED
ISBBRHTR20
Rev. 1.2
PRINTED IN U.S.A.
Brower
®