CARR AMPLIFIERS OWNER’S MANUAL Revised 22 Mar 2011
ii
Slant 6V Instructions Thank you for purchasing the Carr Slant 6V amplifier. The Slant 6V is our most versatile amp capable of yielding a huge array of tones. Our channel switching scheme uses a high quality, gold contact relay to organically select between the 100% discrete channels. The guitar signal does not have to go through any solid state devices in this style of channel switching. Our goal was to fully optimize each channel for its job without compromise.
Master – Adjusts the overall loudness of the overdrive channel. Treble – Varies the top end from balanced to forward. Middle – Varies the mid frequencies and is very influential in taking the tone from dark to cutting. Bass – Varies the low end from lean to full. Standby – Set amp to Standby (switch baton down) before turning on the power switch (see On-Off-On below). After 1 minute of warm up, switch the Standby baton up. The amp is ready to be played.
Full Power: Half Power, Fixed Bias: 40 Watts. The full power setting brings the best from both the cathode and fixed bias pairs of output tubes. The snappy immediacy of the fixed bias pair is fleshed out with the more complex midrange of the cathode bias pair. The amp has added dimension with a more organic quality to its dynamics in full power. The full power setting has the most clean headroom. 22 Watts.
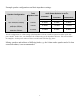
Example speaker configurations and their impedance settings: Speaker Configuration Impedance Selector setting when Power Selector is set to: Total Speaker Load Full Power Half Power, Fixed Bias Half Power, Cathode Bias Slant 6V combo speaker(s) 8 ohms 8 ohms 4 ohms 4 ohms Carr extension cabinet 8 ohms 8 ohms 4 ohms 4 ohms Combo speaker(s) and Carr extension cabinet 4 ohms 4 ohms *See below *See below Marshall-style 4x12 extension cabinet 16 ohms 16 ohms 8 ohms 8 ohms *In this conf
Biasing your Slant 6V The bias needs to be adjusted whenever the fixed-bias pair of 6V6s (inner pair of power tubes) are changed. This is easy to do with a voltmeter: 1. With the new tubes installed, set the amp for half power, fixed bias, and turn it on. 2. Set the voltmeter to volts DC or millivolts DC (0.001 volt = 1 millivolt). 3. Locate the bias test points on the back panel, and plug the red lead of the voltmeter into the red test point and the black lead into the black test point. 4.
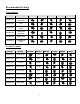
Recommended Settings Clean Channel Pickup Sound Single coil Warm 60s American Single coil Surf Single coil Atmosphere Neck Humbucker Warm 60s American Humbucker Bridge Bark Humbucker Atmosphere Neck Volume Treble Middle Bass Reverb Overdrive Channel Pickup Sound Volume Boost Single coil Texas Neck Up Single coil Brit AC Bridge Up Single coil 73 Rock Down Single coil Neck Swell Down Humbucker 1972 Punch Up Humbucker Clear Punch Up Humbucker Cutting Rock Down Humbuc
7
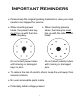
Important Reminders Please keep the original packing materials in case your amp needs to be shipped for service. When inserting power When inserting preamp tubes, the power tube key must line up with the tube socket keyway. tubes, the tube pins must line up with the tube socket holes. Do not insert power tubes with missing or damaged keys or pins. Do not insert preamp tubes with missing or damaged pins. To reduce the risk of electric shock, keep the unit away from excess moisture.
CARR AMPLIFIERS WARRANTY All Carr amplifiers are warranted to be free from defects in workmanship (solder joints, hardware assembly etc.) for the lifetime of the original owner, and free from defects in materials (including cabinet) for three years from the date of purchase by the original owner, provided that: The owner mails the signed warranty registration card (next page) and a copy of the original sales receipt to Carr Amplifiers within thirty days of purchase.
10