
Operating instructions


10
3
41
2
1
ALKALINE
ALKALINE
2
2
18km/h
1
11
ON
ON
ON
ON
OFF
OFF
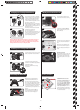
Aufl aden des Akkus
Einsetzen des Akkus
2
GREEN = ReadyRED = Charging
Charging the rechargeable battery Now you can drive the car
Installing the rechargeable battery
Inserting the batteries
Let’s practise!
Always recharge the battery immediately after use to prevent its becoming deep
discharged. Recharge the battery occasionally (suggested every 2-3 months).
Failure to treat the battery as described above can lead to its becoming defective
.
Rechargeable batteries are only to be charged by adults.
First connect the Carrera RC rechargeable
battery to the battery charger supplied. The
connection terminals between the battery
and the charger are designed to prevent
connection with the wrong polarity. Connect
the charger to a power source.
When the battery is properly connected and
charging normally, the red LED is constantly
lit. Once the battery is fully charged, the red
LED switches to green.
The battery can now be disconnected and
installed in the Carrera RC car.
The car is now ready for use.
After use, the battery must be allowed to cool
down for at least 20 minutes before it can be
fully recharged. Failure to observe this
pause may damage the battery.
Using a screwdriver, remove the cover of the
battery compartment in the Carrera RC car.
Connect the end of the cable from the
Carrera RC vehicle with the charged battery.
Put the battery in place.
Replace the compartment cover using
a screwdriver.
Open the battery compartment with a
screwdriver and insert the batteries in
the remote control. Please keep in mind
the correct polarity. Diff erent types of batter-
ies or new and used batteries are not to be
mixed. After having closed the compartment
you can check all functions of the remote
control with the help of the power-switch on
the front.
With the power-switch turned ON and
proper functioning, the top center LED
on the remote control will light up red.
The Carrera RC car and the remote
control are bound as a factory setting.
2. Switch on the controller. The LED on
top of the controller will fl ash rhythmi-
cally.
After a few seconds, the LEDs on the
car and on the controller will light con-
tinuously, meaning the bind has been
made.
Adjusting the steering
If the Carrera RC vehicle is found to pull
towards the left or right while moving,
use the adjuster control shown in the
illustration to adjust the car’s track pre-
cision.
1. Switch the car ON at the ON/OFF
switch. The LED on top of the car will
fl ash rhythmically.
CAUTION! This vehicle reaches
speeds up to 18 km/h (11 mph). Prac-
tice on an empty surface at least 2.5
metres (8.2’) square. When operating
the model for the fi rst time, be care-
ful with the accelerator, as the car
reacts very sensitively. You should
practice slow running for at least two or
three full battery charges before going
on to faster manoeuvres.