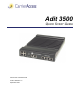
Adit 3500 QUICK START GUIDE Part Number: 002-0250-0010 Product Release: 1.
Copyright 2007 Carrier Access Corporation. All rights reserved. The information presented in this manual is subject to change without notice and does not represent a commitment on the part of Carrier Access Corporation. The hardware and software described herein are furnished under a license or nondisclosure agreement. The hardware, software, and manual may be used or copied only in accordance with the terms of this agreement.
QUICK START GUIDE Quick Start Guide In this Guide Unpacking and Inspection Installation Environment User Safety Installation - Compliant Installation Ferrite Beads Wall Mounting Rack Mounting Battery Backup Chassis Overview Interface Connectors Reset Button Alarm/Status LEDs Web-Based Management Setting up a CLI Connection Log in Key Enabled Software Features Basic Configuration Web-Based Management - Restore Factory Defaults Modify Default Admin U
Quick Start Guide Unpacking and Inspection Unpacking and Inspection WARNING! OBSERVE PRECAUTIONS FOR HANDLING ELECTROSTATIC DEVICES. 1. Inspect containers for damage during shipment. Report any damage to the freight carrier for possible insurance claims. 2. Compare packing list with office records. Report any discrepancies to the office. 3. Open shipping containers, be careful not to damage contents. 4. Inspect contents and report any damage. 5.
Quick Start Guide Installation Environment Installation Environment The environment in which you are installing the Adit 3000 must meet the following conditions: z Operating temperature range: 32° to 104° F (0° to 40° C) z Storage temperature range: -40° to 158° F (-40° to 70° C) z Maximum operating altitude: 10,000 ft. (3,048 m) z Maximum non-operating altitude: 40,000 ft.
Quick Start Guide Installation Installation The following are instructions for a compliant installation of the Adit 3500. Please note the following warnings, before installing the unit. For wall and rack mount instructions, use the links listed below to the appropriate section: z z z Wall Mounting Rack Mounting Battery Backup WARNING! OBSERVE PRECAUTIONS FOR HANDLING ELECTROSTATIC DEVICES. SEE Electrostatic Discharge (ESD) Precautions ON PAGE 4 FOR DETAILED INFORMATION.
Quick Start Guide Installation Compliant Installation NOTE: It is important the DS1/E1 Network Interface Cables are secured separately from the power and Signal Cables. 1. Inspect the unit. 2. Mount the unit. z Wall mounting installation, see Wall Mounting on page 9. z Wall mounting with Battery Backup Unit, see Battery Backup on page 12. z Rack mounting installation, see Rack Mounting on page 10. 3. Ground the unit.
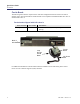
Quick Start Guide Installation Ferrite Beads The following ferrite bead is required on the Adit 3500 configurations that do not have the FXS 4 channel option. The ferrite bead will enable the Adit to be compliant with EMI standards FCC Part 15 and ICES-003 Class A. Ferrite beads shipped with Adit chassis: Ferrite Provided Part Number Intended For 1 large P/N 010-0051 Power cable, which requires a loop through the bead (see drawing).
Quick Start Guide Installation Wall Mounting Before beginning the mounting process, verify that the installation area is a stable environment, clean and free from extremes of temperature, shock, vibration and EMI. See Installation Environment on page 5.
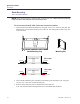
Quick Start Guide Installation Rack Mounting This is an Optional Feature. NOTE: Rack mounting kits are available for both 19 and 23 inch racks. 1 Rack Unit (RU) of spacing is required above the Adit 3000 in the Rack Mount Unit. To rack mount the Adit 3000, follow the instructions below: 1. Attach bracket ears to Rack Mounting Tray using four #10-32 x 1/4" screws on each side. The Mounting Ears can be used for both a 19 or 23 inch rack. The drawing below shows a top view of the 2 versions.
Quick Start Guide Installation 4. Place the Adit 3000 on the Tray Slide and attach with the 4 screws removed in step 2. screws screws Tray Slide 5. Slide the assembled piece (Adit 3000 and Tray Slide) onto the installed Rack Mounting Tray. 6. Secure the Tray Slide to the Rack Mounting Tray with the attached screws on the Tray Slide. NOTE: The mounting brackets are designed to not allow units to be mounted closer than recommended. Adit 3500 - Release 1.
Quick Start Guide Installation Battery Backup This is an Optional Feature. The Adit 3500 Battery Backup is designed specifically for the Adit 3500. The battery backup unit is a single 12V sealed lead-acid battery in a metal enclosure designed for wall mounting. Installation There are two possible configurations to wall mount the Adit 3500 and the Battery Backup. NOTE: It is recommended that the BBU be mounted to a wooden backboard using (4) #6 screws, or to drywall using (4) #6 screws with anchors.
Quick Start Guide Installation #1 Adit 3500 mounted on top of the Battery Backup This method will use a minimal amount of wall space. Note: This installation will require a minimum wall space of space of: 9" (H) x 14" (W) x 5" (D). 1. Mount the Battery Backup to the wall with (4) #6 x 1 coarse thread screws Note: Screws are not provided z Mark the location for the top 2 screws (using BBU mounting keyhole as a guide) z Screw these 2 screws into the wall at marked locations.
Quick Start Guide Installation 4. Attach Adit 3500 to the assembled BBU and brackets. z Second bracket here Each bracket attaches to the side of the Adit 3500. Note the orientation of the Adit in the graphic. 5. Attach power cords. 14 z Connect cord from BBU to the Adit 3500 (2 pin connector). z Connect 12V power cord to Adit 3500. Front of Adit Screws into side of Adit Adit 3500 - Release 1.
Quick Start Guide Installation #2 Adit 3500 and Battery Backup mounted to the wall This method requires a more wall space. Note: This installation will require a minimum of wall space of: 17" (H) x 14" (W) x 2.5" (D). Adit 3500 Back Front Holds AC Adapter portion of power cord Battery Cable Battery Backup 1. Mount the Battery Backup to the wall with (4) #6 screws, by: z Mark the location of the left-side 2 screws (using the BBU mounting keyhole as a guide).
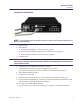
Quick Start Guide Chassis Overview Adit 3500 Battery Backup Power Connector The following cable, is hard wired to the Adit 3500 Battery Backup and connects the Adit 3500. Pinout Wire Definition Red 12V (+) Black 12V (-) Chassis Overview The following illustrations show all connectors on the Adit 3500. Front (4) DS1/E1 (E1 Future) Alarm Status (4) Analog (FXS) connectors Reset (2) 10/100Base-T Back Ground 16 Battery Power RS-232 Management Port Adit 3500 - Release 1.
Quick Start Guide Interface Connectors Interface Connectors The following are the Adit 3500 interface connectors: Note: The following is dependant upon how the system (hardware) is configured. Systems can be ordered with/without FXS, and can have from 1-4 DS1 ports. Front of Adit z 4 DS1 Ports (used for DS1 WAN and/or PRI/CAS trunks) (RJ-45C connector).
Quick Start Guide Interface Connectors 12 VAC Power Connection The Adit 3500 is powered by a 12 VAC Power Converter, which provides 12 VDC to the unit. Item Input Output Specification Rate input voltage AC100V-240V Vibration input voltage range AC90V-255V Frequency Rated 50-60 Hz Frequency Vibration 47-63Hz Input rated current 15A max. at 115VAC cool start 30A max. at 230VAC cool start Leakage current 0.25mA Efficiency 70% Min. Output voltage 13.5VDC Output max. current 2.
Quick Start Guide Interface Connectors DS1/E1 Connection Ports 1 8 Each DS1/E1 connection port is equipped with a standard RJ-48C (female) on the Adit 3500 unit. Note: E1 will be available in a future release.
Quick Start Guide Interface Connectors 10/100Base-TX Ethernet 1 8 The 10/100Base-TX Ethernet (female) ports provide connectivity for Router WAN and/or LAN ports and for management connection via Telnet and/or SNMP to a Network Management System. Ethernet (RJ-45) The pinouts are as follows: Note: This is a hub pinout, you will need a straight cable to connect to a PC.
Quick Start Guide Reset Button RS-232 Craft Port (Female DB-9) The RS-232 craft port connector (female) is for connection to an external PC or Hayes-compatible modem for local or remote configuration, management, and performance monitoring using the Adit 3500 Command Line Interface (CLI). The RS-232 craft port connects via a female DB-9 connector on the Adit 3500.
Quick Start Guide Alarm/Status LEDs Alarm/Status LEDs LED State Description Critical Off No critical alarms present Red Critical alarms present. Critical alarms include: user-configured manor environmental inputs. Off No major alarms present Red Major alarm present. Major alarms include: user-configured manor environmental inputs, DS1 short, DS1 open, DS1 facility alarm, DS1 RAI, DS1 AIS, DS1 LOF, DS1 LOS, WAN fault, Ethernet fault and dead card alarms.
Quick Start Guide Web-Based Management Web-Based Management The web-based management interface allows you to control various system parameters. The interface is accessed through a web browser. To access the management console: NOTE: The following assumes that you have connected the PC to the LAN port of the Adit 3500. 1. Launch a web browser on your PC in the LAN to which the Adit 3500’s LAN port is connected.
Quick Start Guide Setting up a CLI Connection Setting up a CLI Connection A CLI connection will require the LAN or WAN IP address of the unit. Note: If the WAN IP address is used, the remote admin WAN access must be enabled with the following command sequence: Command Username: admin Description Log into the system (username and password). Password: ******** Adit 3500> enable Enter the Privileged mode. Password: ******** Enter password for the Privileged mode.
Quick Start Guide Log in Log in After successful connection, via telnet or HyperTerm, the user must login. Default Logins are: Login: admin Password: admin123 After successful login the prompt will be displayed as follows: Adit 3500> NOTE: It is recommended that you change your password from the default. Key Enabled Software Features The Adit 3500 has additional features that are not provided on the base system. These features can be purchased with the product or added later as needed.
Quick Start Guide Key Enabled Software Features This information is also displayed with the following CLI command: Adit 3500> show version Application Version: 1.5.0 Compilation Time: Thu Jun 14 2007 18:07:22 FPGA Version: 1.00 Board Version: 5 003-1215-0300 IXP400 Software Release: 1_4 SQA4_1 MSP: 82530 - 60 channels Image File Name: TGW_v5_05.axf API Version : 2.1.0 Source IP Addr : 192.168.1.1 Voice Slot 1 : FXS Card Present: Rev 3.
Quick Start Guide Basic Configuration Basic Configuration The following configuration is divided into logical sections, where each section configures an additional function. The first must be configured before the second and so forth, however, you may stop at any section and not add the following feature. NOTE: The order in which commands are entered can affect the successful provisioning of the Adit 3500.
Quick Start Guide Basic Configuration Restore Factory Defaults If the unit is not out-of-the-box, you may want to verify that the unit is set to defaults. Note: this will reset the IP address back to the default setting of 192.168.1.1. In the web-browser: 28 z Select Advanced from the Navigation bar z Select Restore Defaults z Select OK to restore defaults Adit 3500 - Release 1.
Quick Start Guide Basic Configuration Modify Default Admin User For security purposes it is recommended that the Administrator User be changed from the default settings. Modify the Administrator User in the web-browser: z Select Advanced from the Navigation bar z Select Users icon z Select Administrator, to open the profile. Adit 3500 - Release 1.
Quick Start Guide Basic Configuration 30 z Modify the User information, and select OK to save. It is important to note that you need to have a minimum of one user with Administrative Privileges. For users with other access levels, use the New User to add additional users on the system. Note: For security purposes, the password should be changed from the default setting. z You will be required to login again, if you have modified the User Profile that you are logged in with. Adit 3500 - Release 1.
Quick Start Guide Basic Configuration Configure WAN Interface for Internet Connectivity There are options to this WAN configuration. This is the connection to the end user’s internet provider. It can be the following: z z z Single T1 (PPP) Multiple T1s (Multilink) Ethernet WAN Single T1 (PPP) To configure a single T1 utilizing PPP: 1. Select Network Connections from the Navigation bar. 2. Select (click) a T1 Interface (from T1 1 - T1 4) to configure, T1 1 is recommended.
Quick Start Guide Basic Configuration 3. Select the Settings button. 4. Set the proper Framing Type and Line Coding. 5. Select OK to apply the new settings and exit this window. 6. Select OK again to return to the Network Connections window. 32 Adit 3500 - Release 1.
Quick Start Guide Basic Configuration 7. Select (click) the Serial 1 connection. 8. Select the Settings button. Adit 3500 - Release 1.
Quick Start Guide Basic Configuration 9. Set the following on the Configure Serial 1 window: - Network Type to WAN (this is the default setting) - PPP Authentication to your required preferences 10. Select OK to apply the new settings and exit this window. 11. Select OK again to return to the Network Connections window. 34 Adit 3500 - Release 1.
Quick Start Guide Basic Configuration Multiple T1s (Multilink) To configure Multiple T1s utilizing Multilink PPP: 1. Select Network Connections from the Navigation bar. 2. Select (click) a T1 Interface (from T1 1 - T1 4) to configure. 3. Select the Settings button. Adit 3500 - Release 1.
Quick Start Guide Basic Configuration 4. Set the proper Framing Type and Line Coding. 5. Select OK to apply the new settings and exit this window. 6. Select OK again to return to the Network Connections window. 7. Repeat steps #1-6 for additional T1s required for the ML-PPP 8. Select (click) the delete icon associated with the Serial 1 connection. Select OK to confirm the deletion of this connection. 36 Adit 3500 - Release 1.
Quick Start Guide Basic Configuration 9. Select (click) New Connection to create the ML-PPP connection. 10. Select the Multilink Point-to-Point Protocol over DS0 (Multilink), and select Next. Adit 3500 - Release 1.
Quick Start Guide Basic Configuration 11. Enter User Name and Password. 12. Select the T1s for this Multilink and the channel ranges. 13. Select Next. 14. A summary of the Multilink connection will be displayed. If correct, select Finish. 38 Adit 3500 - Release 1.
Quick Start Guide Basic Configuration 15. The new Multilink connection will display on the Network Connections window. 16. Select (click) the Multilink 1 connection. 17. Select the Settings button. Adit 3500 - Release 1.
Quick Start Guide Basic Configuration 18. Set the following on the Configure Multilink 1 window: - Network Type to WAN (this is the default setting) - PPP Authentication to your required preferences 19. Select OK to apply the new settings and exit this window. 20. Select OK again to return to the Network Connections window. 40 Adit 3500 - Release 1.
Quick Start Guide Basic Configuration Ethernet WAN To configure the WAN utilizing Ethernet feed: 1. Select Network Connections from the Navigation bar. 2. Select (click) the delete icon associated with the Serial 1 connection. Select OK to confirm the deletion of this connection. 3. Select (click) the Ethernet 2 (WAN Ethernet) connection to configure. Adit 3500 - Release 1.
Quick Start Guide Basic Configuration 4. Select the Enable button, to configure the WAN Ethernet up (or in-service). 5. Select the Settings button. 6. Set Network type to WAN. 7. Set Internet Protocol option (method of IP address assignment). 8. Select OK to apply the new settings and exit this window. 9. Select OK again to return to the Network Connections window. 42 Adit 3500 - Release 1.
Quick Start Guide Basic Configuration Configure the Adit 3500 as a SIP Gateway 1. Select Voice Over IP from the Navigation bar. Adit 3500 - Release 1.
Quick Start Guide Basic Configuration 2. On the IP Telephony tab, under Proxy Servers: - Set Proxy Type to Generic/custom (BroadSoft or Sylantro). Example: BroadSoft - Select Use SIP Proxy and enter SIP Proxy IP address - Select supported Codecs 3. Select Apply to save the new settings. 4. Select the Advanced button. 44 Adit 3500 - Release 1.
Quick Start Guide Basic Configuration 5. Modify any advanced VoIP settings as needed and select Apply. 6. Select OK to exit window. Adit 3500 - Release 1.
Quick Start Guide Basic Configuration 7. If using the FXS ports, select the Phone Settings tab. 8. Select the Action icon on line #1 to edit. 46 Adit 3500 - Release 1.
Quick Start Guide Basic Configuration 9. Enter the Phone Number in the User ID field. 10. Enter Authentication information as needed. 11. Select OK to apply and exit this window. 12. Select OK to acknowledge that with these changes, active calls will be dropped. 13. Repeat this step for each FXS Line. Adit 3500 - Release 1.
Quick Start Guide Basic Configuration 14. The current User ID of the FXS lines will display. 15. Select the Line Monitoring tab. This window displays the SIP status of the FXS ports. Note: When a telephone port is successfully registered the Registration Status column displays "Registered" in green." 16. Select the Trunk Settings tab. 17. Select (click) on the trunk to configure. 18. Set the Trunk Signaling type to PRI or CAS. 48 Adit 3500 - Release 1.
Quick Start Guide Basic Configuration 19. Set the Signaling Type. 20. Select New Entry to assign numbers to your PRI interface(s). Adit 3500 - Release 1.
Quick Start Guide Basic Configuration 21. Enter the phone number range for numbers to be routed to the trunk interface for incoming SIP calls, on the Call Destination window. Use Strip and Prefix entries to translate the incoming destination number from SIP to the destination number to be sent to the PRI/CAS interface. 22. Select OK to save and exit this window. Note: this information will display at the bottom of the Trunk Settings window. 23. Select OK again to return to the Voice Over IP window.
Quick Start Guide Basic Configuration 24. Select the Trunk Monitoring tab to view the status of any calls on the PRI. Adit 3500 - Release 1.
Quick Start Guide Basic Configuration 52 Adit 3500 - Release 1.