EdgeFLEX 600 HARDWARE INSTALLATION MANUAL Part Number: 770-0170-AA Release: 2.
© Copyright 2007 Carrier Access Corporation. All rights reserved. All noted trademarks are the property of Carrier Access Corporation in the U.S. and various countries. The information presented in this manual is subject to change without notice and does not represent a commitment on the part of Carrier Access Corporation. The hardware and software described herein are furnished under a license or nondisclosure agreement.
PREFACE Compliance Safety of Information Technology Equipment EdgeFLEX™ 600 is safety certified by an independent laboratory and is compliant with the following safety standards: UL60950, 1st Edition / CSA C22.2 No. 60950-1-03 EN60950-1 FCC Requirements, Part 15 This device complies with Part 15 of the FCC Rules.
Preface Compliance Europe EN55022 and AS/NZS CISPR22 WARNING! THIS IS A CLASS A PRODUCT. IN A DOMESTIC ENVIRONMENT THIS PRODUCT MAY CAUSE RADIO INTERFERENCE IN WHICH THE USER MAY BE REQUIRED TO TAKE ADEQUATE MEASURES. NEBS Level 3 Requirements The chassis, power supply and controller are NEBS Level 3 Certified. For other service cards, refer to their chapter in this manual, to determine NEBS compliance.
Preface Compliance EdgeFLEX 600 - Release 2.
Preface Safety Notices Safety Notices Class 1 Laser Product Safety Warning The EdgeFLEX 600 is a Class 1 Laser Product. This product complies with 21 CFR 1040.10 and 1040.11 except for deviations pursuant to Laser Notice 50, dated July 26, 2001, as well as European requirements EN 60825-1 and EN 60825-2. Operational wavelengths are in the range 830-1620 nm. This symbol on the front panel indicates the presence of invisible laser light.
Preface Safety Notices DC Power Supply Warnings The DC power supply must be installed in a restricted area, such as an equipment closet or room, in compliance with Articles 110-16, 110-17, and 110-18 of the National Electric Code, ANSI/NFPA 70. The DC power source must be isolated from the AC power source and must have a proper ground. The grounded conductor of the DC supply circuit can be connected to the frame grounding conductor of the EdgeFLEX 600.
Preface Service and Maintenance - End User Service and Maintenance - End User All service to the EdgeFLEX 600 shall be undertaken ONLY by qualified service personnel. There are no user serviceable parts inside the unit. Do NOT plug in, turn on or attempt to operate an obviously damaged unit. Ensure the supply voltage for the product is within the range indicated on the identification label.
Preface Safety Information Safety Information CAUTION! ALWAYS USE CAUTION WHEN INSTALLING TELEPHONE LINES. READ THE CAUTIONS BELOW FOR DETAILS ON SAFETY GUIDELINES TO PREVENT INJURY. Never touch uninsulated telephone wires and terminals unless the telephone line has been disconnected at the Network Interface (NI) as voltage potentials as high as 300 VAC may be present across the transmit and receive pairs Only use No.
Preface Electrostatic Discharge (ESD) Precautions Electrostatic Discharge (ESD) Precautions ESD can damage processors, circuit cards, and other electronic components. Always observe the following precautions before installing a system component. 1. Do not remove a component from its protective packaging until ready to install. 2. Wear a wrist grounding strap and attach it to a metal part of the system unit before handling components.
Preface Warranty Warranty Carrier Access warrants to Distributor that Products are free from substantial defect in material and workmanship under normal use given proper installation and maintenance for period of five (5) years from the date of shipment by Carrier Access. This warranty shall not apply to Products that have been either resold or transferred from Distributor’s customer to any other party. Any such transfer shall void the above warranty.
Preface Warranty Warranty Product Returns Before returning any equipment to Carrier Access Corporation, first contact the distributor or dealer from which you purchased the product. A Return Material Authorization (RMA) number is required for all equipment returned to Carrier Access Corporation. Call Carrier Access Corporation Customer Support at (800) 786-9929 or (303) 442-5455 for RMA number, repair/warranty information and shipping instructions.
TABLE OF CONTENTS Preface Compliance . . . . . . . . . . . . . . . . . . . . . . . . . . . . . . . . . . . . . . . . . . . . . . . . . iii Safety Notices . . . . . . . . . . . . . . . . . . . . . . . . . . . . . . . . . . . . . . . . . . . . . . . vi Service and Maintenance - End User. . . . . . . . . . . . . . . . . . . . . . . . . . . . . viii Safety Information . . . . . . . . . . . . . . . . . . . . . . . . . . . . . . . . . . . . . . . . . . . . ix Notices . . . . . . . . . . . . . . . . . . . . . . .
Table of Contents Wiring and Connecting DC Power . . . . . . . . . . . . . . . . . . . . . . . . . . . 2-9 Connecting System Cables . . . . . . . . . . . . . . . . . . . . . . . . . . . . . . . . . . . . 2-10 System Management Connections. . . . . . . . . . . . . . . . . . . . . . . . . . . 2-10 System Management Connectors. . . . . . . . . . . . . . . . . . . . . . . . . . . . 2-10 Connecting the Management Cable(s). . . . . . . . . . . . . . . . . . . . . . . . 2-10 Connecting the Local Console Cable. .
CHAPTER 1 EdgeFLEX 600 Overview In this Chapter Hardware Overview Site Planning Technical Specifications Related Documentation
EdgeFLEX 600 Overview Hardware Overview Hardware Overview The EdgeFLEX 600 is a carrier-class multiservice telecommunications switch. The EdgeFLEX 600 complies to the building equipment standards published by both Telcordia (NEBS) and the European Telecommunications Standards Institute (ETSI). It is 10.40 inches (6 rack-units, 264.16 mm) in height, 17.26 inches (438.4 mm) wide, and 11.
EdgeFLEX 600 Overview Site Planning Site Planning Power Requirements The EdgeFLEX 600 is available with redundant DC power input connections. The power connectors are pluggable terminal blocks rated at 41 amps, -40 to -72 VDC, -48 VDC nominal. The maximum power consumption for an EdgeFLEX 600 device is approximately 675 watts, drawing maximum 16 amps at 40 volts. Maximum current draw (worst case) is 16 amps.
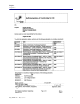
EdgeFLEX 600 Overview Related Documentation Environmental Specifications The following table lists the environmental specifications for the EdgeFLEX 600 chassis. Attribute Measurement Operating temperature 32° to 122 °F (0° to 50 °C) stable Storage temperature -40° to 158 °F (-40° to 70 °C) Operating altitude 0 to 14,000 ft.
CHAPTER 2 EdgeFLEX 600 Installation In this Chapter Preparing for Installation Chassis Components Installing the EdgeFLEX 600 Chassis in a Rack Installing the Decorative Bezel Connecting Power Connecting System Cables Connecting Network Cables Powering Up and Checking LEDs Routing Cables
EdgeFLEX 600 Installation Preparing for Installation Preparing for Installation Required Tools to Unpack and Install the Chassis You may need the following tools to unpack and install the EdgeFLEX 600 chassis in a rack: Cable cutters #2 screwdriver (Phillips or flathead) ESD wrist strap Unpacking the EdgeFLEX 600 The EdgeFLEX 600 is shipped in a foam enclosure within a sturdy cardboard container. Carefully slice the strapping tape on the top of the box.
EdgeFLEX 600 Installation Chassis Components Chassis Components Fan Tray, System Interfaces, and Power Supply Units The following components are standard features of the EdgeFLEX 600 chassis: System interfaces (Ethernet, RS-232, etc.
EdgeFLEX 600 Installation Installing the EdgeFLEX 600 Chassis in a Rack The Fan Fault LEDs indicate the status of the fan trays installed in the EdgeFLEX 600. Each PSU has a Fan Controller built in and the two PSUs share control over the two Fan Tray Units. The CTRL LED indicates that the Fan Controller circuit on the PSU is operating correctly; the MAIN and AUX LEDs indicate the status of each Fan Tray Unit.
EdgeFLEX 600 Installation Installing the EdgeFLEX 600 Chassis in a Rack 2. Insert each of the four 6-32 1/4-inch flathead screws through the flange holes and into the chassis. 3. Use a #2 screwdriver to tighten the screws. 4. Position the left-hand mounting flange so that the holes in the flange align with the corresponding holes in the chassis, and that the flange face is in front, as shown in step 2. 5. Insert each of the four 6-32 1/4-inch flathead screws through the flange holes and into the chassis.
EdgeFLEX 600 Installation Installing the EdgeFLEX 600 Chassis in a Rack Rack Installation To install the EdgeFLEX 600 chassis in a rack, you need the following: Two people able to lift at least 45 pounds Eight 10-32 1/2-inch round-head screws to secure the chassis to the rack (included in the shipment). #2 screwdriver (flat or Phillips) To install the EdgeFLEX 600 chassis into a rack, perform the following steps: 1.
EdgeFLEX 600 Installation Installing the Decorative Bezel Installing the Decorative Bezel A decorative bezel is included in the Accessory Kit to cover the fan tray and air filter. Snap the bezel onto the ball stud as shown in the following illustration. Connecting Power DANGER! BEFORE INSERTING OR EXTRACTING A EDGEFLEX 600 DC POWER SUPPLY UNIT, ENSURE THAT THE PSU’S CIRCUIT BREAKER POWER CONNECTOR HAS BEEN UNPLUGGED.
EdgeFLEX 600 Installation Connecting Power Connecting Chassis to Ground To connect the EdgeFLEX 600 chassis to ground, perform the following steps: 1. Slide the attached Panduit ground lug onto an appropriate ground wire (8 AWG), and crimp securely. 2. Place the ground lug over the two posts in the lower left corner of the rear of the chassis as shown below. 3. Fasten the two locking nuts securely onto each post. 2-8 EdgeFLEX 600 - Release 2.
EdgeFLEX 600 Installation Connecting Power Wiring and Connecting DC Power To connect power to the EdgeFLEX 600 chassis, perform the following steps: 1. Ensure that the DC circuit breaker on the front of each PSU is off. 2. Ensure that the local DC power source is off. Using 8 AWG wire, wire the power supply connector block as shown below. Insert the DC RTN wire into the left-hand terminal position, and the DC supply wire into the right-hand terminal position.
EdgeFLEX 600 Installation Connecting System Cables 5. When the connector block has been secured as shown below, the circuit breaker switch may be switched to the ON position to power the EdgeFLEX 600. Connecting System Cables System Management Connections The front panel of the EdgeFLEX 600 provides all the connections for the system cables. For pinouts of system management connectors, see Appendix A, “Connector Pin Assignments”.
EdgeFLEX 600 Installation Connecting System Cables Connecting the Local Console Cable To connect a local console cable (included in the Accessory Kit) to the RS-232 serial connector on the EdgeFLEX 600, perform the following steps: 1. Locate the local console cable to use as the local connection for network management. 2. Connect the cable to the mini RS-232 port labeled COM 1 on the front of the chassis.
EdgeFLEX 600 Installation Connecting Network Cables 3. Re-insert the terminal blocks into the receptacles on the chassis, and fasten the two retaining screws on each terminal block. Connecting Network Cables Selecting the Appropriate Network Cables The EdgeFLEX 600 is capable of providing a variety of different interface types to connect to the network.
EdgeFLEX 600 Installation Connecting Network Cables Connecting to 10/100 Ethernet Interfaces To connect 10/100 Ethernet network cables to the EdgeFLEX 600, perform the following steps: 1. At the front of the chassis, locate the 10/100 Ethernet cable(s) to install. 2. Insert the RJ-45 cable connector into the appropriate 10/100 Ethernet interface connector on an Ethernet card.
EdgeFLEX 600 Installation Connecting Network Cables 4. Finally, connect the individual DS1/E1 lines to the physical interfaces provided on the breakout panel. (In the example below, ports 15 and 16 are connected by a small loopback connector for testing purposes.) Connecting to Optical Interfaces DANGER! DO NOT LOOK DIRECTLY INTO THE END OF A FIBER-OPTIC CABLE. FIBER-OPTIC CABLES WITH LIGHT EMITTING FROM THE END OF THE CABLE CAN CAUSE INJURY TO YOUR EYE.
EdgeFLEX 600 Installation Powering Up and Checking LEDs Powering Up and Checking LEDs Powering Up the Chassis After you install the power cables, system cables, and network cables, you are ready to power up the EdgeFLEX 600. To power up the chassis, perform the following steps: 1. Ensure that the ground cable and all the power cables are installed and secure. 2. Apply DC power from the power source, as appropriate. 3. Turn the circuit breaker switch to ON.
EdgeFLEX 600 Installation Powering Up and Checking LEDs Checking System Status LEDs The EdgeFLEX 600 system status LEDs are located on the SCPX card, the Power Supply Units, and the Management Card. The following table lists the normal state and alarm state of these LEDs. Refer to the illustration in Card LED Locations, on page 2-15 for the location of the LEDs.
EdgeFLEX 600 Installation Powering Up and Checking LEDs Check I/O Card LEDs The I/O cards contain LEDs that represent card and/or port status, depending on the cards installed in the EdgeFLEX 600. Refer to the illustration in Card LED Locations, on page 2-15 for the location of the LEDs. The following table shows the states and interpretation of the LEDs.
EdgeFLEX 600 Installation Routing Cables Routing Cables Routing System and Network Cables The EdgeFLEX 600 accessory kit includes a cable management bracket that you can use to position the system and network cables around the chassis. If you installed the optional cable management bracket (see Rack Installation, on page 2-6), use the following guidelines to route the cables: Route the power cables from the PSU units to the left side and secure using a tie-wrap.
CHAPTER 3 Adding and Replacing Components In this Chapter Replacing the Air Filter Replacing a Fan Tray Replacing an SFP Module Removing/Installing Cards Nonreplaceable Components
Adding and Replacing Components Replacing the Air Filter Replacing the Air Filter The air filter should be replaced or cleaned on a regular basis. This may be done while the unit is operating. To replace the air filter, perform the following steps: 1. Remove the front bezel that covers the fan tray and air filter. 2.
Adding and Replacing Components Replacing a Fan Tray 3. The air filter is located to the right of the fan tray. Grasp the filter removal strap and carefully pull the air filter out of the chassis. NOTE: If you have large fingers, it may be difficult to pop the removal strap up enough to grasp it. A small hook or tool may help. 4. Insert the new air filter into the chassis, reversing the procedure in Step 3. 5.
Adding and Replacing Components Replacing a Fan Tray 2. With a #2 Phillips screwdriver, unscrew the captive thumbscrews at the top and bottom of the filter cover by turning them counterclockwise until the filter cover is free from the chassis. Place the filter cover to one side. 3. With the fan tray cover removed, the EdgeFLEX 600’s fan tray will be visible, as shown in the figure below. Fan Tray removal handle Air Filter removal handle Retaining screws for Fan Tray 3-4 EdgeFLEX 600 - Release 2.
Adding and Replacing Components Replacing an SFP Module 4. Unscrew the captive retaining screw at the bottom of the fan tray. Grasp the fan tray removal handle and pull the fan tray out of the chassis, as shown below. 5. Insert a replacement fan tray in the empty slot, aligning it with the internal guides in the chassis. Slide the fan tray assembly into the chassis completely, until it is fully seated, and the front of the handle is flush with the front of the chassis. 6.
Adding and Replacing Components Removing/Installing Cards 3. Flip down the extractor bail. 4. Grasp the extractor bail and gently but firmly pull to remove the SFP module. 5. Insert the replacement SFP module into the empty slot, and using the extractor bail, gently but firmly push until fully seated. NOTE: Be sure to replace with the same type of SFP, unless there is no software configuration present for the port in question. 6. Flip the extractor bail to the upright position. 7.
Adding and Replacing Components Removing/Installing Cards CAUTION! REMOVING THE MANAGEMENT CARD WILL BREAK ANY OUT-OF-BAND MANAGEMENT CONNECTIVITY TO THE EDGEFLEX 600! IF MANAGEMENT CONNECTIVITY IS TO BE MAINTAINED, BE SURE THAT A FUNCTIONING IN-BAND MANAGEMENT CONNECTION IS ESTABLISHED AND OPERATIONAL PRIOR TO EXTRACTING THE MANAGEMENT CARD.
Adding and Replacing Components Removing/Installing Cards 2. As shown in the following illustrations, grasp the ejector latch, slide the locking bar towards the end of the handle, then pull the ejector latch. This will force the card to disengage from the backplane and slide out of the chassis. Use a smooth, quick action to ensure all electrical contacts from the card to the backplane are broken at once. NOTE: The SCPX cards and the Management card have ejectors at each end of the card.
Adding and Replacing Components Nonreplaceable Components 4. At this point, be sure the ejector latch is perpendicular to the card (in the ejected position), then gently press the ejector latch toward the card. The ejector latch should engage with the chassis and draw the card into its fully-inserted position. Use a smooth, quick action to install the card so that electrical connections from the card to the backplane are made at once.
Adding and Replacing Components Nonreplaceable Components 3-10 EdgeFLEX 600 - Release 2.
APPENDIX A Connector Pin Assignments In this Appendix Pin Locations Ethernet (RJ-45) Pinout (management port) Serial Port Pinout Timing Port Pinout Alarm Inputs Pinout Alarm Outputs Pinout
Connector Pin Assignments Pin Locations Pin Locations The tables in this appendix list the connector pin assignments for the ports on the Management card. The following illustration provides pinout numbering arrangements for reference.
Connector Pin Assignments Serial Port Pinout Serial Port Pinout Pin Signal 1 Carrier Detect (not used) 2 Receive Data 3 Transmit Data 4 Data Terminal Ready 5 Ground 6 Data Set Ready 7 Request to Send 8 Clear to Send 9 Ring Indicator (not used) Timing Port Pinout Timing In Ports The EdgeFLEX 600’s two Timing In ports provide both timing input and output connections, as shown in the following table.
Connector Pin Assignments Alarm Inputs Pinout Timing Out Ports The EdgeFLEX 600’s two Timing Out ports provide only timing output pins, as shown in the following table. When the EdgeFLEX 600 is powered, the timing output is synchronized to the input timing signal. When the EdgeFLEX 600 is not powered, the input timing signal is connected directly to the output pins as a pass through.
Connector Pin Assignments Alarm Outputs Pinout Alarm Outputs Pinout Pin Signal 1 Audible Minor Alarm Common 3 Audible Minor Alarm Normally Open 5 Audible Minor Alarm Normally Closed 7 Audible Major Alarm Common 9 Audible Major Alarm Normally Open 11 Audible Major Alarm Normally Closed 13 Audible Critical Alarm Common 15 Audible Critical Alarm Normally Open 17 Audible Critical Alarm Normally Closed 2 Visible Minor Alarm Common 4 Visible Minor Alarm Normally Open 6 Visible Minor Alar
Connector Pin Assignments Alarm Outputs Pinout A-6 EdgeFLEX 600 - Release 2.
INDEX Index A normal states . . . . . . . . . . . . . . . . . . . . . . . . . . . . . 2-16 power supply . . . . . . . . . . . . . . . . . . . . . . . . . . . . . . 2-3 accessory kit, contents . . . . . . . . . . . . . . . . . . . . . . . . . 2-2 air filter, replacing . . . . . . . . . . . . . . . . . . . . . . . . . . . . 3-2 airflow . . . . . . . . . . . . . . . . . . . . . . . . . . . . . . . . . . . . . 1-3 airflow requirements . . . . . . . . . . . . . . . . . . . . . . . . . . 1-4 alarm contacts . .
Index W W wiring Ethernet interfaces . . . . . . . . . . . . . . . . . . . . . . . . . 2-13 fiber optic connectors . . . . . . . . . . . . . . . . . . . . . . 2-14 ground connection . . . . . . . . . . . . . . . . . . . . . . . . . . 2-8 management connections . . . . . . . . . . . . . . . . . . . . 2-10 power . . . . . . . . . . . . . . . . . . . . . . . . . . . . . . . . . . . . 2-9 timing . . . . . . . . . . . . . . . . . . . . . . . . . . . . . . . . . . . 2-11 wiring, alarm contacts . . . . . . . . .