
Specifications


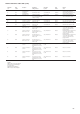


59
Service replacement compressor
Compressor rotation control
Correct compressor rotation is one of the most critical application
considerations. Reverse rotation, even for a very short duration,
can seriously affect the reliability of the compressor.
The reverse rotation protection scheme must be capable of
determining the direction of rotation and stopping the compressor
within 300 milliseconds.
Reverse rotation is most likely to occur whenever the wiring to
the compressor terminals is disturbed.
To minimize the opportunity for reverse rotation, the following
procedure must be applied. Rewire the power cables to the
compressor terminal pin as originally wired.
For service replacement compressor, a low pressure switch is
included with the compressor. This low pressure switch should
be temporarily installed as a hard safety on the high pressure part
of the compressor. The purpose of this switch is to protect the
compressor against any wiring errors at the compressor terminal
pin. The electrical contact of the switch would be wired in series
with the high pressure switch. The switch will remain in place
until the compressor has been started and direction of rotation
has been verified; at this point, the switch will be removed and
discarded.
The switch that has been selected for detecting reverse rotation is
Carrier part number HK01CB001. This switch opens the contacts
when the pressure falls below 50 mm of vacuum. The switch is a
manual reset type that can be reset after the pressure has once
again risen above 70 kPa. It is critical that the switch be a manual
reset type to preclude the compressor from short cycling in the
reverse direction.
EXV Troubleshooting Procedure
Follow steps below to diagnose and correct EXV/
Economizer problems.
On 30HXC/GX units with economizers, verify that the valve for
the bubbler tube (bottom of Economizer) is open. Check EXV
motor operation first. Press <4> <TEST> on the HSIO keypad
and select the appropriate EXV. Press <1> <ENTER> to move
the valve to 25 %. You should be able to feel the actuator moving
by placing your hand on the EXV or economizer body (the
actuator is located about one-half to two-thirds of the way up
from the bottom of the economizer shell). Repeat pressing <1>
<ENTER> three more times until the display reads 100 % for a
target percent (waiting until actuator stops each time). You should
feel a hard knocking come from the actuator when it reaches the
top of its stroke (can be heard if surroundings are relatively quiet).
Press <1> <ENTER> again if necessary to confirm this. Press
<0> <ENTER> four times to step the actuator closed in 25 %
increments, waiting again in between each move. The actuator
should knock when it reaches the bottom of its stroke. If it is
believed that the valve is not working properly, contact your
Carrier service department for further checks on:
• output signals on EXV module
• wire connections (continuity and tight connection at all pin
terminals)
• resistance of the EXV motor windings.