
Operating instructions


SMB 09-0022 90% Furnace Inspection Instruction
13
Repair or replace as necessary
I. Check vent termination
Vent termination damaged
Evidence of water staining on building surfaces
Evidence of leaves or debris getting into intake
Correct level above anticipated snow/ ice level
Repair or replace as necessary
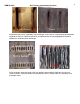
Section 5- Inspecting the heat exchanger
Any crack or hole that is big enough to affect combustion will be visible to the naked eye. Furnace
heat exchangers joints are of a rolled and crimped design and operate under negative pressure.
DO NOT use water, oil, other fluids or smoking agents to check for leaks.
If there are any visible splits, cracks or holes, the heat exchanger must be replaced.
The inside of the coupling box, cold spot baffle, primary heat exchanger outlets and secondary HX
inlets cannot be thoroughly inspected with out removing the heat exchanger assembly. If these areas
require a more detailed inspection, it will necessary to remove the heat exchanger assembly from the
furnace.
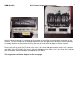
To perform a visual inspection of the outside of the heat exchanger:
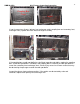
Remove the blower assembly from the blower compartment.
Inspect the secondary heat exchanger assembly through the blower compartment. Use an inspection
mirror and a flashlight to inspect the upper portion of the secondary heat exchanger. Is there
evidence of:
Corrosion
Water leakage
Perforations
If any abnormalities are noted, remove the heat exchanger assembly for further inspection.
The primary heat exchanger can be inspected in a similar manner. If an evaporator coil is not
installed on the furnace, the primary heat exchanger can be inspected through an opening in the
supply plenum. Cover any field-fabricated plenum opening with a supply air register or field fabricated
patch for the type of duct material you are working with. Seal any leaks around the register or patch
with foil tape, silicone or duct sealer.