
Specifications


2
SAFETY CONSIDERATIONS
Installation and servicing of air-conditioning equipment can
be hazardous due to system pressure and electrical compo-
nents. Only trained and qualified service personnel should
install, repair, or service air-conditioning equipment.
Untrained personnel can perform basic maintenance func-
tions of cleaning coils and filters and replacing filters. All other
operations should be performed by trained service personnel.
When working on air-conditioning equipment, observe precau-
tions in the literature, tags and labels attached to the unit, and
other safety precautions that may apply.
Follow all safety codes. Wear safety glasses and work
gloves. Use quenching cloth for unbrazing operations. Have
fire extinguishers available for all brazing operations
INSTALLATION
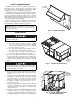
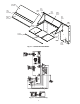
1. Prepare the unit for installation:
a. For units with two-position damper installed
remove the outdoor air hood. See Fig. 2. Unplug
the two-position damper and remove the assembly
from the outdoor air opening.
b. For units with manual damper installed, remove
the outdoor air hood and damper assembly.
c. For units with no outdoor air option installed,
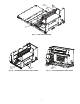
remove the outdoor air intake cover. See Fig. 3.
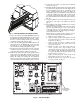
2. Remove the side panel on the return end of the unit to ex-
pose the return section of the unit. Save the screws for use
later when replacing the panel. The inside of the unit will
contain a frame for installing the economizer as shown in
Fig. 4.
3. Remove the frame support brackets from both sides of
the frame inside the unit. See Fig. 4. Save the screws for
use later.
4. Uncrate the economizer assembly. Position the damper
assembly so that it will rest on the angle bracket support
at the bottom of the economizer frame inside the unit.
Slide the economizer into the unit. (See Fig. 5.) Secure
the damper assembly to the frame using the
1
/
4
-in. x
5
/
8
-in. screws provided.
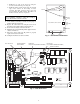
5. Open the hinged control box compartment on the unit and
remove the control box cover. Save the screws for use lat-
er. Be sure not to place sharp objects on any surface that
could be damaged.
6. Install the economizer board (P/N 50ZZ401127) into the
control box using the no. 6,
3
/
4
-in. screws provided. The
economizer board will mount into the pre-drilled holes on
the right side flange of the control box as shown in Fig. 6.
IMPORTANT: Do not adjust the damper assembly.
The motor and damper have been pre-set and adjusted
for proper operation.
Turn off unit power and lock out. Electrical shock and per-
sonal injury could result.
Cover the duct opening as a precaution so objects cannot
fall into the return duct opening. Be sure to remove the
cover when installation is complete.
OUTDOOR
AIR INTAKE
COVER
Fig. 3 — Outdoor Air Intake Cover
FRAME
SUPPORT
BRACKETS
(SIDE PANEL
REMOVED)
Fig. 4 — Frame Support Brackets
(Side Panel Removed)
OUTDOOR
AIR HOOD
Fig. 2 — Outdoor Air Hood