
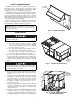
Specifications


4
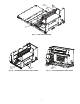
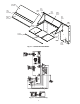
g. Install the top part of the hood top using the
6 screws removed in Step 2. See Fig. 12.
h. Install the filter retainer track along the bottom
edge of the outdoor air hood using 4 screws
provided. For filter removal, remove the four
screws holding the filter retainer. The filters can
then be removed, cleaned, or replaced.
15. Secure all wires so that they do not rub any sharp edges or
interfere with any moving parts.
16. Replace the control box cover using the screws saved
from Step 5. Economizer wiring is shown in Fig. 13.
17. Power can now safely be restored to the unit.
18. Install the three mist eliminating filters supplied into the
outdoor air inlet hood.
19. Inspect the unit to make sure all panels are properly
replaced and secured to the unit.
20. Configure the unit for use with economizer.
IMPORTANT: If the return duct opening was covered
prior to installation, remember to remove the covering so
as not to block off the return air to the unit.
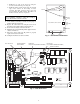
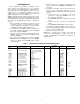
RELAYS
ECONOMIZER CONTROL BOARD
ECB-J7
ECB-J2
ECB-J5 ECB-J4
ECB-J9
DIP
SWITCHES
(S1)
Fig. 7 — Economizer Control Board
CEPL130346-01
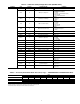
STATUS
LEN
J1
J2
J4
J3
J5
J6
J7
J8
J9
J10
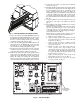
CCN
YELLOW LED -
CCN (CARRIER COMFORT NETWORK)
INSTANCE JUMPER
RED LED-STATUS
MAIN BASE BOARD
PART NUMBER
GREEN LED-
LEN (LOCAL EQUIPTMENT NETWORK)
Fig. 8 — Main Base Board