
Specifications


Schedules Group — This group includes Schedule I
and II, Timed Discrete Output, Timed Override, Adaptive
Optimal Start, and Adaptive Optimal Stop (available on CV
units only).
TIME SCHEDULES — Time Schedule function provides
two separate schedules from the unit controls. Schedule I is
provided for unit operation as a means to automatically switch
back and forth from Unoccupied to Occupied modes. Sched-
ule II provides a means to automatically change the Discrete
Device Output (for control of outdoor building or parking
lot lights).
Each schedule consists of 1 to 8 occupied time periods
that are set by the user through the function on the HSIO.
NOTE: A control relay for external device control (see Timed
Discrete Output) is required for Schedule II.
Sequence of Operation
Schedule I — When the schedule changes from Unoccupied
to Occupied modes (or vice versa), the Master Loops will
change their priorities and control the submaster reference
values according to user configuration instructions for unit
Unoccupied or Occupied mode.
Schedule II — See the Timed Discrete Output section below.
Configuration — To configure Time Schedule set points, en-
ter the Set Point function and the Date and Time subfunc-
tion by pressing and . To set the Day of the Week
and Time, scroll down to DOW. The current day, hour, and
minute will be displayed (where 1= Monday, 2 = Tuesday,
and so on). To change the day and time, press the numbers
of the new set point (example:
ENTER
would be Monday, 2:30 PM) and then press .
To set the Month, Day, and Year, scroll down to
MDY. The current month, day, and year will be displayed
(mm.dd.yy). To change the month, day, and year, press the
numbers of the new set point (example:
ENTER
which would be May 14, 1998) and then press .
To Set Daylight Savings Time and Set Occupancy Sched-
ules, Schedule I, see the Program Time Sequences on
page 50. See Table 16.
TIMED DISCRETE OUTPUT — The unit control can be
programmed with a unique time schedule (separate and dif-
ferent from the unit Occupied/Unoccupied schedule) that may
be used to control an external function or device (such as
parking lot lights) without adding a discrete timeclock de-
vice. This schedule is designated as ‘‘Schedule II.’’
A special relay (P/N HK35AB001) with a 20 vdc coil is
required.
Sequence of Operation — From Schedule II, when time sched-
ule indicates Unoccupied time, the control output is off. When
time schedule indicates Occupied time, control output is on
(relay energized).
Configuration — To configure:
1. Connect control wires from external controlled device at
PSIO2 Channel 44 (terminals J6/41 and J6/42).
2. Enter Time Schedules. Press . (See Schedule
Function section on page 50 for detailed instructions.)
Define Period 1 (Occupied, Unoccupied). Define Periods
2 thru 8 (as required).
TIMED OVERRIDE — The Timed Override mode allows
an occupant to return a system that is in Unoccupied status
to Occupied status, for period of 1 to 4 hours (user-configured).
Timed Override is Mode 38. The Timed Override function
can be user-configured to return only the unit, the Timed Dis-
crete Output, or both to Occupied status. A T-55 space sen-
sor (factory-supplied, field-installed) or T-56 space sensor
(field-supplied and -installed) is required.
To activate Timed Override, press the button on face of
the space sensor. The unit control will recognize this signal
and enable the Occupancy Schedule program to extend the
Occupied period by the configured timed override amount.
To configure Timed Override, perform the following
procedure:
Select which Time Schedules permit the use of override.
Press to enter into the Service function. Enter the
password. Press to enter into the User Configuration
subfunction. Scroll down to TSCH. The current schedule con-
figuration will be displayed. A 1 represents Unit schedule
only (Time Schedule I). A 2 represents Timed Discrete Out-
put only (Time Schedule II). A 3 represents both Schedules
I and II. Press the number of the desired configuration and
ENTER
press .
Configure the duration for Timed Override (Schedule I).
Press to enter in to the Service function and the Over-
ride subfunction. Scroll down to TOVR. The number of over-
ride hours will be displayed. The default is 1 hour. The range
is 1 to 4 hours. To change the configuration, press a new
ENTER
number (example: ) and .
One-time Period Override — As an alternate way to initiate
override, a service technician may initiate Timed Override
from the HSIO, for a one-time period.
To initiate an override for Schedule I, press to en-
ter into the Schedule function. Scroll down to OVRD. The
current override time will read 0. Press the number of the
ENTER
desired override time and press . The acceptable range
of values is 0 to 4 hours. At end of this time override event,
the entered OVRD values will be reset to zero.
To initiate an override for Schedule II, press
to enter into the Schedule function. Scroll down to OVRD.
The current override time will read 0. Press the number of
ENTER
the desired override time and press . The acceptable range
of values is 0 to 4 hours. At end of this time override event,
the entered OVRD values will be reset to zero.
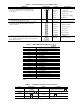
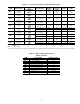
Table 16 — Configuring Day of Week/Time of Day
DESCRIPTION HOW TO CONFIGURE AT HSIO SET POINT RANGE
Set Day of Week
DOW Monday = 1; Tuesday = 2; etc.
Set Time of Day
TIME
hh.mm (military time)
(use for ‘‘:’’)
Set Daylight Savings Time (see Table 46)
Set Occupancy Schedules (see Table 47)
18