
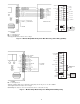
Specifications
Occupied Set Point Limiting — The occupied set
point limits establish the maximum allowable heating set point
and the minimum allowable cooling set point. The range of
allowable temperature limits is 50 to 99 F for heating and
cooling.
The Cooling Set Point Low Limit is set in category 1, op-
tion 1. The left set point buttons control the cooling set point
limit. Press the top set point button to raise the set point limit.
Press the bottom set point button to lower the set point limit.
The cooling set point limit is displayed in the top of the moni-
tor thermostat screen. The default value is 68 F.
The Heating Set Point High Limit is set in category 1,
option 2. The left set point buttons control the heating set
point limit. Press the top set point button to raise the set point
limit. Press the bottom set point button to lower the set point
limit. The heating set point limit is displayed in the top of
the monitor thermostat screen. The default value is 75.
By limiting the occupied set points to a defined range, the
heating and cooling system will operate within desired pa-
rameters and minimizes the possibility of extended unit cycles
to heat or cool a zone.
Temperature Display — Temperature sensor infor-
mation is displayed by the monitor thermostat in 1/10° F reso-
lution. Temperature and units are displayed in the top of the
display screen. The temperature scale can be set to either
Fahrenheit or Celsius units.
To enable the Fahrenheit Temperature Display option, set
the category to 1 and the option to 6. Use the left set point
buttons to toggle the option ON or OFF. ON will display
temperature in Fahrenheit. OFF will display temperature in
Celsius.
NOTE: Pressure is always shown as in. wg.
NOTE: Absolute temperatures (temperatures not measured
by devices) are always in Fahrenheit, irrespective of the set-
ting of the Fahrenheit Temperature Display option.
UNOCCUPIED MODE OPERATION
Unoccupied mode is the time period when the monitor
thermostat maintains the unoccupied set point temperatures.
Unoccupied time periods follow the schedule of the monitor
thermostat zone. Unoccupied time periods allow for lower
heating temperature set points and higher cooling tem-
perature set points to conserve energy when the zone is
unoccupied.
The monitor thermostat unoccupied time periods may be
controlled:
• locally by the monitor thermostat, which will follow its
own programmed unoccupied and occupied time periods
• through communication from another device on the net-
work, which will send the monitor thermostat an unoccu-
pied schedule.
During local control the unoccupied/occupied programs
can be locked to prevent unauthorized or unintentional changes.
When the monitor thermostat is in a time period designated
for unoccupied mode operation, zone occupants can tempo-
rarily override unoccupied operation to the occupied mode.
During unoccupied override, the monitor thermostat will main-
tain configured occupied conditions. At the end of the over-
ride period, the monitor thermostat will automatically return
to unoccupied mode operation.
When the monitor thermostat is operating in unoccupied
mode, the unoccupied set points will be displayed on the
monitor thermostat screen.
Unoccupied Set Points — The unoccupied set points
establish the heating and cooling temperatures maintained
in the zone controlled by the monitor thermostat during the
Unoccupied mode. The range of allowable temperatures is
99 to 50 F for heating and 99 to 40 F for cooling.
To configure the unoccupied cooling set point, enter cat-
egory 1, option 3. The left set point buttons control the un-
occupied cooling set point. Press the top set point button to
raise the set point. Press the bottom set point button to lower
the set point. The unoccupied cooling set point is displayed
in the top of the monitor thermostat screen. The default value
is 80 F.
To configure the unoccupied heating set point, enter cat-
egory 1, option 4. The left set point buttons control the un-
occupied heating set point. Press the top set point button to
raise the set point. Press the bottom set point button to lower
the set point. The unoccupied heating set point is displayed
in the top of the monitor thermostat screen. The default value
is 65.
Occupancy Schedules — The occupancy schedules
establish the time periods when the monitor thermostat op-
erates in the Occupied or Unoccupied mode.
The unoccupied/occupied program has individual 7 day
programming with 8 time periods. Unoccupied/occupied ON/
OFF times are entered on the minute. The start of an ON
time is the beginning of the Occupied mode. The start of an
OFF time is the beginning of the Unoccupied mode.
NOTE: If an ON time and an OFF time are set for the same
hour, the monitor thermostat operates in Unoccupied mode
for that entire period.
The Unoccupied/Occupied program of the monitor ther-
mostat can be configured locally.
The monitor thermostat will follow the holiday time sched-
ule on days that are configured as holidays in the Holiday
Configuration tables. If a local occupancy schedule is being
used, then the local holiday configuration will be used. Oc-
cupancy schedules received from the network already have
holiday information included.
PROGRAMMING SCHEDULES USING SOFTWARE —
Each occupancy time schedule consists of 8 periods. From
the Carrier network access software program each period may
be configured. Three configuration options are set from the
software: Occupied From, Occupied To, and Days of the Week
the time period is in effect. Eight different days are recog-
nized: Monday through Sunday, and Holiday.
OCCUPANCY SCHEDULE MODE — The unoccupied/
occupied program can be directly configured at the monitor
thermostat. Press both upper (or lower) set point buttons at
the same time to enter the Program mode. The occupancy
schedules are in category 2, options 1 through 8. Option 1 is
occupied period 1. Option 2 is occupied period 2.
The options continue to option 8 which is occupancy period 8.
The procedure is different than programming other
options. To select category 2 press the upper left set point
button. When category 2 is shown on the display screen, press
the select (lower right) button. The display will show
option 1. This will show the start time for option 1 only. To
modify the start time for period 1, press select. To modify
the stop time for period 1 press the upper left set point but-
ton. Instead of displaying period 2, the stop time for period
1 will be shown. Press the select button to modify the stop
time. To modify the days of the week that this occupied pe-
riod will be active, use the upper left set point button to ad-
vance to the next option. Instead of showing period 2, the
screen will display the active days for the occupied period.
Each occupied period (options 2.1 through 2.8) will have
three different screens associated with it — start time, stop
time, and active days.
19