
Install Instructions


3
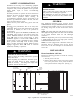
EQUIPMENT DAMAGE HAZARD
Failure to follow this caution may result in damage to
equipment.
When removing panels from the unit, be careful not to
damage the roof or other surfaces with the panels.
CAUTION
!
CUT HAZARD
Failure to follow this caution may result in personal
injury.
When removing access panels or performing
maintenance functions inside your unit, be aware of
sharp sheet metal parts and screws. Although special
care is taken to reduce sharp edges to a minimum, be
extremely careful when handling parts or reaching
into the unit.
CAUTION
!
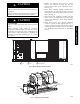
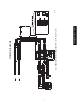
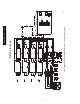
3. Remove the block--off plate and save screws.
Remove post adjacent to control box and post
located between filter access and blower access.
(See Fig. 2.)
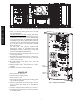
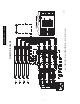
4. Insert heater assembly through opening where
block--off plate was previously removed. Let back
end of heaters slide along support rails beneath fan
deck. (See Fig. 3.)
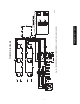
5. Slide heaters until completely installed such that
heater controls are completely in the unit. Using
screws saved from Step 3, secure heater assembly.
(See Fig. 4.)
6. Route heater power wires through grommeted
notches in vertical fan deck support. (See Fig. 3.)
Continue routing wires under coil and filter support
through the bottom notched section of the control
box. Avoid sheet metal edges and any protruding
screws.
Post Post
Block Off Plate
C09421
Fig. 2 -- Block--Off Plate and Post Locations
Grommets
Opening
for Heater
Heater
Support Rails
C09422
Fig. 3 -- Opening for Electric Heater
CRHEATER270A00-- 287A00