
Installation manual


High Wall Type
Installation Manual
–9–
5 Drain Piping Work
Piping and drain hose forming
* Apply heat-insulation for both refrigerant pipe and drain hose surely so that no dew generates inside of
the equipment. (Use polyethylene foam for insulating material.)
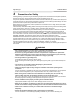
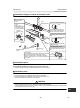
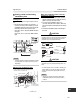
1. Remove the front panel
The front panel must be removed for piping
connections in the left, bottom left, and rear
left directions.
• Open the air inlet grille upward.
• Remove the four screws securing the
front panel.
• Slightly open the lower part of the front
panel, and then pull the upper part of the
front panel toward you to remove it from
the rear plate.
2. Die-cutting front panel slit
Cut out the slit on the leftward or right side of the front panel for the left or right connection and the slit on
the bottom left or right side of the front panel for the bottom left or right connection with a pair of nippers.
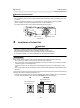
3. Changing drain hose
For leftward connection, bottom-leftward connection and rear leftward connection's piping, it is necessary
to change the drain hose and drain cap.
Without changing the drain hose position, the indoor unit will not fit to the wall.
Remove the drain hose
• The drain hose can be removed by removing the screw securing the drain hose
and then pulling out the drain hose.
• To remove the drain hose, be careful of any sharp edges of steel plate. The
edges can injuries.
• To install the drain hose, insert the drain hose firmly until the connection part
contacts with heat insulator, and the secure it with original screw.
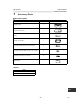
Piping
preparation
Die-cutting
front panel
slit
Rear right
Rear left
Bottom left
Left
Bottom right
Right
Removing
front panel
Changing
drain hose
3
2
1
Air inlet grille
Front panel
Heat insulator
Drain hose
9-EN