
User's Manual


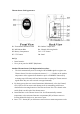


Thermo Sensor Unit Appearance.
D1: Transmission Indication LED D2: Outdoor Temperature
D3: Wall Mount Hole D4: Channel Selecting Switch
D5: Battery Compartment D6: “°C/°F” button
D7: “TX” button D8: Stand
Set Up:
y Insert batteries.
y Use a pin to press the RESET (B8) button
Outdoor Thermo Sensor Unit Registration Procedure:
y The clock automatically starts receiving the RF 433MHz signal to register new
Thermo Sensor Unit after new batteries inserted, “- - . -“ flashes on the outdoor
temperature. After registered all channels or press “CHANNEL” button (B3),
scanning stops. All buttons will not function when scanning for Thermo sensor’s
signal unless they are well received or stopped manually.
z For having more than one external transmitter (Maximum3), select the Channel,
CH1, CH2 or CH3 to ensure each thermo sensor is transmitting in difference
channel before inserting batteries of the Thermo Sensor Unit. The channel select
switch (D4) is at the back of the thermo sensor.
z Insert Batteries on the Thermo Sensor Unit. It will automatically transmit
temperature to the main unit. Batteries compartment (D5) of thermo sensor is
locating behind the back cover, unscrews to open.
z Press “ TX “ button (D7) on the thermo sensor unit to transmit temperature to the