
User's Manual


6
z Hold “+” button [B8] for 3 seconds to select the unit for barometric
pressure meter in hPa, inHg or mmHG.
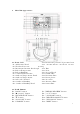
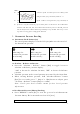
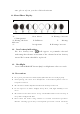
7.4 Barometric Pressure Bar Graph
The Barometric Pressure Reading at 0hr, –2hr,-4hr,-8hr,-12hr is recorded
and shown on Barometric Pressure Bar Graph [A3]. The Graph is
displayed in both hPa and inHg
8. Thermometer
8.1 RF Transmission Procedure:
z The main unit automatically starts receiving transmission from
outdoor thermo sensor for outdoor temperature after weather
condition setting.
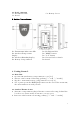
z The thermo sensor unit will automatically transmit temperature to the
main unit after batteries inserted. For having more than one external
transmitter (Maximum3), select the Channel, CH1, CH2 or CH3 to
ensure each sensor is transmitting difference channel before
inserting batteries. The channel select switch (D8) is at the back of
the thermo sensor.
z If main unit failed to receive transmission from outdoor thermo
sensor in first 3 minutes after the batteries inserted (“- - . –”display on
the LCD), hold “Channel” button (B6) for 3 seconds to receive
transmission manually. RF icon “ ” flashes on the LCD
Note: “WEATHER/HISTROY” (B7), “+/C/F” (B8), “-/MAX/MIN“(B9),
“ABSOLUTE/RELATIVE” (B10) buttons will not function while scanning for
thermo sensor’s signal unless they are well received or stopped
manually.
8.2 Temperature & Humidity
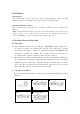
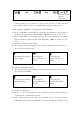
(1) Outdoor Temperature--- Channel Selection
z Press “CHANNEL” button (B6) to view the 3 Channels’ temperature &
humidity. The sequence is shown as follow:
PRESS “CHANNEL” button PRESS “CHANNEL” button PRESS “CHANNEL”
button
0 HR = Current Barometric Pressure Reading
-1HR = Barometric Pressure Reading in 1 hour ago
-2HR = Barometric Pressure Reading in 2 hour
ago ……..etc