
Fluid Head - User Manual


8
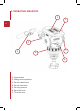
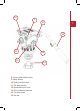
3. PROCEDURES
1 - Place the FOCUS 12 on your Tripod by loosening the e-down
knob (14) under the Fluid Head and level using the level bubble (12).
In low light condions, press buon (12) for light.
2 - Connect the Pan bar (15) to the Fluid Head ghtening the lever (3)
on the Pan bar aachment and select your desired operang angle.
The telescopic Pan bar length can be adjusted via lever (4).
3 - Lock both Pan and Tilt brakes (6 & 7), turn both Tilt drag selector (11)
and counterbalance knob (13) to the minimum.
4 - Open the Camera plate lock lever (8) completely to release the camera
plate (1).
5 - Remove the Camera plate (1) from the sliding Camera plaorm (2) by
squeezing simultaneously Camera plate lever (8) and the safety buon
(9). Aach the Camera plate (1) to the boom of the Camera and
ghten the clamping screw to secure the Camera. Try to center the
Camera plate on the Camera, keeping the center of gravity posion
in mind.
6 - Lock the sliding plaorm lever (10), click the Camera into the quick
release sliding plaorm (2), the plate will lock into place.
7 - Hold the Camera in horizontal posion with the Pan bar (15) and release
the Tilt brake lever (7). Release the sliding plaorm lever (10) and nd
the correct center of gravity posion, by sliding the Camera plaorm (2)
back and forth unl you have achieved the correct balance. Lock the
sliding plaorm lock (10).
8 - Set the counterbalance system by turning the balance knob clockwise
(13) to appropriate tension. The Camera has to stay at any lt angle.
Eventually ne-tune by adjusng the sliding plate.
9 - Unlock the Pan brake lever (6) and set the Fluid drag control by