
Owner's Manual


11 8
CX630
6
6
5
5
4
4
3
3
2
2
1
1
MON
LEVEL
MIC
5
4
3
2
1
0 10
9
8
7
6
EFF
REV
20
LINE
HI
MID
LOW
0
3
6
12
3
6
9 9
12
dB
5
4
3
2
1
0 10
9
8
7
6
5
4
3
2
1
0 10
9
8
7
6
0
3
6
12
3
6
9 9
12
0
3
6
12
3
6
9 9
12
MON
LEVEL
MIC
5
4
3
2
1
0 10
9
8
7
6
EFF
REV
20
LINE
HI
MID
LOW
0
3
6
12
3
6
9 9
12
dB
5
4
3
2
1
0 10
9
8
7
6
5
4
3
2
1
0 10
9
8
7
6
0
3
6
12
3
6
9 9
12
0
3
6
12
3
6
9 9
12
MON
LEVEL
MIC
5
4
3
2
1
0 10
9
8
7
6
EFF
REV
20
LINE
HI
MID
LOW
0
3
6
12
3
6
9 9
12
dB
5
4
3
2
1
0 10
9
8
7
6
5
4
3
2
1
0 10
9
8
7
6
0
3
6
12
3
6
9 9
12
0
3
6
12
3
6
9 9
12
MON
LEVEL
MIC
5
4
3
2
1
0 10
9
8
7
6
EFF
REV
20
LINE
HI
MID
LOW
0
3
6
12
3
6
9 9
12
dB
5
4
3
2
1
0 10
9
8
7
6
5
4
3
2
1
0 10
9
8
7
6
0
3
6
12
3
6
9 9
12
0
3
6
12
3
6
9 9
12
MON
LEVEL
MIC
5
4
3
2
1
0 10
9
8
7
6
EFF
REV
20
LINE
HI
MID
LOW
0
3
6
12
3
6
9 9
12
dB
5
4
3
2
1
0 10
9
8
7
6
5
4
3
2
1
0 10
9
8
7
6
0
3
6
12
3
6
9 9
12
0
3
6
12
3
6
9 9
12
MON
LEVEL
MIC
5
4
3
2
1
0 10
9
8
7
6
EFF
REV
20
LINE
HI
MID
LOW
0
3
6
12
3
6
9 9
12
dB
5
4
3
2
1
0 10
9
8
7
6
5
4
3
2
1
0 10
9
8
7
6
0
3
6
12
3
6
9 9
12
0
3
6
12
3
6
9 9
12
GRAPHIC EQ
0
8
4
4
8
–12
+12
125 250 50063 1K 2K 4K 8K 16K
MAIN
PHANTOM
MONITOR REVERB
EFF SEND TAPE EFF RTN
TAPE RETURN
TAPE SEND
SEND MONITOR MAINAMP PATCH
EFFECTS
RETURN
POWER
2 8
0 10
1 9
5
64
73
5
4
3
2
1
0 10
9
8
7
6
5
4
3
2
1
0 10
9
8
7
6
5
4
3
2
1
0 10
9
8
7
6
0
5
4
3
2
1
10
9
8
7
6
PA CABINET
PA CABINET
MONITOR SPEAKERS
EXTERNAL
POWER AMP
TWO-TRACK
TAPE RECORDER
TO REAR
SPEAKER OUTPUTS
CHANNEL
1
2
3
4
5
6
7
8
91011
12
13
15
17
19
22
30
50
0 dB
PROTECT CHANNELPOWER
1
2
3
4
5
6
7
8
91011
12
13
15
17
19
22
30
50
0 dB
1 2
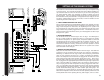
This section is a brief overview of what it takes to hook up a sound system using
a CX series mixer. The overview will include some of the different possible set-
ups and some basics on how to mix live sound. If you are new to using mixers,
you should find this section very informative in helping to operate your sound
system properly. If you are experienced with mixers, then you may find some of
the information new or presented with a new approach that can help you as well.
As always, experimentation is the key to success, so don’t be afraid to use the
controls to get a feel for what they do.
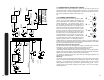
1. INPUT CONNECTIONS FROM THE STAGE
For live sound reinforcement or public address systems (P.A. Systems), the input
signals to the mixer will come from the microphones and instruments on the
stage. Each microphone or instrument to be amplified by the P.A. system must
be connected to one of the mixer’s inputs. It is preferred to have as many of the
stage instruments as possible plugged into the mixer. This allows the best over-
all sound control of the instruments as they are mixed together and then ampli-
fied by the P.A. system.
2. ON STAGE OPERATION
The CX Series mixers are small enough to have on stage. The advantages to
this are: a band member can operate the mixer so no extra person is needed,
and also the microphone, 1/4” phone inputs, and speaker cables are short and
plug directly into the mixer, leaving no cables for the audience to trip over. The
only disadvantages are the band member / mixer operator, on stage, doesn’t
hear what the audience is hearing and because the mixer operator is a band
member he can not react fast to problems with the “PA” system such as feed-
back and sudden volume changes.
3. REMOTE TO STAGE OPERATION
Many times the mixer will be located a distance from the stage. This allows the
performance to be monitored and mixed from the audience’s perspective.
Monitoring at a distance from the stage usually means employing a multi-cable
cable or more commonly referred to as a “Snake” (available from CARVIN).
Each of the microphones and instruments are plugged into the snake box at the
stage and the snake cable carries all these signals to the mixer. At the mixer,
the snake cable, which fans out to plugs corresponding to the jacks on the snake
box, is plugged into the appropriate inputs and line level (pre-amp) outputs of the
mixer. All snake cables are numbered, both on the snake box and the cable, to
help in keeping track of which microphones are being plugged into which chan-
nels. It is a good idea at this point to label each of the mixer channels according
to what instrument each will be controlling. This can be done with masking tape
(Scotch brand #230 drafting tape) or another suitable ‘light’ sticking tape. The
tape will give you a surface to write on, to properly label the channels. The (XLR)
balanced low impedance format will ensure the best possible performance and
lowest possible noise when operating with long cable lengths, such as a snake.
SETTING UP THE SOUND SYSTEM