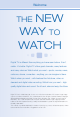
Digital Video User’s Guide THE FUTURE NOW SHOWING
Welcome NEW WAY to WATCH the Digital TV is different than anything you have seen before. It isn’t cable…it’s better. Digital TV offers great channels, many features and many choices. Watch what you want – sports, movies, news, cartoons, drama, comedies – anything you can imagine is there. Watch when you want – with features like Autotune, video on demand and digital video recording. Watch how you want – high quality digital video and sound. So sit back, relax and enjoy the future.
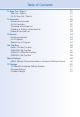
Table of Contents Remote Control Layout ADB Potenza Remote Control 1 1 1 Remote Control Basics Turn Your Set Top Box or TV On or Off Change Channels Adjust Volume System Buttons 2 2 2 2 2 2 How To Use This Book Layout Color-codes & Icons 4 4 4 3 Infobar Infobar Layout Introducing The Infobar Go To The Infobar Using the Infobar 5 5 6 6 7 4 Menubar Introducing the Menubar Go To the Menubar Understanding the Menubar 8 8 8 8 5 Guide Guide Layout Introducing Guide Go To Guide Getting Around Guide Favor
Table of Contents 7 Recording Recordings Quick Recording General Guidelines About Recordings Pausing Live TV (PLT) Controlling Live TV DVR Playback Controller Schedule Event Accessing the Schedule Event Screen Configuring the Schedule Event Screen Record By Search 19 19 19 19 19 20 20 21 21 21 22 8 DVR Introducing DVR Go To DVR The DVR Menu Quick Reference Recorded Programs Recorded Programs: Watching a Recorded Program Recorded Programs: Sorting Recordings Recorded Programs: Locking or Unlocking a Record
Table of Contents 10 Rentals Introducing Rentals & VOD (Video on Demand) Go To Rentals Browsing Rentals Renting a VOD Rental Watching Your VOD Rental Controlling Rental Playback The Slider 33 33 33 33 34 35 35 36 11 My Library Introducing My Library The My Library Menu Go To My Library Go To Rented Videos Watching a Rental Video Introducing PPV Events Go To PPV, Pay Per Block, and Sports Package Introducing Reminders Go To Reminders Cancel a Reminder or Autotune Introducing Messages Go To Messages Reading
Table of Contents 14 Sign Out / Sign In Sign Out / Sign In Go To Sign Out / Sign In 51 51 51 15 Favorites Introducing Favorites Go To Favorites Choosing a Favorites List Creating or Editing a Favorites List Delete a Favorites List 52 52 52 52 53 53 16 Search Introducing Search Go To Search Search For A Program 54 54 54 54 Set Top Box Amino 125 Set Top Box ADB 2500 Set Top Box ADB 5721 WNX Set Top Box ADB 5810 Set Top Box 56 56 57 58 59 Movie Ratings MPAA (Motion Picture Association of America) Ratin
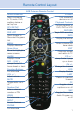
Remote Control Layout ADB Potenza Remote Control Device Selection Send commands to TV, audio, DVD, auxiliary device or set top box RCU SETUP Setup remote DVR LIST Quick Access to Recorded Programs List MENU Displays Menubar Arrow Keys Move the highlight in menu screens GUIDE Displays Guide DAY - / DAY + Jumps Guide 12 hours ahead or back Function Buttons For future use VOL + / Adjust volume MUTE Toggle audio on or off Number Pad Enter a channel number or PIN WWW For future use INPUT Access Devices PHONE For
1 Remote Control Basics Turn Your Set Top Box or TV On or Off The device selection buttons tell your remote whether you want to control your set top box or your television. To turn your TV On/Off, press the TV button then the POWER button. To turn your set top box on or off, press the STB button and then the POWER button. Note: It is not necessary to turn your set top box off. Note: Your remote control must have the remote code programmed in before it can send the correct signals for your TV.
1 Remote Control Basics MENU displays the Menubar when in cable [STB] mode, and in [TV] mode you will see your TV’s menu. The Menubar provides quick access to every feature supported by your service. For more information about the Menubar, see section 4 Menubar. INFO displays the Infobar, a feature that lets you see information on what you’re watching, what’s coming on next, and what’s on other channels. For more information on the Infobar, see section 3 Infobar.
ADB Potenza Remote Instruction Manual Programming Remote Control Your remote control can handle several devices. However, first you have to set up your remote control for your equipment. You can do this in one of the following ways: Brand Setup First, find the manufacturer of your equipment on the Brand Codes list. If the manufacturer’s brand is not listed, go to Automatic Search below. To set up your remote control follow these steps: 1. 2. 3. 4. Turn the device on.
Deleting a Single Learning Key Once you have used a particular key to store a new function on it, you may restore the original function of the key. 1. 2. 3. 4. Press RCU SETUP until the last selected mode key blinks twice. Then press 9 7 6. Press the mode key (for example DVD). The mode key blinks twice. Press the key containing the learned function. The mode key blinks twice. Press and hold RCU SETUP to exit programming. Deleting All Learned Keys 1.
Troubleshooting Problem Device key does not blink when you press a key. Device key blinks when you press a key, but home entertainment device does not respond. Solution Replace the batteries with two (2) new AA batteries. Make sure you are aiming the remote control at your home entertainment device and that you are within 4.5 meters / 15 feet of the device you are trying to control. The remote control does not control home entertainment devices or commands are not performing properly.
Audio Receivers ADC Aiwa Akai Alco Amphion Media Works AMW Anam Apex Digital 0531 1405, 0189, 0121, 0405, 1243, 1388, 1641 1512 1390 1563, 1615 1563, 1615 1609, 1074 1257, 1430, 1774 Magnavox Marantz Mitsubishi Norcent Nova Onkyo Optimus Oritron Arcam 1120 Panasonic Audiotronic Audiovox B&K BK Bose Cambridge Soundworks Capetronic Carver Classic Coby Curtis Mathes Daewoo Delphi Denon Fisher 1189 1390, 1627 0701, 0820, 0840 0702 1229, 1629, 1841, 1933 1370 0513 1189, 0189 1352 1389 0080 1250 1414 1360,
Cable Boxes/ Converters ABC Americast Amino Bell & Howell Bell South Clearmaster ClearMax Coolmax Digeo Digi Director Dumont General Instrument Goldstar Hamlin i3 Micro Jerrold Memorex Motorola Multitech Myrio Pace Panasonic Panther Paragon Philips 0003, 0008, 0014, 0017 0899 1602, 1822 0014 0899 0883 0883 0883 1187 0637 0476 0637 0476, 0810, 0276, 0003 0144 0009, 0273 1602 0476, 0810, 0276, 0003, 0012, 0014 0000 1376, 0476, 0810, 0276, 1187, 1254, 1106, 1540 0883 1602, 1822 1376, 1877, 0237, 0008 1376, 18
DVD Players Accurian Adcom Advent Aiwa Akai Alco Allegro Amphion Media 1072, 1416 1094 1016 0641 0695, 0770 0899, 1089 0790 0869 0872, 1245 Greenhill Harman/Kardon Hitachi Hiteker iLo Initial Innovative Tech Insignia 0717 0582, 0702 0573, 0664, 1247, 1919 0672 1348, 1472 0717, 1472 1542 1268 Portland Presidian Prima Primare Princeton Proscan ProVision Qwestar AMW 0872, 1245 Integra 0627 RCA Jaton 1078 Rio 0869 JBL Jensen JSI 0702 1016 1423 0558, 0623, 0867, 1164, 1275, 1602, 1863 RJTech Rote
Satellite Receivers AlphaStar Amino Chaparral Coolsat Crossdigital DirectTV Dish Network System Dishpro Echostar Expressvu GE General Instrument GOI Goodmans Hisense Hitachi HTS Hughes Network Sys Humax iLo JVC LG Magnavox Memorex Mitsubishi Motorola 0772 1615 0216 1806 1109 1377, 0392, 0566, 0639, 1639, 1142, 0247, 0749, 1749, 0724, 0819, 1856, 1076, 1108, 0099, 1109, 1392, 1414, 1442, 1443, 1444, 1609, 1640 1505, 1005, 0775, 1170 1775 1505, 1005, 0775, 1775 1505, 1005, 0775, 1170, 1775 0775, 1775 0566 08
TVs A-Mark Abex 0003 0032 CyberHome Cytron Accurian 1803 Daewoo Action Admira Advent Adventura Aiko Aiwa Akai Alaron Albatron Ambassador America Action Ampro 0873 0093, 0463 0761, 0783, 0815, 0817, 0842, 1933 0046 0092 0701 0812, 0702, 0030, 0098, 0672, 1207, 1903, 1935 0179, 0183, 0216 0700, 0843 0177 0180 0751 Daytron Dell Denon Denstar Diamond Vision Dumont Durabrand Dwin Dynatech Electroband Electrograph Electrohome Anam 0180, 0004, 0009, 0068 Emerson Anam National AOC Apex Digital Archer As
JVC Kamp Kawasho 0053, 0036, 0069, 0160, 0169, 0182, 0731, 1253 0216 0158, 0216, 0308 Optomoa Optonica Orion Kaypani 0052 Panasonic KEC 0180 Penney Kenwood KLH Kloss KMC Konka 0030, 0019 0765, 0767, 1962 0024, 0046, 0078 0106 0628, 0632, 0638, 0703, 0707 Petters Philco Philips Pilot Pioneer Kost 1262, 1483 Polaroid KTV Portland Prima 0761, 0783, 0815, 0817, 1933 Princeton Prism Proscan Proton 0700, 0717 0051 1447, 0047, 0747, 1347 0178, 0003, 0031, 0052, 0466 Protron 1320, 1323 Majesti
Spectricon Squareview SSS Starlite Studio Experience Superscan Supre-Macy Supreme SVA Tosonic Totevision Trical TVS Ultra Universal Universum US Logic Vector Research 0185 0039 0157 0463 0391, 1323 0027 1337 1286, 1303 0030 Victor 0053 Video Concepts Vidikron Vidtech 0098 0054, 0242, 1398 0178, 0019, 0036 Viewsonic 0797, 0857, 0864, 0885, 1330, 1342, 1578, 1627, 1755 Technics Technol Ace Technovox Techview 0003, 0137 0171 0180, 0019 0180 0843 0093, 0864 0046 0000 0748, 0587, 0768, 0865, 0870, 0871
TV/VCR Combos America Action Audiovox Emerson TV/VCR Combos TV/VCR/DVD Combos Controlled by the TV Sharp 0180 0180 0236 0278 0278 0002, 0479, 1479 1278 0072 LG Lloyd’s Magnasonic Magnavox Magnin Curtis Mathes 1035 Memorex Daewoo 0637, 1278 0002, 0294, 0479, 0593, 1278, 1479 0000 0240, 0807, 1035, 1060 1237 0000 0000 Funai GE GoldStar Harley Davidson Hitachi TV/VCR/DVD Combos Akai Broksonic Diamond Vision Emerson ESA Magnavox 0807 Controlled by the VCR America Action Audiovox Broksonic Citi
iBUYPOWER Jensen JVC KEC Keen Kenwood 1972 0041 0067, 0041, 0008, 0206, 0207, 0384, 1707 0037, 0278 0693 0067, 0041, 0038, 0384 Quarter Quartz Quasar RadioShack Radix Randex KLH 0072 RCA Kodak LG Linksys Lloyd’s Logik LXI Magnasonic Realistic ReplayTV Ricavision Ricoh Runco Salora Samsung Samtron 0643 Magnin Marantz Marta Matsushita 0035, 0037 1037 1972 0000, 0208 0072 0037 0593, 1278 0035, 0039, 0081, 0000, 0149, 0110, 0563, 0593, 1593, 1781 0240 0035, 0081 0037 0035, 0162, 1162 0046 0046 0035,
2 How To Use This Book Layout Instructions are paired with screen shots to illustrate the process and provide confirmation of what you should see on your TV. Section headings and on-screen text, such as screen titles, messages and options are shown in Deep Blue Bold Type. Buttons on the remote control are represented by a graphic of that button, or Red Bold Type when a graphic cannot be shown. Color-codes & Icons Program listings may display icons based on settings for a particular program.
3 Infobar Infobar Layout 1 2 4 5 8 1 8 2 4 5 3 6 7 3 6 7 9 1 Channel Name & Number The name and number of the channel currently listed in the Infobar. 2 3 Current Time Program Type Indicates whether you are watching Live TV, Video on Demand, a recorded program or a Pay-Per-View program. This may also indicate if the program is Blocked/Restricted because of parental controls or that the Emergency Alert System is active.
3 Infobar Introducing The Infobar The Infobar is a quick way of finding information about the show you are watching, what comes on later, and what is on other channels. Go To The Infobar There are three ways to make the basic Infobar appear. Press INFO on your remote control. Press the Up or Down Arrow Keys on your remote control. The basic Infobar will also appear any time you change channels. Once the Infobar is active, press INFO again to display the detailed Infobar.
3 Infobar Using the Infobar Step 1: Go To The Infobar Press INFO, the Up or Down Arrow Keys, or change channels. Step 2a: See What’s On Other Channels Press the Up or Down Arrow Keys to scroll the Infobar through what is showing on other channels without actually changing channels. If you find something you would rather watch on another channel, press OK to tune to that channel.
4 Menubar Introducing the Menubar The Menubar is a quick and easy way to access any feature of your service. Go To the Menubar To display the Menubar, press MENU on your remote control. Press the Left/Right Keys on your remote control to navigate the highlight through the menu. Press Menu again to exit or press Exit on your remote control. Understanding the Menubar Guide will bring up the program guide. For information on Guide, please see section 5 Guide.
4 Menubar My Library provides quick access to previously purchased programs, Reminders you have scheduled, and messages regarding your service. For more information on My Library, see section 11 My Library. Controls allow you to temporarily disable or enable all parental controls. For information on parental control functions, see section 12 Controls and 13 Settings. Note: The Parental Controls option will only appear if the Parental Controls are configured and the box is checked in Settings.
5 Guide Guide Layout Favorites List Indicates the favorite list currently in use. Info Area Provides information about the currently highlighted program. Picture-in-Picture Allows you to watch TV while you are in Guide. Highlight Indicates what program listing is currently in focus. Program Listings Shows channel number and abbreviation and program listings for each channel. Program listings may include icons to indicate a setting or feature for a particular program.
5 Guide Introducing Guide Guide is the place to quickly find out what’s on now and what’s playing later. You can set Reminders or Recordings for upcoming programs in Guide. Go To Guide There are two ways to go to Guide. Press GUIDE or Press MENU, scroll to Guide icon, and press OK. Getting Around Guide To navigate Guide… • Move to a channel by entering the channel with the Number Pad (0-9). • Use the Arrow Keys on the remote to move the highlight through the Guide, channel by channel.
6 Guide - Alerts & Recording Introducing Guide & Recording In this section, you will learn about setting or scheduling a recording, recording a series, and editing it. You will view the recordings under the DVR icon. A Reminder informs you a program is about to come on. An Autotune automatically changes the channel when the program is about to start. A Recording will automatically record the program to your set top box.
6 Guide - Alerts & Recording Step 3: Return to Guide The program listing now shows an icon. Reminder set Autotune set Recording set Step 4a: Your Reminder A few minutes before your program comes on, a box will appear on your screen telling you that you have a Reminder. Press INFO to display the Reminder. Highlight the button showing the program name and press OK to watch the program. Highlight Cancel and press OK to ignore the Reminder.
6 Guide - Alerts & Recording Step 4c: Your Recording If you set a future recording, your set top box will record it for you once your program begins (see 7 Recordings for more details). To watch your recording, go to 8 DVR - Recorded Programs. Editing a Recording Note: Recording is not available if your set top box doesn’t support it. Once you have created a recording, you can adjust when the recording begins or ends.
6 Guide - Alerts & Recording Setting a Series Recording Note: Recording is not available if your set top box doesn’t support it. If you choose to record a program that is part of a regular series, you will be offered the option to record the series. This allows you to record every episode of a favorite program. Step 1: Pick a Program Find any episode of the series you want to record. Highlight the program listing and press OK. Step 2: Set the Recording Highlight Record Series and press OK.
6 Guide - Alerts & Recording Editing a Series Recording Note: Recording is not available if your set top box doesn’t support it. Once you have created a series recording, you can adjust which episodes of the series are recorded and which are skipped. Step 1: Pick a Series Recording Locate any program in the series to be recorded. Highlight its listing and press OK. Step 2: Edit Series Recording From the options shown for this program, highlight Edit Series Recording and press OK.
6 Guide - Alerts & Recording Channels determines whether the series is recorded when aired on the channel originally set to record, or record the series on whatever channel airs it. Preference determines whether to record the program when shown in standard definition or only when shown in high definition. Episodes determines whether to record re-runs and new episodes of the series or only new episodes.
6 Guide - Alerts & Recording Cancelling an Autotune, Reminder, Recording or Series Recording You can cancel any event you have previously scheduled directly from Guide. Step 1: Pick the Program Highlight the program with the event you want to cancel and press OK. Step 2: Cancel the Event Depending on the type of event you are cancelling, your option will be or Highlight the option you want and press OK. Step 3: Return to Guide After you press OK, you will return to the Guide.
7 Recording Recordings Creating recordings and pausing live TV both require a DVR (Digital Video Recorder). There are several ways to record besides those covered in 6 Guide - Alerts & Recording. They are listed here. Quick Recording The fastest and easiest way to begin recording is to use the RECORD button on your remote control. Step 1: Start Recording While watching a program, press RECORD. Recording will begin immediately. You can also start a quick record in Guide.
7 Recording Controlling Live TV While watching a recorded program or live TV, you can use the Playback Control Buttons to control playback. Press PAUSE on your remote control to pause the program. Programs can be paused as long as the current channel is not changed. Press PLAY to resume watching. Press REWIND or FAST FORWARD to reverse or advance playback from the current point. Press repeatedly to increase FAST FORWARD or REWIND speed. Press STOP to exit playback of the program.
7 Recording Schedule Event With Schedule Event, you can select the channel, date, start and stop time, duration, and frequency of a recording. It is helpful when you want to record or watch a portion of a program on a reoccurring basis. Accessing the Schedule Event Screen There are two ways to access the screen. Option 1: When you select a future program in Guide and press OK, select the Scheduled Event option from the pop-up menu.
7 Recording Set Type of Event Arrow Down and highlight Type and press OK. The highlight will become left/right arrows. Arrow Left or Right until you see the event type you want (Recording, Autotune, Reminder), then press OK. Set Event Frequency Arrow Down on your remote and highlight Freq and press OK. The highlight will become left/right arrows. Arrow Left or Right on your remote until you see the frequency you want (Single, Weekly, M-F, Every Day), then press OK.
8 DVR Introducing DVR In DVR, you can view current recordings, see a list of future scheduled recordings, edit and cancel recordings, sort and prioritize recordings, lock recordings, and schedule a future event. Schedule Event is the only DVR feature that enables recordings. Go To DVR Press MENU, highlight DVR and press OK. The DVR Menu Quick Reference Recorded Programs lists programs you have already recorded. Go here to watch, sort, lock or delete these recorded programs.
8 DVR Recordings not yet watched are listed with white text; those you have are listed with grey text. If a program is still being recorded a red dot icon will appear to the left of the program’s name. The Whole Home icon (coming soon) means that the recorded program can be viewed from any set top box in the house and will appear to the left of the program’s name. (See the end of this DVR section for more details about Whole Home DVR.) In the lower right of the info area a percentage full item is shown.
8 DVR Step 4: Return To Live TV When the recording ends, you will be returned to live TV. If you want to return to live TV before your recording has ended, press STOP ( ). See Playback Controls on your remote. Recorded Programs: Sorting Recordings Highlight Recorded Programs and press OK to bring up your recording list. The first listing will be highlighted.
8 DVR Step 2a: Lock the Recording Highlight Lock and press OK. Once a program is locked, a on the recording’s listing. appears Step 2b: Unlock the Recording If you select a locked program in Step 1, the Lock option will instead be Unlock. Highlight Unlock and press OK. When the program is unlocked, the padlock icon is removed. Recorded Programs: Deleting a Recording Step 1: Pick a Recording Highlight the recording you want to delete and press OK.
8 DVR To Record: Sort Future Recordings A list of your scheduled future recordings will appear to the right. The list of programs to be recorded can be sorted by title, date to be recorded, channel airing the program to be recorded, or recordings to be skipped or not. For more information on sorting items in this list, see Sort Recordings earlier in this section.
8 DVR Schedule Event Highlight Schedule Event and press OK. Setting a Schedule Event is covered in 7 Recordings. Editing instructions are covered here. Schedule Event: Editing a Scheduled Event You can edit the channel number, date, time, and type of timer and frequency of the event. Highlight the setting you want to change by Arrowing to the item and press OK. Use the Right and Left Arrow Keys to change the settings and press OK on the remote to end the edit.
8 DVR Whole Home DVR (Coming Soon) As the name suggests, with Whole Home DVR all set top boxes in the household can record programs and view live or pre-recorded shows from any room in the house. You can also stop a recorded program in one room and continue watching it in another. Set a Recording You can set a recording from all set top boxes in the household, not just the DVR. Of course, you need one DVR in the household because it actually does the recording functions for all the non-DVR set top boxes.
8 DVR Watching from Room to Room If you start watching a recorded program in one room (family), and wish to move to another room (bedroom) you can view the recording there. Step 1: Stop the recording playing in the family room by pushing the stop button on your remote. (See the Playback Controls on your remote). A screen will appear giving you a choice to either Keep this Recording (highlighted) or Delete this Recording. Click OK on the highlighted Keep this Recording.
9 Pay Per View Introducing Pay Per View (PPV) Pay Per View allows you to watch exclusive sporting events and other content in the comfort and privacy of your home. Forget long lines, big crowds, expensive concessions and seats in the “nose bleed” section. Go To Pay Per View Using the Arrow Keys on your remote, scroll the menubar to PPV, then press Ok. The PPV list will appear on the Guide menu. Buying Pay Per View Note: Use these steps to purchase Pay Per Events, Pay Per Block, and Sports Packages.
9 Pay Per View Step 3: Confirm Your Purchase Highlight the box next to Enter PIN and enter your Pay Per View PIN using the Number Pad (0-9). For more information on PINs, see section 13 Settings. To share this video with other viewers on your system, highlight the checkbox next to Share PPV and press OK. For more information on Share PPV, see section 13 Settings. Finally, highlight the Buy button and press OK. Step 4: Watch Your Pay Per View You can now watch your pay per view program.
10 Rentals Introducing Rentals & VOD (Video on Demand) Rentals provides access to VOD (Video on Demand) movies and programs. It’s like renting from the local video rental store, only better. You can choose from the most recent movies and older favorites, along with favorite TV shows, music videos and local programming. Unlike pay per view which only allows you to watch the program once at the scheduled time, VOD allows you to determine what and when you want to watch, and how often during the rental period.
10 Rentals Renting a VOD Rental Step 1: Pick a Rental Select your VOD rental choice and press OK. Step 2: Rent Highlight Rent and press OK. Step 3: Confirm Your Rental The confirmation screen appears. If you want other users to be able to watch this VOD Rental, highlight the Share Rental check box and press OK. Now highlight the text box next to Enter PIN and use the Number Pad to enter your PIN, then highlight Rent and press OK to confirm your VOD Rental.
10 Rentals Watching Your VOD Rental You can play your VOD Rental from Rentals or from My Library. Note: For information on the My Library, see section 11 My Library. Step 1: Pick Your Rental Highlight your VOD Rental and press OK. Step 2: Play Your Rental Highlight Play From Start and press OK to start play at the beginning of the program. If you have already watched part of the program and want to pick up where you left off, highlight Play From Last and press OK.
10 Rentals The Slider Any time you press one of the Playback Control Buttons while watching a previously recorded program, the DVR playback controller is displayed. The box to the left indicates the playback function in use. The bar in the middle gives a visual representation of where you are in the recording. The filled-in portion of the progress bar indicates how much of the recording has been played.
11 My Library Introducing My Library My Library stores all purchased programming, a list of your scheduled Reminder and Autotune events, and messages about your service. The My Library Menu Video provides access to your VOD Rentals you have purchased from Rentals. PPV Events allows you to view a previously purchased concert, sporting or other pay per view event. Pay Per Block allows you to view purchased pay per view programming in blocks of time rather than for an entire program.
11 My Library Watching a Rental Video Step 1: Pick Your Video Rental Highlight your Video Rental and press OK. Step 2: Play Your Rental Highlight Play From Start and press OK to start playing at the beginning. If you have already watched part of the program and want to pick up where you left off, highlight Play From Last and press OK. Introducing PPV Events PPV Events allows you to view a previously purchased program. Go To PPV, Pay Per Block, and Sports Package Arrow down to your topic and press OK.
11 My Library Introducing Reminders Reminders lists all Reminder and Autotune events you have created. From here you can cancel a Reminder or Autotune. Go To Reminders Highlight Reminders and press OK. A list of your Reminders and Autotunes appears to the right. Cancel a Reminder or Autotune Step 1: Pick the Program Highlight the Reminder or Autotune you want to cancel and press OK.
11 My Library Introducing Messages Messages may inform you of promotional offers, upcoming Video on Demand events, service upgrades or billing alerts. Whenever you receive a new message an alert will appear on your screen. Press INFO on your remote to display the message, or press EXIT to ignore the alert and view the message later. Go To Messages Highlight Messages and press OK. A list of all available messages appears to the right. Reading a Message Highlight the message listing you want to read.
12 Controls Introducing Controls Note: Parental Controls must first be set up in Settings before the Control On/Off icon will appear on the Menubar (For insturctions see 13 Settings - Go to Parental Controls). Parental Controls are available once you have enabled them in the Settings menu. They enable parents to selectively block programming by channel or rating. Controls let you turn on and off the parental controls you have set.
12 Controls When you disable the controls, they will remain that way until you turn them back on, or the Parental Control Unlock Timeout is reached. The time out is the maximum period of time for which the parental controls will be disabled. At the end of the Parental Control Unlock Timeout, the system will automatically restore parental controls. You will see an alert on the screen just before parental controls are restored. This Parental Control Unlock Timeout is located in Settings (see 13 Settings).
13 Settings Introducing Settings Settings gives you control over your video service. You can choose to share purchased programs, change how alerts appear on your screen, create parental controls and block programs by channel or ratings. You can also create accounts for members of your family. Go To Settings Press MENU and highlight Settings. Then enter your password, highlight OK and press OK. There are two main sections of Settings: Preferences and Users. Both are used for setting up parental controls.
13 Settings Unlock Timeout (Only Available on Master Account) Unlock Timeout determines how long parental controls will remain disabled. To set Unlock Timeout, highlight the option box next to Unlock Timeout and press OK. Use the Right/Left Arrow Keys to select the amount of time wanted, then press OK. See 12 Controls Turning Controls Off for more details. Block Unrated (Only Available on Master Account) Block Unrated allows or blocks any program that does not have a rating.
13 Settings Caller ID Timeout Caller ID Timeout determines how long Caller ID notifications remain on the screen. To set Caller ID Timeout, highlight the option box to the right of Caller ID Timeout and press OK. Then press the Right or Left Arrow Key to rotate to the amount of time you want the alert displayed, then press OK. Channel Blocking Channel Blocking enables or disables the list of channels you have blocked. Blocked channels do not appear in Guide.
13 Settings Autotune Alert Autotune Alert determines how early an Autotune will be shown once you set an Autotune. To set Autotune Alert, highlight the option box to the right of Autotune Alert and press OK. Then press the Right or Left Arrow Key to display 0 seconds, 30 seconds, 2 minutes or 5 minutes, then press OK. 0 seconds will display your Autotune at the exact time the program begins. Any of the other settings will trigger the Autotune that many seconds or minutes before the program begins.
13 Settings Adding a User Account To create a new user account, highlight the Add button and press OK. Highlight New Login to enter the name for the new account and press OK. An onscreen keyboard appears. Use the Arrow Keys to highlight a letter or number and press OK to add it to the login name. Once you have entered the desired name, highlight Done and press OK to return to the Create New User screen.
13 Settings Highlight New Password to enter the password for the new account. Use the Number Pad on your remote to enter the password. Highlight Confirm Password to re-enter the password for the new account. Use the Number Pad on your remote to re-enter the password. Theme For service provider use only. Highlight Allowance $ to enter a limit to the amount of programs that can be purchased per month for the new account. Use the Number Pad on your remote to enter a whole dollar amount (e.g.
13 Settings The second Add User Account screen allows you to create parental controls specific to this user. These parental control settings are identical to the settings shown earlier with the exception that there is no Unlock Timeout or Block Unrated setting. Once you have entered the settings for the new account, highlight Submit and press OK. Editing a User Account To edit a user account, highlight the user account and press OK, then highlight the Edit button and press OK.
13 Settings Now highlight New Password to change the password. Use the Number Pad on your remote to enter a numeric password. Highlight Confirm Password to re-enter the password. Use the Number Pad on your remote to exactly re-enter the password. Highlight PIN and enter the account’s existing PIN. Highlight New PIN and enter a new PIN for this account. Highlight Confirm PIN to re-enter the new PIN. Highlight the Enable PIN check box and press OK to enable or disable the need to use a PIN.
14 Sign Out / Sign In Sign Out / Sign In This function is typically only used if there are more than one user account, usually when a parent adds a child as a new user. The parent’s account (master account) controls the child’s account (sub account). Go To Sign Out / Sign In Press the MENU button on the remote. Scroll the menubar to the Sign Out icon and click OK. You will then be signed out of your account, and the Sign In screen will appear. Highlight the Name entry box and press OK.
15 Favorites Introducing Favorites Save time and enjoy the channels you watch the most. Each Favorites list contains just the TV channels you wish to view. You can create multiple Favorites lists and quickly change the Guide to show them. Go To Favorites Press MENU and highlight Favorites, then press OK. A screen will appear with options to choose, edit, create or delete a list, or cancel.
15 Favorites Creating or Editing a Favorites List Step 1: Create or Edit Follow the steps in “Go To Favorites,” highlight Create or Edit, and press OK to bring up the Favorites create/edit screen. This screen displays every channel offered. Step 2: Name Your Favorites List The Name: box is already highlighted. Press OK to use the on-screen keyboard to change the name for your favorites list. First, highlight Clear All and press OK to clear the default name.
16 Search Introducing Search Search allows you to enter the name or partial name of a program or video you are looking for and have your service find any program matching the text you enter. Go To Search Press MENU and highlight Search, then press OK. Search For A Program Step 1: Enter The Program Title The highlight will be on the Search text box when the Search screen appears. Press OK and a keyboard will appear to the right of the screen.
16 Search Note: It is best to enter as little as possible when searching. Usually the first 3 or 4 letters in the name will be enough to find what you want. Step 2: Search Highlight Search Guide and press OK to have the system start searching for all programs that match your search criteria. Step 3: Pick A Result You can now highlight any program or rental listing and press OK to… Watch or record a program if it’s on now. Set a reminder, auto tune or recording for a program if it comes on later.
Set Top Box Amino 125 Set Top Box 1 2 3 4 5 6 7 1. 5V DC Provides power to the set top box. 2. Network Connects the set top box to the video service using a CAT5 Ethernet cable. 3. USB (Universal Serial Bus) Connects the set top box to technician’s equipment and other devices. 4. SPDIF Digital Out Connects the set top box to a home theater system to provide surround sound audio - provides audio only. 5.
Set Top Box ADB 2500 Set Top Box 1 2 3 4 5 6 7 1. Power 12V DC 1.1A Provides power to the set top box. 2. USB (Universal Serial Bus) Connects the set top box to technician’s equipment and other devices. 3. Ethernet Connects the set top box to the video service using a CAT5 Ethernet cable. 4. SPDIF Connects the set top box to a home theater system to provide surround sound audio - provides audio only. 5. S-Video Connects the set top box to your TV to provide high-quality video - provides video only.
Set Top Box ADB 5721 WNX Set Top Box 1 5 2 3 6 7 8 4 9 10 11 1. Secondary Video/Stereo Audio R/L (Video/Audio Left/Audio Right) Connects the set top box to your TV or VCR to provide good quality video and stereo audio. 2. Primary Video/Stereo Audio R/L (Video/Audio Left/Audio Right) Connects the set top box to your TV or VCR to provide good quality video and stereo audio. 3. S-Video Connects the set top box to your TV to provide high-quality video - provides video only. 4.
Set Top Box ADB 5810 Set Top Box 1 2 3 4 5 6 7 8 9 10 11 1. USB Connects the set top box to USB compatible devices. 2. Ethernet Connects the set top box to the video service using a CAT5 Ethernet cable. 3. HDMI (High Definition Media Interface) Connects the set top box to your HDTV using an HDMI cable - provides audio and video. 4. Pr/Pb/Y (Component Video) Connects the set top box to your TV to provide very high-quality video - provides video only. 5.
Movie Ratings MPAA (Motion Picture Association of America) Ratings System G – General Audience This is a film which contains nothing which would, in the view of the MPAA Rating Board, be offensive to parents whose younger children view the film. PG – Parental Guidance Suggested The theme of a PG-rated film may itself call for parental guidance. There may be some profanity in these films. There may be some violence or brief nudity.
TV Ratings TV Parental Guidelines Ratings System The TV Parental Guidelines ratings provides program ratings, and content ratings to provide a clearer idea of the reason for a program’s rating Program Ratings TV-Y – All Children This program is designed to be appropriate for all children. TV-Y7 – Directed to Older Children This program is designed for children age 7 and above. It may include mild fantasy violence or comedic violence.
Clarksville Department of Energy 2021 Wilma Rudolph Blvd Clarksville, TN 37040 Phone (931) 648-8151 www.clarksvillede.