Washing Machine WF 8101-A THE BEAUTY OF SIMPLICITY USER MANUAL
1 Important safety instructions • Follow the instructions on the textile tags and on This section contains safety instructions that will help protect from risk of personal injury or property damage. Failure to follow these instructions shall void any warranty.
• Total weight of the washing machine and the dryer -with full load- when they are placed on top of each other reaches to approx. 180 kilograms. Place the product on a solid and flat floor that has sufficient load carrying capacity! • Do not place the product on the power cable. • Do not install the product at places where temperature may fall below 0ºC. • Place the product at least 1 cm away from the edges of other furniture. laundry. 1.
A Do not use any tools to loosen the lock nuts. Otherwise, they will get damaged. Electrical connection • To prevent flowing of dirty water back into the machine and to allow for easy discharge, do not immerse the hose end into the dirty water or drive it in the drain more than 15 cm. If it is too long, cut it short. • The end of the hose should not be bent, it should not be stepped on and the hose must not be pinched between the drain and the machine.
Packaging materials of the product are manufactured from recyclable materials. Dispose of them properly and sort in accordance with recycled waste instructions. Do not dispose of them with normal domestic waste. Transportation of the product Unplug the product before transporting it. Remove water drain and water supply connections. Drain the remaining water in the product completely; see, "Draining remaining water and cleaning the pump filter".
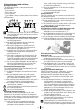
Using detergent and softener Detergent Drawer The detergent drawer is composed of three compartments: - (I) for prewash - (II) for main wash – (III) for softener – ( )in addition, there is siphon piece in the softener compartment. II III I III II I The detergent dispenser may be in two different types according to the model of your machine as seen above. Detergent, softener and other cleaning agents • Add detergent and softener before starting the washing programme.
laundry, close to the lower part of the drum in future washings. Use the tablet or gel detergent without C selecting the prewash function. Using starch • Add liquid starch, powder starch or the dyestuff into the softener compartment as instructed on the package. • Do not use softener and starch together in a washing cycle. • Wipe the inside of the machine with a damp and clean cloth after using starch.
4 Operating the product Control panel 1 6 1 2 3 4 - 2 3 7 8 4 Spin Speed Adjustment button Display Temperature Adjustment button Programme Selection knob 5 6 7 8 Display symbols - 5 On / Off button Delayed Start buttons (+ / -) Auxiliary Function buttons Start / Pause / Cancel button Preparing the machine Make sure that the hoses are connected tightly. Plug in your machine. Turn the tap on completely. Place the laundry in the machine. Add detergent and fabric softener.
Always select the lowest required temperature. Higher temperature means higher power consumption. For further programme details, see "Programme and consumption table". Main programmes Depending on the type of fabric, use the following main programmes. • Cottons (Algodón) Use this programme for your cotton laundry (such as bed sheets, duvet and pillowcase sets, towels, bathrobes, underwear, etc.). Your laundry will be washed with vigorous washing action for a longer washing cycle.
appears on the temperature indicator. To decrease the temperature, press the Temperature Adjustment button. Temperature decreases with increments of 10° and finally, “-” symbol indicating the cold wash option appears on the display. you scroll to cold wash option and press C IfTemperature Adjustment button again, the recommended temperature for the selected programme appears on the display. Press the Temperature Adjustment button again to decrease the temperature.
Programme and consumption table Temperature Selectable temperature range℃ Cottons 90 8 82 2.70 1200 • • • • • 90-Cold Cottons 60 8 80 1.80 1200 • • • • • 90-Cold Cottons 40 8 80 1.00 1200 • • • • • 90-Cold Cotton Eco 60** 8 59 1.36 1200 • • • • • 60-Cold Cotton Eco 40 8 72 0.75 1200 • • • • • 60-Cold Intensive 40 60 0.60 1000 Intensive+ 90 8 73 2.70 1200 Synthetics 60 4 55 1.00 1000 • • • • • 60-Cold Synthetics 40 4 55 0.
Auxiliary function selection Select the desired auxiliary functions before starting the programme. Furthermore, you may also select or cancel auxiliary functions that are suitable to the running programme by pressing the Start / Pause / Cancel button when the machine is operating. For this, the machine must be in a step before the auxiliary function you are going to select or cancel. Depending on the programme, press 2a, 2b, 2c or 2d buttons to select the desired auxiliary function.
“:” sign in the middle of the delayed start time on the display starts flashing. Canceling the Delayed Start function If you want to cancel the delayed start countdown and start the programme immediately: Press Start / Pause / Cancel button. “:” sign in the middle of the delayed start time on the display stops flashing. Start symbol disappears. Pause symbol and Delayed Start symbol flashes. Decrease the delayed start time by pressing the Delayed Start - button. Programme duration appears after 30 minutes.
avoid touching of the residues in the drawer with your skin when cleaning. Insert the drawer back into its place after cleaning and make sure that it is seated well. door opening, then turn the Programme Selection knob to Pump+Spin programme and discharge the water in the machine. Machine is in Rinse Hold mode Spin symbol flashes and Pause symbol illuminates when the machine is in Rinse Hold mode.
If the filter cap is one piece, pull the cap from both sides at the top to open. can remove the filter cover by slightly C You pushing downwards with a thin plastic tipped tool, through the gap above the filter cover. Do not use metal tipped tools to remove the cover. Some of our products have emergency draining hose and some does not have. Follow the steps below to discharge the water.
6 Technical specifications Models WA 8101-A Maximum dry laundry capacity (kg) Height (cm) 8 84 Width (cm) 60 Depth (cm) 56.5 70 Net weight (±4 kg.) Electrical input (V/Hz) 220-240V~/50Hz Total current (A) 10 Total power (W) 2000-2350W Spin speed (rpm max.) 1200 Stand-by mode power(W) 1.00 Off-mode power(W) 0.20 Technical specifications may be changed without prior notice to improve the quality of the product. Figures in this manual are schematic and may not match the product exactly.
7 Troubleshooting Programme cannot be started or selected. • Washing machine has switched to self protection mode due to a supply problem (line voltage, water pressure, etc.). >>> Press and hold Start / Pause button for 3 seconds to reset the machine to factory settings. (See "Canceling the programme") Water in the machine. • Some water might have remained in the product due to the quality control processes in the production. >>> This is not a failure; water is not harmful to the machine.
Casa (S) Pte Ltd. 15 Kian Teck Crescent, Singapore 628884. Service Centre Hotline: 62680077. Fax: 68980510. Email: service@casa.com.