BRESCIA OWNERS MANUAL
CONTENTS INTRODUCTION . . . . . . . . . . . . . . . . . . . . . . . . . . . . . . . . . . . . . . . . . . . . . . . . . . . . . . . . . . . . . . . . . . . . . . 1 MOUNTING RECOMMENDATIONS . . . . . . . . . . . . . . . . . . . . . . . . . . . . . . . . . . . . . . . . . . . . . . . . . . . . . . . . . . 2 PREPARATION INSTRUCTIONS . . . . . . . . . . . . . . . . . . . . . . . . . . . . . . . . . . . . . . . . . . . . . . . . . . . . . . . . . . . 3 FAN INSTALLATION . . . . . . . . . . . . . . . . . . . . . .
MOUNTING RECOMMENDATIONS Before mounting your Casablanca fan, read the following helpful recommendations. The location of the fan, air circulation, and fan size are all important factors to consider before installation. Location Ceiling fans have practical uses in almost every room in your home. We suggest you follow these mounting recommendations as you decide where to install your Casablanca fan. • For safety reasons, the fan blades must be a minimum of 7′ above the floor.
BRESCIA PREPARATION INSTRUCTIONS Unpacking: Before assembling and installing your ceiling fan, remove all parts from the shipping cartons and check them against the parts listed here. Before discarding packaging material, be certain that all parts have been removed.
CROSSBAR MOUNTING BRACKET INSTALLATION Proceed with installation as follows: Step 1. Route the wires from the ceiling outlet box through the crossbar mounting bracket center hole. Attach the bracket, with ground wire and ridges down, to the ceiling fixture outlet box with the mounting hardware included with the outlet box. Tighten the screws firmly by hand only, being careful not to bend the bracket by over tightening.
BRESCIA HANGING THE FAN Step 3. To hang the fan body in the canopy, hold the fan body firmly and insert the ball into the canopy opening. Check that no wires were pinched. Rotate the fan body until the slot in the ball fits into the pin opposite the canopy opening. BALL Fan Hanging Weight is 21 lbs CAPPED BLUE D1-OPTION WIRE ON 3-SPEED ONLY FOR INDEPENDENT LIGHT CONTROL (SOLD SEPARATELY) SLOT PIN CANOPY ELECTRICAL CONNECTIONS Step 4a.
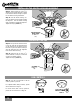
INSTALLING THE BLADE/BLADE HOLDER TO FAN MOTOR PREPARATION Step 8. To reach the blade holder mounting holes in the fan motor the dummy switch housing must be removed. Take out the two 5-32 X 9/32” screws securing the dummy switch housing and remove. Set the two (2) screws aside for the moment, they will be used in Step 13 to install the switch housing after the blades are installed. The dummy switch housing is used only when shipping the fan.
BRESCIA REMOVE SHIPPING BLOCKS Step 10. On the flywheel remove the four shipping blocks by unscrewing the screws. Discard the shipping blocks and shipping block screws. SHIPPING BLOCKS BLADE/BLADE HOLDER INSTALLATION Step 11. Using the screws from the pack, attach each blade/blade holder assembly to the motor. Using the screwdriver, tighten securely by hand only. Your Brescia fan is equipped with a flywheel that allows for both 4 and 5 blade installation.
INSTALLING THE SWITCH HOUSING ASSEMBLY Step 13. Attach the two (2) 5-32 X 9/32″ switch housing screws removed in Step 8 to fan motor as shown, leaving 1/8" space for the switch housing installation. Step 14. Lift the switch housing, running the switch housing screws through the keyholes. Turn the switch housing right (clockwise) to engage the keyholes. Tighten securely by hand only. KEYHOLE SWITCH HOUSING MOUNT SCREW 5-32 X 9/32″ (2) INSTALLING THE CAP Step 15.
3-SPEED ♦ OPERATION Pull-chain switches on the fan control the fan and lights. Using the fan control pull-chain switch: Fan off at start. First pull: fan ON, low speed Second pull: medium speed Third pull: high speed Fourth pull: fan OFF Direction of blade rotation is controlled by the reverse slide switch on the side of the switch housing. No changes in household wiring are required.
R INTELI•TOUCH© INSTALLING THE W-32 WALL CONTROL The wall control installs in the same manner as an ordinary light switch, using an existing junction box and wiring. This controller is designed to signal the fan microcomputer as well as perform normal switching operations. For this reason the following precautions must be observed: 1. Use only the Casablanca W-32 wall control. 3. Do not use more than one fan per wall control. 2. Do not use any additional control with your Inteli-Touch 4.
R INTELI•TOUCH OPERATION ♦ POWER The button is normally left in the on position. Always turn the power off during cleaning or servicing the fan and during thunderstorms. It is also used to exit or enter additional programs. POWER must be left on to retain a previously set fan speed or light level. INTELI•TOUCH OPERATION ♦ SPEED CONTROL There are six individual speed settings for the fan; each speed is indicated by an audible tone of increasing pitch. To select the desired fan speed: 1.
INTELI•TOUCH OPERATION ♦ LIGHT-MINDER® PROGRAM The Light-Minder program automatically turns OFF the fan mounted lights after two hours. To enter the Light-Minder Program: 1. Turn the OFF for at least three seconds. ON. 2. Turn the 3. Immediately operate the buttons in the following sequence: + + + 4. A series of tones indicates this command has been accepted. The fan and light will operate normally using the buttons to turn them on and off.
R INTELI•TOUCH TROUBLESHOOTING Before Requesting Service: Please follow this troubleshooting guide before contacting your dealer for assistance. Caring for Finishes: For cleaning, a soft brush or lint-free cloth should be used to prevent scratching the finish. A vacuum cleaner brush nozzle can remove heavier dust. Surface smudges or an accumulation of dirt and dust can easily be removed by using a mild detergent and slightly dampened soft cloth.
761 CORPORATE CENTER DRIVE • POMONA, CA 91768 TOLL FREE: 888-CASA-1ST (227-2178) www.CasablancaFanCo.com ©COPYRIGHT 2001 CASABLANCA FAN COMPANY • U.S.