
User Guide


6
WASHER
(4 PER BLADE)
BLADE SCREW
(4 PER BLADE)
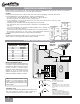
Step 8. Unscrew and remove the 5 shipping
blocks. You can discard these 5 screws and
the shipping blocks.
The shipping blocks are used only when
shipping the fan.
BLADE & BLADE HOLDER HARDWARE
BLADE
HOLDER
BLADE HOLDER
SCREW
(2 PER BLADE)
CANOPY HATCH INSTALLATION
Step 5. Tuck the wires into the canopy
with the wire nuts pointed upwards, so
that the WHITE and BLACK wires are on
opposite sides of the canopy and all wires
are clear of the canopy opening.
Step 6. Install canopy hatch with the last
canopy screw and lock washer. To do this,
tilt the fan body away from the hatch
opening.
Tighten the screws firmly by hand only,
TILT THE
FAN TO
INSTALL
LAST
CANOPY
SCREW
CANOPY
HATCH
CANOPY
SCREW
LOCK
WASHER
Step 7. Straighten the fan, then check
to ensure that there is no movement be-
tween the canopy and ceiling or Hang-Tru
ball and top support shaft.
Note: Write down the
Serial Number and the
model number for future
reference.
REMOVE SHIPPING BLOCKS
SHIPPING
BLOCKS