ESTRADA OWNERS MANUAL
CONTENTS INTRODUCTION . . . . . . . . . . . . . . . . . . . . . . . . . . . . . . . . . . . . . . . . . . . . . . . . . . . . . . . . . . . . . . . . . . . . . . MOUNTING RECOMMENDATIONS . . . . . . . . . . . . . . . . . . . . . . . . . . . . . . . . . . . . . . . . . . . . . . . . . . . . . . . . . . PREPARATION INSTRUCTIONS . . . . . . . . . . . . . . . . . . . . . . . . . . . . . . . . . . . . . . . . . . . . . . . . . . . . . . . . . . . FAN INSTALLATION . . . . . . . . . . . . . . . . . . . . . . . . .
MOUNTING RECOMMENDATIONS Before mounting your Casablanca fan, read the following helpful recommendations. The location of the fan, air circulation, and fan size are all important factors to consider before installation. Location Ceiling fans have practical uses in almost every room in your home. We suggest you follow these mounting recommendations as you decide where to install your Casablanca fan. • For safety reasons, the fan blades must be a minimum of 7′ above the floor.
ESTRADA PREPARATION INSTRUCTIONS Unpacking: Before assembling and installing your ceiling fan, remove all parts from the shipping cartons and check them against the parts listed here. Before discarding packaging material, be certain that all parts have been removed.
ESTRADA CEILING HARDWARE ADDITIONAL HARDWARE CROSSBAR MOUNTING BRACKET 21/4″ x 8-32 ROUNDED HEAD SCREW (2) 1″ x 8-32 ROUNDED FLAT WASHER (2) HEAD SCREW (2) WIRE NUT (4) GETTING STARTED Installing a New Ceiling Fixture Outlet Box If you do not have an existing fixture located where you wish to place your Casablanca fan, an approved ceiling fixture outlet box must be installed and wired.
ESTRADA CANOPY INSTALLATION Step 2. Thread the wires from the ceiling through the opening in the canopy. Attach the canopy to the crossbar mounting bracket with three of the 8-32 x 21/4″ long canopy screws and canopy lock washers. CROSSBAR MOUNTING BRACKET INSTALLED Using the screwdriver, tighten the screw firmly by hand only. CANOPY Note: On sloped ceilings, align the canopy opening toward the top or room peak. CANOPY LOCK WASHERS CANOPY SCREWS HANGING THE FAN Step 3.
ESTRADA CANOPY HATCH INSTALLATION Step 5. Tuck the wires into the canopy with the wire nuts pointed upwards, so that the WHITE and BLACK wires are on opposite sides of the canopy and all wires are clear of the canopy opening. CANOPY HATCH Step 6. Install canopy hatch with the last canopy screw and lock washer. To do this, tilt the fan body away from the hatch opening. Using the screwdriver, tighten the screws firmly by hand only, Step 7.
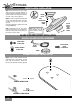
ESTRADA BLADE INSTALLATION Step 9. Attach the blades to the blade holders by first pressing the blade badge into the blade, then installing the blade holder using the four blade screws provided for each blade. BADGE STYLE BLADE HOLDER Using the screwdriver, tighten securely by hand. BLADE BLADE SCREW (4 PER BLADE) BLADE BADGE REMOVE SHIPPING BLOCKS Step 10. On the flywheel remove the five shipping blocks by unscrewing the screws. Set these screws aside for installing the blades in Step 11.
3-SPEED ♦ OPERATION Pull-chain switches on the fan control the fan and reverse. Using the fan control pull-chain switch: Fan off at start. First pull: fan ON, low speed Second pull: medium speed Third pull: high speed Fourth pull: fan OFF REVERSE PULL CHAIN SWITCH FAN & SPEED CONTROL PULL CHAIN SWITCH Direction of blade rotation is controlled by the reverse pull chain on the side of the switch housing. No changes in household wiring are required.
761 CORPORATE CENTER DRIVE • POMONA, CA 91768 TOLL FREE: 888-CASA-1ST (227-2178) www.CasablancaFanCo.com ©COPYRIGHT 2000 CASABLANCA FAN COMPANY • U.S.