
Owner`s manual


12
BLADE INSTALLATION
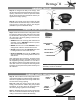
Blade Irons (5)
Blade Iron
Screws (11)
BLADE HARDWARE (not to scale)
Blades (5)
(packed separately)
Blade Badges (5)
Blade Screws (21)
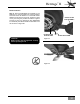
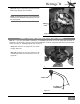
Step 8. Remove the ve shipping blocks, washers,
and screws as shown in Figure #1. DO NOT discard
the ve screws; you will need them for installing the
blades onto the fan.
SHIPPING BLOCK
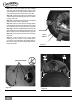
Attach Blade Irons
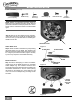
Step 9. Attach a blade to a blade iron by rst pressing
the blade badge onto the blade, then attaching the
blade iron using four blade screws as shown in Figure
#1. Using the provided screwdriver, tighten securely
by hand only. Repeat for each blade assembly.
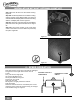
Blade Installation
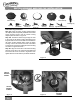
Step 10. Before attempting to attach the blades,
review Figure #3 for blade placement on the blade
holder adapter ring. The numbers and lines show
screw placement when attaching the ve blade irons
and blades assemblies to the fan. When placing
the blades on the adapter ring, each blade iron will
cover one of the ve adapter ring mounting screws
as shown.
Figure #1
BLADE IRON
BLADE BADGE
BLADE
BLADE BADGE
SCREWS
Figure #3
Figure #2
Phillips
Screwdriver
BLADE
HOLDER
ADAPTER
RING
NOTE: Blades are packaged separately based on
blade style. For illustrative purposes, the BL-ADK-RA
(Adirondack Reclaimed Antique) blades are shown.
Please use the instructions below for all three blade
types.