
Owner`s manual


6
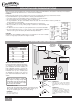
Step 4. To hang the fan body in the canopy, support the fan
at the center of the glass holder and top support and insert
the ball into the canopy opening. Rotate the fan body until
the slot in the ball fits into the pin opposite the canopy
opening.
HANGING FAN BODY IN CANOPY
BLADE
HOLDER
BLADE
TIP
BLADE
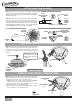
ATTACHING THE BLADES
BALL
SLOT
PIN
GLASS
HOLDER
INSIDE
TOP SUPPORT
Step 3a. Attach the 5 blade tips to the blades using two
6-32x
1
⁄
8
” round head screws provided. Note: the screws have
locktite on them, so once they are installed it will be difficult
to remove the screws.
Step 3b. Attach each of the five blades to the blade holders
using four of the truss head screws and fiber washers pro-
vided for each blade. The truss head screw is placed through
the blade and then a fiber washer is pressed on so that it is
between the blade and blade holder; see the detail drawing
below. Hand tighten each truss head screw firmly.
CANOPY ELECTRICAL CONNECTORS
WHITE WIRES
(2)
BLACK WIRES
(2)
GREEN WIRES
(3)
WIRE NUT
Step 5. Attach the fan wires to the ceiling fixture outlet box
wiring by twisting the bare ends of the wires together and
securing with a wire nut. Connect in this order:
• GREEN leads from mounting plate and fan to GROUND
conductor of power source. Secure with wire nut.
• WHITE wire from fanto white NEUTRAL wire in ceiling
fixture outlet box. Secure with wire nut.
• BLACKwirefromfantoblack(orred)POWERwireinceiling
fixture outlet box. Secure with wire nut.
Note: Write down the
Serial Number and the
model number for future
reference.
3b - BLADE INSTALLATION:
BLADE
BLADE TIP
6-32
1
8
”
ROUND
HEAD
SCREW
BLADE
BLADE TIP
6-32
1
8
”
ROUND HEAD
SCREW
3a - BLADE TIP INSTALLATION:
TRUSS HEAD
BLADEHOLDER
SCREW
BLADE
BLADE-
HOLDER
FIBER
WASHER
Note: Fan Weight is 33 lbs.