Assembly Instruction 01
FIRE PIT ITM./ART.#: WFEHFP-03-A / WFEHFP-03-B MODEL#: FW-CTGSQFP ANS Z21.97 CSA 2.41-2017 Outdoor Decorative Gas Appliances INSTALLER: Leave this manual with the appliance. CONSUMER: Retain this manual for future reference DANGER FIRE OR EXPLOSION HAZARD If you smell gas: Shut off gas to the appliance. Extinguish any open flame. If odor continues, leave the area immediately. After leaving the area, call your gas supplier or fire department.
IMPORTANT SAFETY INFORMATION 1. The installation must conform with local codes or, in the absence of local codes, with the National Fuel Gas Code, ANSI Z223.1 NFPA 54; National Fuel Gas Code; Natural Gas and Propane Installation Code, CSA B149.1; or Propane Storage and Handling Code, CSA B149.2, as applicable. 2.
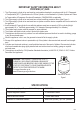
IMPORTANT SAFETY INFORMATION ABOUT PROPANE (LP) GAS 1. The LP-gas supply cylinder to be used must be constructed and marked in accordance with the U.S. Deparment of Transportation (D.O.T.) Specifications for LP-Gas Cylinders, or the Standard for Cylinders, Spheres and Tubes for Transportation of Dangerous Goods and Commission, CAN/CSA-B339, as applicable. 2. The LP-gas supply cylinder to be used must have a listed overfilling prevention device (See Figure 1). 3.
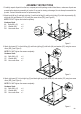
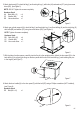
PACKAGE CONTENTS A AA BB M CC DD B EE F L E J G I Q C N K D PART DESCRIPTION Lid A B Table top assembly C Front panel D Door panel E Back panel F Right panel G Front-right leg H Front-left leg I Back-left leg J Back-right leg K Gas cylinder support QUANTITY 1 pc 1 pc 1 pc 1 pc 1 pc 1 pc 1 pc 1 pc 1 pc 1 pc 1 pc H PART L M N Q AA BB CC DD EE DESCRIPTION Lava rock (6.
ASSEMBLY INSTRUCTIONS 1. Carefully unpack all parts from the box, compare parts with package content listed above, make sure all parts are present before beginning assembly of product. If any part is missing or damaged, do not attempt to assemble the product. Contact customer service for replacement parts. 2. Attach back-left leg (I) and back-right leg (J) and front-left leg (H) and front-right leg (G) to table top assembly (B) with bolts (AA) and washer (CC) by using hex screw driver (DD), (see Figure 2).
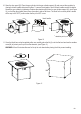
5. Attach back panel (E) to back-left leg (I) and back-right leg (J) with bolts (AA) and washer (CC) using hex screw driver (DD), (see Figure 5). DD NOTE: DO NOT tighten the screws completely. Hardware Used: AA Bolts (M6 x 15) CC Washer (M6) DD Hex screw driver x4 x4 x1 CC AA I E J Figure 5 6. Attach gas cylinder support (K) to back-left leg (I) and back-right leg (J) and front-left leg (H) and front-right leg (G) with bolts (BB) and washer (CC) using hex screw driver (DD), (see Figure 6).
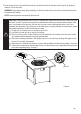
9. Open the box of lava rocks, put the lava rocks (L) into the fire bowl of the fire table, (see Figure 9). A gas fire pit requires 13.2 lbs lava rocks. WARNING: Keep children away during assembly, as this item contains lava rock, which are small pieces and can be swallowed by children. NOTE: Leave the pilot box uncovered by the lava rock. CAUTION: Please be advised that this fire pit is equipped with natural lava rock that may crackle or pop the first time it is used.
10. Open the door panel (D). Place the gas cylinder into the gas cylinder support (K) and connect the regulator by turning the black handle clockwise to tighten. To remove the regulator, turn the black handle counter-clockwise. Secure the gas cylinder by tightening clockwise the retention point found on gas cylinder support (K), (see Figure 10), so that the gas cylinder cannot move from side to side or fall down.
STOP NATURAL GAS CONVERSION STOP Natural gas conversion must be performed only by natural gas provider or a service company. 1. Disconnect the propane hose from the gas valve (see Figure 12). Caution: The propane tank shall be shut off prior to disconnecting the propane hose, before proceeding with the conversion. gas valve propane hose Figure 12 2. Unscrew and disconnect the propane orifice from the bellows (see Figure 13). Propane orifice (2.21 mm diameter size) is painted with red mark.
4. Connect the natural gas hose to the gas valve by screwing clockwise tightly (see Figure 15). Plug the natural gas fixture into the natural gas supply system (see Figure 16). The conversion kit should be CSA certified. Below are several suggested CSA certified conversion kits for your reference. (1). Part# DH22 / QH1, manufacturer: KSUN or (2). Part# WH02 / KJ50A2, manufacturer: Laite or (3). Part# KJ-3/8G-3/8 / KJ-3/8G, manufacturer: Wanan The natural gas orifice is included in the package.
BATTERY Make sure the control knob is in the “OFF” position. Unscrew the push button cap on the ignitor module located on the control panel to access the battery compartment. The ignitor module requires one AAA size battery, (see Figure 18). BATTERY IS NOT INCLUDED. WARNING: 1. Please observe proper polarity and use the correct battery type when installing or replacing the battery. Improper installation could result in ignition failure. 2.
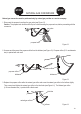
gas valve / regulator hose connection (Figure 22) inlet tube / bellows connection (Figure 23) To perform a leak test: 1. Make 2~3 oz. of leak solution by mixing one part liquid dishwasher detergent and three parts water. Noted: make sure control knob is “OFF”. 2. Apply several drops of solution where the cylinder attaches to regulator, (see Figure 19), inspect the solution at the connection looking for bubbles. If NO bubbles appear, the connection is secure.
Observe Flame Height When Lit: The burner will display blue and yellow flames. These flames should be a blue / yellow color between 1~2 in. height, (see Figure 25). These flames should not be yellow or produce thick smoke. This would indicate an obstruction of airflow through the burners. The flames should be blue with straight yellow tops.
REPLACEMENT PARTS LIST NO A B C PART# L-530 F210020 / F210020-A F210020-C DESCRIPTION Firepit round lid, 530mm x 9 Table top assembly Front panel D E F G F210020-D F210020-G Door panel Back panel Right panel Front-right leg H F210020-H Front-left leg I F210020-I Back-left leg J F210020-J Back-right leg K F210020-K Gas cylinder support L EFP-LVRK-13.2 Firepit lava rock (red), 6.
WARRANTY Firepits Burner, steel fire pit bowl, all mechanical parts and fittings to control panel and burner assembly, and all fire pit tops that are not cast aluminum are warranted for a period of one (1) year from original date of purchase, against defects in material and or workmanship. Rust is not covered. Frames Frames are warranted to be free from defects in materials and workmanship for a period of one (1) year.