
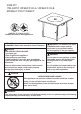
Instructions / Assembly


C
G
B
G
G
J
F
J
I
H
H
06
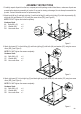
Figure 2
Figure 3
Figure 4
ASSEMBLY INSTRUCTIONS
1. Carefully unpack all parts from the box, compare parts with package content listed above, make sure all parts are
present before beginning assembly of product. If any part is missing or damaged, do not attempt to assemble the
product. Contact customer service for replacement parts.
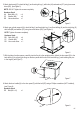
2. Attach back-left leg (I) and back-right leg (J) and front-left leg (H) and front-right leg (G) to table top assembly (B)
with bolts (AA) and washer (CC) by using hex screw driver (DD), (see Figure 2).
NOTE: DO NOT tighten the screws completely.
Hardware Used:
AA Bolts (M6 x 15) x 4
CC Washer (M6) x 4
DD Hex screw driver x 1
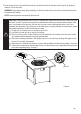
3. Attach front panel (C) to front-left leg (H) and front-right leg (G) with bolts (AA) and washer (CC) using hex screw
driver (DD), (see Figure 3).
NOTE: DO NOT tighten the screws completely.
Hardware Used:
AA Bolts (M6 x 15) x 4
CC Washer (M6) x 4
DD Hex screw driver x 1
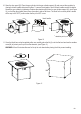
4. Attach right panel (F) to front-right leg (G) and back-right leg (J) with bolts (AA) and washer (CC) using hex screw
driver (DD), (see Figure 4).
NOTE: DO NOT tighten the screws completely.
Hardware Used:
AA Bolts (M6 x 15) x 4
CC Washer (M6) x 4
DD Hex screw driver x 1
DD
AA
CC
DD
AA
CC
DD
AA
CC