
Instructions / Assembly


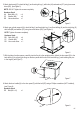

J
J
G
H
I
D
I
I
K
E
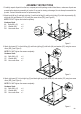
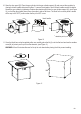
07
Figure 5
Figure 6
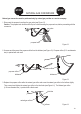
Figure 7
Figure 8
5. Attach back panel (E) to back-left leg (I) and back-right leg (J) with bolts (AA) and washer (CC) using hex screw
driver (DD), (see Figure 5).
NOTE: DO NOT tighten the screws completely.
Hardware Used:
AA Bolts (M6 x 15) x 4
CC Washer (M6) x 4
DD Hex screw driver x 1
6. Attach gas cylinder support (K) to back-left leg (I) and back-right leg (J) and front-left leg (H) and front-right leg (G)
with bolts (BB) and washer (CC) using hex screw driver (DD), (see Figure 6).
NOTE: Tighten all screws completely.
Hardware Used:
BB Bolts (M6 x 25) x 4
CC Washer (M6) x 4
DD Hex screw driver x 1
8. Attach the door handle (N) to the door panel (D) with the bolt (EE) using a Phillips screwdriver (NOT included),
(see Figure 8).
Hardware Used:
EE Bolt (M4 x 10) x 1
7. With the help of another person, carefully turn the fire pit to the upright position. Attach the door panel (D) to the
back-left leg (I) by aligning the hinge on the door panel with those on the back-left leg (I) and inserting the pins
in the hinges, (see Figure 7).
DD
AA
CC
BB
DD
CC
D
N