
Installation Guide
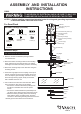

150618
Turn on the power at fuse or circuit box
Turn off the power at fuse or circuit box
Installation Steps
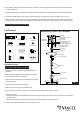
Hardware Package (included):
Mounting Strap (A)
Mounting Screw (B)
Green Grounding
Screw (C)
Hex Nut (F)
Wire Nut (D)
Canopy (H)
Top Loop (I)
Collar (J)
Short Nipple(E)
Washer (G)
Loop Lock (K)
Chain (L)
Mounting Parts For Pendant
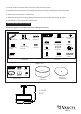
Outlet Box
House Grounding Wire
Wire Nut(D)
Fixture Wire
Fixture Grounding Wire
Mounting Strap(A)
Green Grounding Screw(C)
Mounting Screw(B)
Short Nipple(E)
Canopy(H)
Top Loop(I)
Hex Nut(F)
Washer(G)
Collar(J)
Loop Lock(K)
Loop Lock(K)
Chain(L)
Loop
Fixture Canopy
Fig.1
1. Remove contents of hardware package marked “For
Pendant”.
2. Attach the short nipple to the mounting strap, and then
secure it with a washer and a hex nut.
3. Attach the mounting strap to the outlet box by using two
mounting screws.
4. Secure the top loop to the short nipple.
5. Follow step 4 of instructions For Semi-Flush.
6. Secure the loop onto fixture canopy, thread fixture wires through threaded end of loop first.
7. Connect the chain:
- Determine length of chain needed to achieve desired fixture height. (To remove excess chain section, use pliers to
bend link open.)
- Weave the fixture wires and fixture grounding wire through the chain, collar and canopy.
8. Connect one end of the chain to the loop using a loop lock.
For Pendant
6. Unscrew two ball nuts from the fixture canopy. Attach the fixture canopy to the mounting strap, and then secure
it with the ball nuts.
7. Install two bulbs (not included). Check relamping label at socket area or packaging for maximum allowed wattage.
8. Screw the middle nipple to the coupling of the socket base, and then secure it with a washer and a hex nut.
9. Attach the glass shade and metal ring up to the pan by inserting the middle nipple, and then secure them with a
metal pad and a hex nut (Do not over tighten), finally slide the cover up to the glass panel, secure it with the finial.