
Installation Guide

ASSEMBLY AND INSTALLATION
INSTRUCTIONS
WARNING:
TO AVOID RISK OF ELECTRICAL SHOCK, BE SURE TO SHUT OFF
POWER WHILE INSTALLING OR SERVICING THIS FIXTURE.
NOTE: Before installing, consult local electrical codes for wiring and grounding requirements.
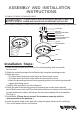
CC38409 /CC38411 /CC38414/CC38417
House Grounding Wire
Ceiling Box
Wire Nut
Mounting Strap
Green Grounding Screw
Mounting Screw
Screw
Glass Shade
Fig.1
Socket
Slot
pan
Surface
Screw
Key Hole
Slot
Slotted
Washer
1. Attach the two screws (w/ lock nut) to the mounting strap, and secure with
the lock nuts.
2. Attach the mounting strap to the ceiling box by using two mounting screws.
3. Make wire nuts:
---The black wire from fixture to the black wire from power source.
---The white wire from fixture to the white wire from power source.
---Attach the grounding wire and house grounding wire to the mounting strap with
a green grounding screw.
Carefully tuck wires back into the ceiling box.
4. Attach the pan to the mounting strap by inserting two screws, and rotate the
pan till both screws lock well. Place the slotted washers in-between the head of the
screws and the pan surface and secure the two screws tightly with a screwdriver.
(See Fig.1)
5. Install bulbs. (Please do not exceed the maximum capacity, which is
recommended on the package.)
6. Attach the glass shade to the pan, then rotate the glass shade into the slot firmly.
7. Turn on the power at fuse or circuit box.
Installation Steps:
Pan
Lock Nut
Grounding Wire