
Installation Guide
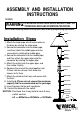

1. Attach the lower pipe onto the connector on
the base by rotating the lower pipe.
2. Secure the connector into the lower pipe,
and then attach the middle pipe onto the
connector by rotating the middle pipe .
4. Secure the connector into the middle pipe,
and then attach the upper pipe onto the
connector by rotating the upper pipe.
5. Attach the antler onto the upper pipe, and
then rotate it tightly.
6. Squeeze the arms of the harp together and
fit them into the retainer, then lower the
sleeves to fix them.
7. Attach the shade to the harp, and secure with
the finial.
8. Install bulb.(Please do not exceed the maximum
capacity that is recommended on the package.)
9. Insert the plug into the wall receptacle.
10. Control the lamp with the switch.
Lower Pipe
Base
Plug
Installation Steps
ASSEMBLY AND INSTALLATION
INSTRUCTIONS
WARNING:
TO AVOID RISK OF ELECTRICAL SHOCK, BE SURE TO SHUT OFF
POWER WHILE INSTALLING OR SERVICING THIS FIXTURE.
NOTE: Before installing, consult local electrical codes for wiring and grounding requirements.
FL33075
050625
Harp arm
Shade
Finial
Retainer
Switch
Sleeve
Connector
Middle Pipe
Upper Pipe
Antler
Connector
Connector
Connector
NOTICE: Purchase the 3-way bulb to have 3-way
switch control:
off 50Watts 100Watts 150Watts.