
Installation Guide

ASSEMBLY AND INSTALLATION
INSTRUCTIONS
WARNING:
TO AVOID RISK OF ELECTRICAL SHOCK. BE SURE TO SHUT
OFF POWER WHILE INSTALLING OR SERVICING THIS FIXTURE.
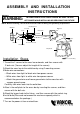
1.Thread the 2 screws to the cross bar outwards, and then secure with
2 lock nuts.(You can adjust the length of the screws)
2.Attach the cross bar to the outlet box by using 2 mounting screws.
3.Make wire connections:
---Black wires from light to black wire from power source.
---White wires from light to white wire from power source.
---Attach the ground wire and house ground wire to the cross bar with
a green ground screw.
Carefully tuck wires back into the outlet box.
4.Attac h the wall plate to the cross bar by inserting the screws, and then
secure with the ball nuts.
5.Attach the lamp shade to the fixture , and then secure with the socket ring.
6.Install bulb.(Please do not exceed the maximum capacity which is
recommended on the package.)
7.Turn on the power at fuse or circuit box.
NOTE: Before installing, consult local electrical codes for wiring and grounding requirements.
Installation Steps
Mounting Screw
Fixture Wire
Wall Plate
Ball Nut
Fixture
Lamp Shade
Socket Ring
Lock Nut
Cross Bar
Ground Wire
Green Ground Screw
Wire Nut
Screw
Outlet Box
OW14663