
Installation Guide

Turn on the power at fuse or circuit box
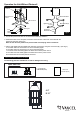
The following parts are available for re-order if damaged or missing.
181212
A:8"
B:18"
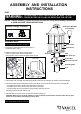
1. Turn off the power at the fuse or circuit box before starting installation.
2. Unthread the fitter screw and plate, and then Loosen the wire connectors connected with the
wires from photocell. (See Fig.3)
Note: Do not move the photocell to prevent water from seeping into the outlet box.
3. Take a white pigtail and black pigtail and make wire connections using wire connectors (B) : (See Fig.4)
a. The black wire from the fixture to one end of the black pigtail.
b. The white wire from the fixture to one end of the white pigtail.
c. The other end of the black pigtail to the black wire from the power source.
d. The other end of the white pigtail to the white wire from the power source.
Put all wires back into the back plate of the fixture.
Operation the Unit Without Photocell
Photocell
White Wires From
Photocell
Wire Connector
Wire Connector (B)
Black Wire From
Fixture
Wires From Fixture
Wires From
Main Power
White Pigtail
Pigtail
Red Wires From
Photocell
Black Wires From
Photocell
Fig.2
Fig.4
White Wire From
Fixture
Plate
Fitter Screw
Photocell
Wire Connector
Black Wire From
Fixture
White Pigtail
Fig.3
Plate
Washer
Hex Nut
Assembly Kit
6054MM (1SET)
Spare Parts List:
Glass Panel
10071RG (4PCS)
Wire Connector (B)
Fitter Screw (A)
B
A