
Installation Guide


ASSEMBLY AND INSTALLATION
INSTRUCTIONS
NOTE: 1. Before installing, consult local electrical codes for wiring and grounding requirements.
2. READ AND SAVE THESE INSTRUCTIONS.
W0079
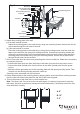
Glass bracket (E)
Bulb G9 Max.50W (H)
(Included)
Back Plate
Parts:
140410
Parts Number (5060MM)
Mounting Screw (C)
Wire Nut (A)
Glass Bracket (E)
Glass Shade (F)
Anchor (D)
Dry Wall Screw (B)
Rubber Pad
Parts Number (5060HD)
Glass Shade (F)
Parts Number (9599EW)
Anti-Knocking Glass (G)
Parts Number (9599AK)
Bulb (H)
Parts Number (8065HL)
Anti-Knocking
Glass (G)
Metal Pad
Lock Nut
Fixture
Mounting
Screw
Set Screw
WARNING: Turn off the main power at circuit breaker before installing fixture.
AVERTISSEMENT: Coupez la source d’alimentation principale au panneau
central de disjoncteurs avant d’installer le luminaire.
1. Unscrew four fixture mounting screws, and remove the mounting plate from the back plate.
2. Place the glass shade onto the glass bracket as shown.
3. Attach the glass bracket to the back plate by aligning set screws on glass bracket with holes on the
back plate. Slide set screws through holes, secure them with two metal pads and lock nuts.
4. Install a bulb (Included). See relamping label at socket area or packaging for maximum allowed
wattage.
5. Mount the rubber pad, thread the anti-knocking glass onto the socket.
Fig.1