
Installation Guide
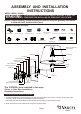

170908
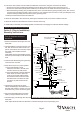
8. Cut any excess plug cord leaving 10
inches from the back plate. Slit the plug
cord apart in 5 inches. Peel off insulation
of the two wires in 5/8 inch. (See Fig.2)
9. Pull out the source wires from the back
plate. Make wire connections using wire
connectors as follows:
---The black wire from the back plate to
the smooth wire (marked) from the plug
cord.
---The white wire from the back plate to
the ridged wire (unmarked) from the
plug cord.
Carefully put the wires back into the back plate.
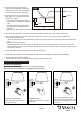
10. Attach the back plate to the cross bar by inserting the headless screws, then secure it with the ball nuts.
11. Attach the pipe strap to the connected pipe at the bottom, then secure it to the wall by using dry wall screws.
a) If the wall material is wood:
Attach the pipe strap to the wall, thread the dry wall screws through the holes on pipe strap, then secure them to the
wall.
b) If the wall material is cement:
Mark the holes where you want to place the pipe strap on the wall. Drill the holes and insert the anchors into the
holes, then attach the pipe strap to the wall, thread the dry wall screws through holes on pipe strap, and then secure
them into the anchors.
12. Attach the shade onto the holder and secure it with the socket ring.
13. Install bulb (not included). See relamping label at socket area or packaging for maximum allowed wattage.
14. Insert the plug into the wall receptacle.
Note:Remove the cover from the plug when the plug is used for the first time.
Page 3
Plug Cord
Back Plate
5/8"
5"
10"
Fig.2
Function and Operation
ACTIVATING SLEEP FEATURE
Wave hand under sensor twice. Light
will flash, then gradually dim-to-off in
5 minutes.
DIMMING LIGHTS
Hold hand under sensor to adjust
brightness.
When power is first applied, the light will turn to high level brightness.
Note: Detection zone is within 4.5 inch distance from the sensor.
Turn on the power at fuse or circuit box.
1x
TURNING LIGHTS ON/OFF
Wave hand under sensor once to
turn light on and off.
2x