
User manual

Operation Guide 2734 58 3748 9
4
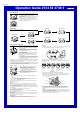
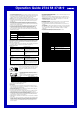
Timekeeping
Use the Timekeeping Mode to set and view the current time and date. This section
also explains how to manually set the current date and time.
• All of the operations in this section are performed in the Timekeeping Mode, which
you can enter by pressing C.
Day of week
Hour: Minutes Seconds Month — Day
A
▲
A
▲
Press A.
▲
Seconds
Month — Day
▲
Press D.
Last Signal Screen
▲
Setting the Digital Time and Date Manually
Make sure you select your Home City code before you change the current time and
date settings. World Time Mode times are all displayed in accordance with the
Timekeeping Mode settings. Because of this, World Time Mode times will not be
correct if you do not select the proper Home City code before setting the time and
date in the Timekeeping Mode.
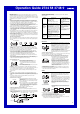
To set the current digital time and date manually
1. In the Timekeeping Mode, hold down A until the
transmitter indicator starts to flash, which indicates the
setting screen.
2. Use A or C to move the flashing in the sequence
shown below to select other settings.
Auto
Receive
DSTCity Code
Seconds
Hour Minutes
12/24-Hour
Format
Day
Month Year
/ Press A.
Press C.
Transmitter
C
C
A
Transmitter/
City Settings
Time/Date
Settings
3. When the setting you want to change is flashing, use B and/or D to change it as
described below.
Screen: To do this:
Change the transmitter setting (A/T,
MSF, or DCF)
Change the city code
Toggle between Daylight Saving
Time (
ON) , Standard Time (OFF),
or Auto DST (A)
Toggle between auto receive on
(
ON) and off (OF)
Do this:
Use D.
Use D (east) and B (west).
Press D.
Press D.
Transmitter/City Settings
DST
• See “City Code Table” for a complete list of available city codes.
4. Use A to exit the setting screen.
• If a Transmitter/City Setting screen is displayed, press A twice.
• If a Time/Date Setting screen is displayed, press A once.
• When you exit the setting screen, the analog hands are adjusted automatically to
match the digital time. See “Analog Timekeeping” for more information.
Note
• See “Transmitters” for more information.
• Auto DST (
A) can be selected only while BER, PAR, LON, or ATH is selected as the
Home City code. For more information, see “Daylight Saving Time (DST)” below.
Screen: To do this:
Toggle between 12-hour (12H)
and 24-hour (24H) timekeeping
Reset the seconds to 00
Change the hour or minutes
Change the month, day, or year
Do this:
Press D.
Press D.
Use D (+) and B (–).
Use D (+) and B (–).
Time/Date Settings
• The auto receive setting is used for time calibration signal reception only. See
“About Auto Receive” for details.
Daylight Saving Time (DST)
Daylight Saving Time (summer time) advances the time setting by one hour from
Standard Time. Remember that not all countries or even local areas use Daylight
Saving Time.
The time calibration signals transmitted from Rugby and Mainflingen include both
Standard Time and DST data. When the Auto DST setting is turned on, the watch
switches between Standard Time and DST (summer time) automatically in
accordance with the received time signal.
• The default DST setting is Auto DST (
A) whenever you select BER, PAR, LON,
or
ATH as your Home City code.
• If you experience problems receiving the time calibration signal in your area, it is
probably best to switch between Standard Time and Daylight Saving Time (summer
time) manually.
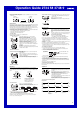
To change the Daylight Saving Time (summer time) setting
1. In the Timekeeping Mode, hold down A until transmitter indicator starts to flash,
which indicates the setting screen.
2. Press C twice and the DST setting screen appears.
3. Use D to cycle through the DST settings in the sequence shown below.
4. When the setting you want is selected, press A twice to exit the setting screen.
Auto DST(
A
) DST off(
OFF
) DST on(
ON
)
Analog Timekeeping
The analog time of this watch is synchronized with the digital time. The analog time
setting is adjusted automatically whenever you change the digital time.
Note
• The hands for the analog timepiece move to adjust to a new setting whenever any
of the following occurs.
When you change the digital time setting manually
When the digital time setting is changed by time calibration signal reception
When you change the Home City code and/or DST setting
• If the analog time does not match the digital time for any reason, use the procedure
described under “To adjust the analog time” to match the analog setting to the
digital setting.
• Whenever you need to adjust both the digital and the analog time settings
manually, make sure you adjust the digital setting first.
• Depending on how much the hands have to move in order to adjust to the digital
time, it may take some time before the analog hands stop moving.
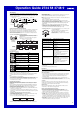
To adjust the analog time
1. In the Timekeeping Mode, press C six times to enter
the Hand Setting Mode.
2. Hold down A until the current digital time starts to
flash, which indicates the setting screen.
3. Use D (+) and B (–) to adjust the analog setting as
described below.
l
l
l
l
l
l
l
l
l
l
l
l
l
l
l
l
l
Current time
When you want to do this:
Move the hand setting
forward 20 seconds
Perform this button operation:
• Press D.
Move the hand setting back
20 seconds
Move the hand setting a short
way forward at high speed
Move the hand setting a
short way back at high speed
Move the hand setting a
long way forward at high
speed
• Press B.
• Hold down D.
• Release D when the hands reach the setting
you want.
• Hold down B.
• Release B when the hands reach the setting
you want.
• While holding down D to move the hands at
high-speed, press B to lock the high-speed
hand movement.
• Press any button when the hands are close
to the setting you want.
• Hand movement stops automatically if the
hour hand makes one full (12-hour)
revolution.
Move the hand setting a long
way back at high speed
• While holding down B to move the hands at
high-speed, press D to lock the high-speed
hand movement.
• Press any button when the hands are close
to the setting you want.
• Hand movement stops automatically if the
hour hand makes one full (12-hour)
revolution.
4. Press A to exit the setting screen.
• The minute hand will be adjusted slightly to match the seconds when you exit the
setting screen.
• To return to the Timekeeping Mode, press C.
Reference
This section contains more detailed and technical information about watch
operation. It also contains important precautions and notes about the various
features and functions of this watch.
Auto return features
• If you leave the watch in the Alarm (except for the target alarm screen explained
under “To set an alarm time”), Date Alert, or Hand Setting Mode for two or three
minutes without performing any operation, it automatically changes to the
Timekeeping Mode.
• If you leave the watch with a flashing setting or cursor on the display for two or
three minutes without performing any operation, it automatically saves any settings
you have made up to that point and exits the setting screen.
Scrolling
The B and D buttons are used in various modes and setting screens to scroll
through data on the display. In most cases, holding down these buttons during a
scroll operation scrolls through the data at high speed.
Initial Screens
When you enter the World Time, Alarm, or Date Alert Mode, the data you were
viewing when you last exited the mode appears first.
Radio-controlled Timekeeping Precautions
• Strong electrostatic charge can result in the wrong time being set.
• Even when the watch is within the reception range of the transmitter, signal
reception is impossible if the signal is blocked by mountains or other geological
formations between the watch and signal source.
• Signal reception is affected by weather, atmospheric conditions, and seasonal
changes.
• The time calibration signal is bounced off the ionosphere. Because of this, such
factors as changes in the reflectivity of the ionosphere, as well as movement of the
ionosphere to higher altitudes due to seasonal atmospheric changes or the time of
day may change the reception range of the signal and make reception temporarily
impossible.
• Even if the time calibration signal is received properly, certain conditions can
cause the time setting to be off by up to one second.