Chapter Data Communications This chapter tells you everything you need to know to transfer programs between two CASIO Power Graphic calculators connected using the cable that is equipped as a standard accessory. You can also use the cable to connect the calculator to a CASIO Label Printer to print screen data. To transfer data between a calculator and a personal computer, you need to purchase the separately available CASIO FA-123 Connection Kit.
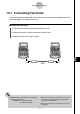
10-1-1 Connecting Two Units 10-1 Connecting Two Units The following procedure describes how to connect two units with the connecting cable that comes equipped as a standard accessory. u To connect two units 1. Check to make sure that the power of both units is off. 2. Remove the covers from the connectors of the two units. 3. Connect the two units using the cable. Cable # Models that are supported for this configuration are shown below. ALGEBRA FX 2.0/FX 2.0 PLUS FX 1.0/FX 1.
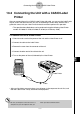
10-2-1 Connecting the Unit with a CASIO Label Printer 10-2 Connecting the Unit with a CASIO Label Printer After you connect the unit to a CASIO Label Printer with cable, you can use the Label Printer to print screen shot data from the unit (see 10-6 Sending a Screen Shot). See the user’s guide that comes with your Label Printer for details on how to perform this operation.
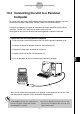
10-3-1 Connecting the Unit to a Personal Computer 10-3 Connecting the Unit to a Personal Computer To transfer data and screen shots between the unit and a personal computer, you must connect them through a separately available CASIO FA-123 Connection Kit. For details on operation, the types of computer that can be connected, and hardware limitations, see the user’s manual that comes with the FA-123. Some types of data may not be able to be exchanged with a personal computer.
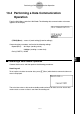
10-4-1 Performing a Data Communication Operation 10-4 Performing a Data Communication Operation From the Main Menu, enter the LINK Mode. The following data communication main menu appears on the display. • {TRNS}/{Recv} ... menu of {send settings}/{receive settings} Communication parameters are fixed at the following settings. • Speed (BPS): 38.
10-4-2 Performing a Data Communication Operation Sending unit To set up the calculator to send data, press 1(TRNS) while the data communication main menu is displayed. Press the number key that corresponds to the type of data you want to send. • {Select} ... {selects data items and sends them} • {Currnt } ... {selects data items from among previously selected data items and sends them} • {Backup} ... {sends all memory contents, including mode settings} • {H-Copy} ...
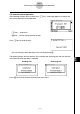
10-4-3 Performing a Data Communication Operation uTo execute a send operation After selecting the data items to send, press 6(Trns). A message appears to confirm that you want to execute the send operation. • w(Yes) ... sends data • i(No) ... returns to data selection screen Press w(Yes) to send the data. • You can interrupt a data operation at any time by pressing A. The following shows what the displays of the sending and receiving units look like after the data communication operation is complete.
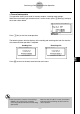
10-4-4 Performing a Data Communication Operation u To send backup data This operation allows you to send all memory contents, including mode settings. While the transmit data type selection menu is on the screen, press d(Backup), to display the screen shown below. Press w(Yes) to start the send operation. The following shows what the displays of the sending and receiving units look like after the data communication operation is complete.
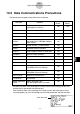
10-5-1 Data Communications Precautions 10-5 Data Communications Precautions The following are the types of data items that can be sent. Data Item Contents Overwrite Check* 1 Password Check*2 Yes Program names Program contents (All programs are listed.
-5-2 Data Communications Precautions • 1(YES) ... {replaces the receiving unit’s existing data with the new data} • 6(NO) ... {skips to next data item} *2 With password check: If a file is password protected, a message appears asking for input of the password. Name of password protected file Password input field 2 After inputting the password, press w. Note the following precautions whenever you perform data communications.
10-6-1 Sending a Screen Shot 10-6 Sending a Screen Shot Use the following procedures to send a hardcopy of the screen directly to a connected personal computer (or CASIO Label Printer) or to save a screen shot in memory to send later. Screen shots can also be sent to a CASIO Label Printer. Use the LINK Mode set up (u3(SET UP)) to specify whether you want to send the screen shot now or save it in memory. u H-Copy • {Dirct}/{Mem} .............
10-6-2 Sending a Screen Shot u To send a saved screen shot to a computer or CASIO Label Printer 1. Connect the unit to the computer (or CASIO Label Printer). On the computer (or CASIO Label Printer), perform the procedures required to set it up to receive data. 2. In the LINK Mode, press 1(TRNS)e(H-Copy) to display the list of screen shots in memory. 3. Use the f and c cursor keys to highlight the name of the screen shot you want to send, and then press 6(Trns).
10-7-1 Add-ins 10-7 Add-ins Add-in capabilities let you install separately available applications and other software to tailor the calculator to suit your particular needs. Add-ins are installed from a computer using the data communication described on page 10-4-1. The following are the types of software that can be installed as add-ins. u Add-in Application After you install an application, its icon appears in the Main Menu, and you can run it just as you would a built-in application.
10-8-1 MEMORY Mode 10-8 MEMORY Mode This calculator has two separate memory areas: a “current area” and a “storage area.” The current area is a work area where you can perform input data, perform calculations and run programs. Data in the current area is relatively safe, but it can be deleted when batteries go dead or when you perform a full reset. The storage area uses “flash memory,” so data is safe even when power is interrupted.
10-8-2 MEMORY Mode u To store a program file into the storage area 1. On the initial MEMORY Mode screen press 1(PROG). • This displays a list of program files that are in the current area.*1 2. Select the program file you want to store. • Use the cursor f and c keys to highlight the name of the program file you want to store, and then press 1(SEL). 3. Press 5(SAVE). The message “Complete!” appears when the store operation is finished. Press i to return to the screen displayed in step 1.
10-8-3 MEMORY Mode u To load a program file from the storage area 1. On the initial MEMORY Mode screen press 1(PROG). 2. Press 6(STRG). • This displays a list of program files that are in the storage area. *1 3. Select the program file you want to load. • Use the cursor f and c keys to highlight the name of the program file you want to load, and then press 1(SEL). 4. Press 5(LOAD). The message “Complete!” appears when the load operation is finished. Press i to return to the screen displayed in step 1.
10-8-4 MEMORY Mode k Deleting Program Files Use the following procedures to delete individual files or all files in the current area or storage areas. u To delete a current area program file 1. On the initial MEMORY Mode screen press 1(PROG). • This displays a list of program files that are in the current area. 2. Use the cursor f and c keys to highlight the name of the program file you want to delete, and then press 2(DEL). • Press w(Yes) to delete the program file.
10-8-5 MEMORY Mode u To delete all the program files in the storage area 1. On the initial MEMORY Mode screen press 1(PROG). 2. Press 6(STRG). • This displays a list of program files that are in the storage area. 3. Press 3(DEL•A). • Press w(Yes) to delete all the program files in the storage area. • Press i(No) to cancel the delete operation. k Searching for a Program File Use the following procedures to search for a specific program file in the current area or in the storage area.
10-8-6 MEMORY Mode u To search for a program file in the storage area ○ ○ ○ ○ ○ Example To search for all program files in the storage area whose names begin with the letter “S” 1. On the initial MEMORY Mode screen press 1(PROG). 2. Press 6(STRG). • This displays a list of program files that are in the storage area. 3. Press 4(SRC). • Input the letter “S” for the keyword. • The first program file name that begins with the letter “S” appears highlighted on display.
10-8-7 MEMORY Mode k Backing Up Current Area Data You can back up all the data in the current area and store it in the storage area. Later you can restore the backed up data to the current area when necessary. u To back up current area data 1. On the initial MEMORY Mode screen press 2(BACK). • Screen A appears if there is already backup data in the storage area. Screen B appears if there is no backup data in the storage area. Screen A Screen B 2. Press 1(SAVE) to backup the data.
10-8-8 MEMORY Mode u To restore backup data to the current area 1. On the initial MEMORY Mode screen press 2(BACK). • On the screen that appears, you can confirm whether or not there is backup data in the storage area. 2. Press 2(LOAD). • A message appears to confirm whether or not you really want to restore the backed up data. Press w(Yes) to restore the data and delete any data currently in the area. Press i(No) to cancel the data backup operation.
10-8-9 MEMORY Mode k Optimizing the Storage Area Storage area memory can become fragmented after many store and load operations. Fragmentation can cause blocks of memory to become unavailable for data storage. Because of this, you should periodically perform the storage area optimization procedure, which rearranges the data in the storage area and makes memory usage more economical. u To optimize the storage area On the initial MEMORY Mode screen press 3(OPT) to start storage area optimization.