ES USER’S GUIDE GUÍA DEL USUARIO Please keep all information for future reference. Guarde toda información para tener como referencia futura. Safety Precautions Before trying to use the piano, be sure to read the separate “Safety Precautions”. Precauciones de seguridad Antes de intentar usar el piano, asegúrese de leer las “Precauciones de seguridad” separadas.
TO REDUCE THE RISK OF FIRE OR ELECTRIC SHOCK, REFER SERVICING TO QUALIFIED SERVICE PERSONNEL. IMPORTANT SAFETY INSTRUCTIONS 1. 2. 3. 4. 5. 6. 7. 8. 9. Read these instructions. Keep these instructions. Heed all warnings. Follow all instructions. Do not use this apparatus near water. Clean only with dry cloth. Do not block any ventilation openings. Install in accordance with the manufacturer’s instructions.
Contents Assembling the Stand .............................................................................................. E-24 Unpacking................................................................. E-24 To connect the pedal cord......................................... E-26 To assemble the stand ............................................. E-24 To install the music stand.......................................... E-26 General Guide ................................... E-2 TONE/SETTING Button......
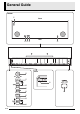
General Guide Bottom 1 Front Rear 23 4 5 Front 6 7 bo 8 9 bk bl bm bn E-2 bp
General Guide CAUTION • Make sure that the cover is fully open whenever you are playing on the keyboard. A partially open cover can suddenly close unexpectedly and pinch your fingers. NOTE • The names shown here are always indicated in bold when they appear within the text of this manual.
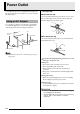
Power Outlet Your digital piano runs on standard household power. Be sure to turn off power whenever you are not using the digital piano. * Using the Clip ■ To fasten the clip As shown in the illustration, press down on (a) to force the tip of the clip into the slot. Press down until you hear the clip click securely into place. Using an AC Adaptor Slot Tip Use only the AC adaptor (AD-12) that is specified for use with this digital piano.
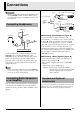
Connections IMPORTANT! • Whenever connecting something to the digital piano, first use the VOLUME controller to set the volume to a low level. After connecting, you can adjust the volume to the level you want. Connecting Headphones Pin plug Audio amplifier AUX IN jack, etc. RIGHT (Red) LEFT (White) Stereo standard plug To digital piano’s PHONES jack Pin jack Pin plug (red) Guitar amplifier Keyboard amplifier, etc.
Playing with Different Tones VOLUME TONE/SETTING SONG / POWER METRONOME GRAND PIANO Selecting and Playing a Tone This digital piano has 11 built-in tones. * You can select these tones using keyboard keys. The name of the tones assigned to each keyboard key is marked above the keys. For details about selecting these tones, see “Selecting a Tone Using the Keyboard Keys” on page E-7. 1. Press the POWER button to turn on the digital piano.
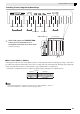
Playing with Different Tones Selecting a Tone Using the Keyboard Keys ʬʊʽ MODERN ɹʳʁʍɹ VARIATION CLASSIC ʚʴɲ˂ʁʱʽ GRAND PIANO ɺʳʽʓʞɬʘ ±1 ʝʠʳʟɳʽ VIBRAPHONE ²2 ʃʒʴʽɺʃ STRINGS ² 2 BASS (LOWER) ʣ˂ʃᴥͲᬩᴦ ELEC PIANO ɲʶɹʒʴʍɹʞɬʘ HARPSICHORD ʙ˂ʡʁɽ˂ʓ PIPE ORGAN ʛɮʡɴʵɶʽ TONE/SETTING button 1. ± 1 Tone Setting Keys While holding down the TONE/SETTING button, press the keyboard key that corresponds to the tone you want to select.
Playing with Different Tones Adjusting the Brilliance of a Tone 1. While holding down the TONE/SETTING button, use the BRILLIANCE keys to specify a brilliance value in the range of –3 to 3. Layering Two Tones Use the following procedure to layer two tones, so they sound at the same time. 1. While holding down the TONE/SETTING button, simultaneously press the keyboard keys that correspond to the two tones that you want to layer. Example: To layer HARPSICHORD and STRINGS.
Playing with Different Tones Using Effects Reverb . . . . Makes your notes resonate. Chorus . . . Adds more breadth to your notes. Using the Digital Piano’s Pedals Your digital piano comes equipped with three pedals: damper, soft, and sostenuto To configure reverb and chorus effect settings 1. While holding down the TONE/SETTING button, press the REVERB or CHORUS keyboard key.
Playing with Different Tones Using the Metronome 1. Press the METRONOME button. • This starts the metronome. • The lamp above the SONG X/ button flash in time with the metronome beat. 2. To change the beat, hold down the TONE/ SETTING button as you press one of the METRONOME BEAT keys to select a beat setting. 4. Press the METRONOME button or SONG X/ button to turn off the metronome.
Playing with Different Tones Changing the Octaves of the Keyboards Playing a Piano Duet You can use the Duet Mode to split the piano’s keyboard in the center so two people can play a duet. The left and right side keyboards have virtually the same range. The left pedal operates as the left side damper pedal, while the right pedal is the right side damper pedal.
Playing Back Built-in Songs TONE/SETTING SONG / LR IMPORTANT! • After you select a built-in song, it can take a number of seconds for the song data to be loaded. While the data is being loaded, the keyboard keys and button operations will be disabled. Selecting a song while playing something on the keyboard will cause sound output of the keyboard notes to stop. Playing Back All of the Built-in Songs Playing Back a Specific Music Library Song 1.
Playing Back Built-in Songs 3. Press the SONG X/ button. • This starts the playback of the song. 4. To stop playback, press the SONG X/ button again. • Playback will stop automatically when the end of the song is reached. NOTE • Pressing the + and – keys at the same time will select song number 01. • You also can adjust the playback tempo and volume of the song. See “Configuring Settings with the Keyboard” on page E-18 for more information.
Recording and Play Back SONG / LR RECORDER METRONOME You can store the notes you play in digital piano memory for later playback. Tracks A track is a container of recorded data, and a song consists of two tracks: Track 1 and Track 2. You can record each track separately and then combine them so they play back together as a single song. Track 1 Record While playing back. . . Song Track 2 ■ Recorded Data Storage • Starting a new recording deletes any data that was previously recorded in memory.
Recording and Play Back Recording Your Keyboard Play After recording to either of the tracks of a song, you can record to the other track while listening to playback what you recorded in the first track. 4. • Recording will start automatically. 5. Press the RECORDER button twice so its lamp is flashing. To stop recording, press the SONG X/ button again. • This will cause the RECORDER button and LR button lamps to change from flashing to lit.
Recording and Play Back To record to one track of a song while listening to the playback of the other track 1. Press the RECORDER button so its lamp is lit. 2. Press the LR button until the lamp of only the track to which you want to play back is lit. 3. Press the RECORDER button so its lamp is flashing. • This will cause the L lamp to flash. 4. Use the LR button to select the track to which you want to record. Press the RECORDER button so its lamp is lit.
Recording and Play Back Deleting Recorded Data The following procedure deletes a specific track of a song. IMPORTANT! • The procedure below deletes all of the data of the selected track. Note that the delete operation cannot be undone. Check to make sure you really do not need the data in digital piano memory before you perform the following steps. 1. Press the RECORDER button so its lamp is lit. 2. Press the RECORDER button again so its lamp is flashing. 3.
Configuring Settings with the Keyboard TONE/SETTING In addition to selecting tones and Music Library tunes, you also can use the TONE/SETTING button in combination with the keyboard keys to configure effect, keyboard touch, and other settings. To configure settings with the keyboard 1. Use the “Parameter List” on page E-20 to find the setting you want to configure, and note its details. 2.
Configuring Settings with the Keyboard Keyboard Keys Used for Configuring Settings • The numbers 1 through br correspond to the same numbers in the “Parameter List” on page E-20.
Configuring Settings with the Keyboard Parameter List ■ Tones Parameter Operation Type (page E-18) Settings Description 1 Tone selection 2 Brilliance –3 to 0 to 3 (BRILLIANCE) Default: 0 B Specifies the brilliance of notes. (page E-8) 3 Reverb (REVERB) Off (OFF), 1 to 4 Default: 2 A Specifies the reverb of notes. (page E-9) 4 Chorus Off (OFF), 1 to 4 Default: Off A Controls the breadth of notes. (page E-9) See page E-6.
Configuring Settings with the Keyboard ■ Keyboard Parameter bk Touch Response Operation Type (page E-18) Settings Description Remarks Off (OFF), 1 to 3 Default: 2 A Specifies the relative touch of the keyboard keys. Setting a smaller value causes lighter touch to produce more powerful sound. –12 to 0 to 12 Default: 0 B Raises or lowers the tuning • The transpose setting cannot be of the digital piano in configured while Music Library playback semitone steps. is in progress and in the Duet Mode.
Configuring Settings with the Keyboard ■ MIDI and Other Settings Parameter Operation Type (page E-18) Settings Description Remarks bn Send Channel 01 to 16 Default: 01 B Specifies one of the MIDI channels (1 through 16) as the Send Channel, which is used for sending MIDI messages to an external device.
Configuring Settings with the Keyboard Connecting to the MIDI Terminal ■ What is MIDI? MIDI is a standard for digital signals and connectors that allows musical instruments, computers, and other devices, regardless of manufacturer, to exchange data with each other. NOTE • For details about MIDI implementation, visit: http://world.casio.
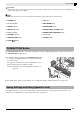
Assembling the Stand CAUTION Unpacking PREPARATION • This stand does not include any of the tools required for assembly. It is up to you to prepare a large Philips head (+) screwdriver for assembly. A C B • Assembly of the stand should be performed by at least two people working together. • This stand should be assembled on a flat surface. • Do not remove the tape securing the keyboard cover in place until assembly is complete.
Assembling the Stand 3. Use the two screws I to secure the top left and right edges of the back panel C to the brackets 5 of side panels A and B. 6. Place the piano onto the stand. • At location 6, slip the G clip onto to the I screw before installing the screw. 9 9 5 6 G I 4. I • At this time the screws on the bottom of the piano 8 should hook into the cutouts in the stand brackets 9. Next, secure the bottom of the back panel C with the six F screws.
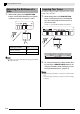
Assembling the Stand 8. Affix the adaptor cord clip K next to the power terminal (DC12V). • For information about securing the cord, see “Power Outlet” on page E-4. DC 12V terminal K To connect the pedal cord 1. Orienting the pedal plug as shown in the illustration, plug it into the pedal connector on the bottom of the piano. • Secure the pedal cord with the clip G. Pedal plug G E-26 To install the music stand 1.
Reference Troubleshooting Problem Cause Action See Page 1. The VOLUME controller is set to “MIN”. 1. Rotate the VOLUME controller more towards “MAX”. ) E-6 2. Headphones are connected to the digital piano. 2. Unplug the headphones from the digital piano. ) E-5 3. MIDI Local Control is turned off. 3. Turn on the Local Control setting. ) E-22 1. The digital piano’s key setting is something other than “0”. 1. Change the key setting to “0”, or turn digital piano power off and then back on again.
Reference Product Specifications Model AP-200 Keyboard 88-key piano keyboard, with Touch Response Maximum Polyphony 128 notes Tones 11 • Layer (excluding bass tones) • Split (Low-range bass tones only) Effects Brilliance (–3 to 0 to 3), Reverb (4 types), Chorus (4 types), Acoustic Resonance Metronome • Beats: 0, 2, 3, 4, 6 • Tempo Range: 20 to 255 Duet Adjustable tone range (–2 to 0 to 1 octaves) Music Library • Number of Songs: 60 • Song volume: Adjustable • Part On/Off: L, R Recorder • •
Reference Operating Precautions Be sure to read and observe the following operating precautions. ■ Location Avoid the following locations for this product. • Areas exposed to direct sunlight and high humidity • Areas subjected to temperature extremes • Near a radio, TV, video deck, or tuner The above devices will not cause malfunction of the product, but the product can cause interference in the audio or video of a nearby device.
Appendix/Apéndice Tone List/Lista de tonos Tone Name/ Nombre de tonos Program Change/ Cambio de programa Bank Select MSB/ MSB de selección de banco Song List/Lista de canciones Maximum Polyphony/ Polifonía máxima No./Nº Song Name/Nombre de canciones 01 Nocturne Op.9-2 02 Fantaisie-Impromptu Op.66 03 Étude Op.10-3 “Chanson de l’adieu” 04 Étude Op.10-5 “Black Keys” GRAND PIANO (MODERN) 0 48 64 GRAND PIANO (CLASSIC) 0 49 64 GRAND PIANO (VARIATION) 07 Prélude Op.
MIDI Implementation Chart Model AP-200 Function Transmitted Recognized Basic Channel Default Changed 1 - 16 1 - 16 1 - 16 1 - 16 Mode Default Messages Altered Mode 3 X Mode 3 X 21 - 108 0 - 127 0 - 127*1 O 9nH v = 1 - 127 X 8nH v = 64 O 9nH v = 1 - 127 X 9nH v = 0.
This recycle mark indicates that the packaging conforms to the environmental protection legislation in Germany. Esta marca de reciclaje indica que el empaquetado se ajusta a la legislación de protección ambiental en Alemania.