
User Manual

MA2307-A Printed in China
Imprimé en Chine
Published: 7/2023 Publié : 7/2023
〒 151-8543 東京都渋谷区本町1-6-2
MA2307-A Printed in China
Imprimé en Chine
制造公司 :卡西欧电子科技(中山)有限公司
制造公司地址 :广东省中山市火炬开发区科技大道西
邮 政 编 码 :5 2 8 4 3 7
版 次 :2 0 2 3 年 7 月
AP-S 系列
/
AP-S series
/
AP-Sシリーズ
/
Serie AP-S
/
AP-S Serie
/
Série AP-S
/
Серия АP-S
/
Série AP-S
事前准备
●
●
Getting Ready
●
This stand does not include
any of the tools required for
assembly. It is up to you to
prepare a large Phillips head
(+) screwdriver for assembly.
●
Before starting assembly,
check to make sure that you
have all the parts shown below.
準 備
●
組み立て用の工具は付属しており
ません。あらかじめ大きめのプラス
(+)ドライバーをご用意ください。
●
最初に以下の部品がそろっている
ことをご確認ください。
Procedimientos iniciales
●
Este Stand no incluye ninguna
de las herramientas requeridas
para el armado. Tenga a mano
un destornillador grande tipo
Phillips (+) para el armado.
●
Antes de comenzar el armado,
compruebe que cuenta con
todas las piezas mostradas a
continuación.
Vorbereitung
●
Das zur Montage benötigte
Werkzeug ist bei diesem Ständer
nicht enthalten. Es ist Ihnen
überlassen, für die Montage
einen großen Kreuzschlitz-
Schraubendreher (+) bereitzulegen.
●
Kontrollieren Sie bitte, ob alle unten
gezeigten Teile vorhanden sind,
bevor Sie mit der Montage beginnen.
Préparatifs
●
Les outils nécessaires pour
l’assemblage ne sont pas fournis
avec le support. Vous aurez
besoin d’un gros tournevis à tête
cruciforme (+) pour l’assemblage.
●
Avant de commencer, assurez-
vous que vous avez bien toutes
les pièces suivantes.
Подготовка
●
Инструменты для сборки в
комплект стойки не входят.
Отвертку с крупной крестовой
головкой для сборки требуется
обеспечить самостоятельно.
●
Перед сборкой убедиться в
наличии всех нижеуказанных
частей.
Preparação inicial
●
Este stand não inclui nenhuma
das ferramentas necessárias para
montá-lo. O usuário deve preparar
uma chave de fenda Phillips
grande (+) para a montagem.
●
Antes de começar a montagem,
certifique-se de que tenha todas
as peças mostradas abaixo.
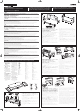
AB
C
D
E
F
G
H
I
J
AB
Side panels
C
Back board
D
Pedal unit
E
Screws
F
Screws
G
Brackets
H
Screw caps
I
Screw caps
J
Clips
AB
側板
C
背板
D
ペダルユニット
E
ネジ
F
ネジ
G
金具
H
ネジキャップ
I
ネジキャップ
J
クリップ
AB
Panel lateral
C
Panel trasero
D
Unidad de pedal
E
Tornillos
F
Tornillos
G
Soportes
H
Tapas de tornillos
I
Tapas de tornillos
J
Clips
AB
Seitentafel
C
Rücktafel
D
Pedaleinheit
E
Schrauben
F
Schrauben
G
Stützwinkel
H
Schraubenkappen
I
Schraubenkappen
J
Clips
AB
Panneau latéral
C
Panneau arrière
D
Bloc pédales
E
Vis
F
Vis
G
Ferrures
H
Capuchons de vis
I
Capuchons de vis
J
Clips
AB
Боковые панели
C
Тыльная панель
D
Педальный блок
E
Винты
F
Винты
G
Уголки
H
Колпачки для винтов
I
Колпачки для винтов
J
Прижимы
AB
Painel lateral
C
Painel posterior
D
Unidade de pedais
E
Parafusos
F
Parafusos
G
Braços
H
Tampas de parafuso
I
Tampas de parafuso
J
Grampos
×2
×2
×6
×4
×2
×4
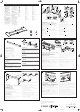
C
A
B
C
1.
Remove the 4 screws inserted in side
C
.
2.
Using the removed screws, attach
A
and
B
to
C
.
1.
C
の側面の付いているネジ(4箇所)を取り外します。
2.
取り外したネジを使って
A
、
B
を
C
に取り付けます。
1.
Quite los 4 tornillos insertados en los laterales
C
.
2.
Fije
A
y
B
a
C
utilizando los tornillos retirados.
1.
Entnehmen Sie die in Seite
C
eingesetzten 4 Schrauben.
2.
Nehmen Sie die entnommenen Schrauben und befestigen Sie damit
A
und
B
an
C
.
1.
Retirez les 4 vis insérées sur le côté
C
.
2.
En utilisant les vis retirées, fixez
A
et
B
à
C
.
1.
Извлечь 4 винта с торцов тыльной панели
C
.
2.
Извлеченными винтами прикрепить боковые панели
A
и
B
к тыльной
C
.
1.
Retire os 4 parafusos inseridos no lado
C
.
2.
Usando os parafusos retirados, instale
A
e
B
em
C
.
*
重 要!
●
K
K
●
K
*
IMPORTANT!
●
If you have trouble inserting a screw into a joint connector
K
screw hole, use a
screwdriver to rotate the joint connector
K
and adjust its position.
●
Trying to forcibly tighten the screw while the joint connector
K
and screw are out of
alignment can strip the threads of the screw.
*
重要
●
ネジが、ジョイントコネクタ
K
のネジ穴に入りにくい場合には、ドライバーを使用し
てジョイントコネクタ
K
を回転させ、調節してください。
●
ジョイントコネクタ
K
とネジの角度があっていない状態で無理に締め付けると、ねじ
山をつぶしてしまうことがあります。
*
¡
IMPORTANTE!
●
Si tiene dificultades al introducir los tornillos en los orificios roscados del conector
de unión
K
, utilice un destornillador para girar el conector de unión
K
y ajustar su
posición.
●
Si intenta forzar el apriete de los tornillos mientras un conector de unión
K
y los
tornillos no están alineados, se podrían dañar las roscas de los tornillos.
*
WICHTIG!
●
Wenn das Einsetzen einer Schraube in das Schraubenloch eines Stoßverbinders
K
Schwierigkeiten bereitet, richten Sie den Stoßverbinder
K
bitte durch Drehen mit
einem Schraubendreher passend aus.
●
Wenn Sie versuchen, eine Schraube gewaltsam einzudrehen, während der Stoßverbinder
K
und die Schraube nicht richtig fluchten, kann das Schraubengewinde beschädigt
werden.
*
IMPORTANT !
●
Si vous ne parvenez pas à insérer une vis dans un trou de vis d’une cosse de
raccordement
K
, utilisez un tournevis pour faire tourner la cosse de raccordement
K
et ajuster sa position.
●
Essayer de serrer de force une cosse de raccordement
K
et tourner les vis alors
qu’elles ne sont pas alignées peut endommager les filets de la vis.
*
ВНИМАНИЕ!
●
Если винт не вставляется в отверстие под винт в стяжке-бочонке
K
, повернуть
ее и отрегулировать ее положение отверткой.
●
Попытка завинчивания винта через силу при его несоосности стяжке-бочонку
K
способна привести к срыву резьбы на винте.
*
IMPORTANTE!
●
Se você tiver problemas para inserir um parafuso em um orifício de parafuso do
conector de união
K
, use uma chave de fenda para girar o conector de união
K
e
ajuste sua posição.
●
Tentar forçar os parafusos para fazer o aperto com um conector de união
K
e os
parafusos desalinhados pode deformar as roscas dos parafusos.
1
1. 2.
A
B
A
B
A
B
G
1-1.
To set the piano up away from a wall
To reduce the risk of the stand falling over, remove the screws from the brackets on
A
and
B
, slide the brackets, and loosely fasten the removed screws.
1-2.
To set the piano up against a wall
Loosen the screws in the brackets on
A
and
B
.
2.
Insert
G
into the gap between the brackets and
A
and
B
.
1-1.壁から離した場所に設置する場合
スタンドを倒れにくくするために
A
、
B
についている金具のネジを取り外し、金具をスライ
ドさせて取り外したネジで仮止めします。
1-2.壁に近づけて設置する場合
A
、
B
についている金具のネジを緩めます。
2.
金具と
A
、
B
の隙間に
G
を差し込みます。
1-1.
Para instalar el piano alejado de la pared
Para reducir el riesgo de vuelco del stand, retire los tornillos de los herrajes situados en
A
y
B
, deslice los herrajes y ajuste los tornillos retirados sin apretarlos por completo.
1-2.
Para instalar el piano contra una pared
Afloje los tornillos de los herrajes de
A
y
B
.
2.
Inserte
G
en el huelgo existente entre los soportes y
A
y
B
.
1-1.
Bei von einer Wand abgerückter Aufstellung des Pianos
Um einem Umfallen des Ständers vorzubeugen, entfernen Sie die Schrauben aus den
Haltern an
A
und
B
, verschieben diese und befestigen sie dann provisorisch wieder
mit den entfernten Schrauben.
1-2.
Bei Aufstellung des Pianos an einer Wand
Lösen Sie die Schrauben in den Haltern an
A
und
B
.
2.
Setzen Sie
G
in den Spalt zwischen den Haltern und
A
und
B
ein.
1-1.
Pour installer le piano loin dʼun mur
Pour réduire le risque de chute du stand, retirez les vis des ferrures
A
et
B
, faites
glisser les ferrures et fixez les vis retirées sans les serrer.
1-2.
Pour installer le piano contre un mur
Desserrez les vis des ferrures
A
et
B
.
2.
Insérez
G
dans lʼespace entre les ferrures et
A
et
B
.
1-1.
Как установить пианино на удалении от стены
Для снижения риска опрокидывания стойки извлечь винты из накладок на боковых
панелях
A
и
B
, накладки сдвинуть и наживить на них извлеченные винты.
1-2.
Как установить пианино у стены
Ослабить винты в накладках на боковых панелях
A
и
B
.
2.
В зазоры между накладками и боковыми панелями
A
и
B
вставить уголки
G
.
1-1.
Para instalar o piano afastado de uma parede
Para reduzir o risco de queda do stand, retire os parafusos dos braços em
A
e
B
,
deslize os braços, e aperte levemente os parafusos retirados.
1-2.
Para instalar o piano contra uma parede
Afrouxe os parafusos nos braços em
A
e
B
.
2.
Insira
G
na folga entre os braços e
A
e
B
.
22
1-1.
1-2.
2.
2.
D
D
E
H
D
2
A
B
I
1.
Pull the pedal cord out of
D
.
2.
Place
D
on top of the brackets and secure it using the screws
E
. Then fit
H
onto the
screw heads.
3.
While pushing
D
against the floor, firmly tighten the screws that you loosened or
loosely tightened in step
2
.
4.
Check that the 6 screws fitted in
A
and
B
are all firmly tightened and then fit
I
onto
the screw heads.
1.
D
の中からペダルコードを引き出します。
2.
金具の上に
D
を載せ、ネジ
E
で固定した後に、
H
をネジの頭にはめ込みます。
3.
D
を床に押し付けながら、
2
で仮止めまたは緩めたネジをしっかり締めます。
4.
A
、
B
に取り付けたネジ(6箇所)がしっかりと締まっていることを確認してから、
I
をネジの
頭にはめ込みます。
1.
De
D
, saque el cable del pedal.
2.
Coloque
D
encima de los herrajes y fíjelo con los tornillos
E
. Luego encaje
H
en la
cabeza de los tornillos.
3.
Mientras presiona
D
contra el suelo, apriete firmemente los tornillos que se soltaron o
aflojaron temporalmente en el paso
2
.
4.
Compruebe que los 6 tornillos colocados en
A
y
B
estén bien apretados y luego
coloque
I
en la cabeza de los tornillos.
1.
Ziehen Sie das Pedalkabel aus
D
hervor.
2.
Legen Sie
D
oben auf die Halter und sicheren Sie das Teil mit den Schrauben
E
.
Bringen Sie dann
H
auf den Schraubenköpfen an.
3.
Drücken Sie
D
gegen den Boden und ziehen Sie dabei die in Schritt
2
gelösten oder
provisorisch angezogenen Schrauben fest.
4.
Kontrollieren Sie, dass die in
A
und
B
eingesetzten 6 Schrauben fest angezogen sind
und bringen Sie dann
I
an den Schraubenköpfen an.
1.
Tirez le cordon de la pédale hors de
D
.
2.
Placez
D
sur les ferrures et fixez-le à lʼaide des vis
E
. Ensuite, placez
H
sur les têtes de vis.
3.
Tout en poussant
D
contre le sol, serrez fermement les vis que vous avez desserrées ou
serrées faiblement à lʼétape
2
.
4.
Vérifiez que les 6 vis fixées en
A
et
B
sont toutes fermement serrées, puis placez
I
sur
les têtes de vis.
1.
Из поперечины
D
извлечь педальный шнур.
2.
Поперечину
D
поместить на уголки и закрепить ее винтами
E
. Головки винтов
накрыть колпачками
H
.
3.
Придавливая поперечину
D
к полу, винты, ослабленные или наживленные при
выполнении операции
2
, плотно затянуть.
4.
Убедиться, что вставленные в боковые панели
A
и
B
6 винтов плотно затянуты,
и накрыть их головки колпачками
I
.
1.
Puxe o cabo dos pedais para fora de
D
.
2.
Coloque
D
na parte superior dos braços e fixe-o com os parafusos
E
. Logo, ajuste
H
nas cabeças dos parafusos.
3.
Enquanto empurra
D
contra o chão, aperte firmemente os parafusos que afrouxou ou
apertou levemente no passo
2
.
4.
Verifique se os 6 parafusos colocados em
A
e
B
estão todos apertados com firmeza e,
em seguida, ajuste
I
nas cabeças dos parafusos.
3
1.
3.
3.
2.
4.
2.
L
A
B
F
1.
Hold the underside of the piano unit at least 10 cm in from each end. Set the piano unit
down on the stand so that it is 5 cm clear of the back of the stand.
2.
Move the piano unit so that the screws
L
on the base of the piano body slot into the brackets.
3.
With the piano unit placed on the stand, adjust its position to equalize the difference in
the level of
A
and
B
on each side.
4.
Use the screws
F
to fasten the piano unit to the stand.
1.
ピアノ本体の端から10cm 以上内側の底面を持ちます。スタンドの奥から 5cm程度手前の位置
にピアノ本体を載せます。
2.
ピアノ本体底面のネジ
L
が金具にはまり込むように、ピアノ本体を動かします。
3.
ピアノ本体をスタンドに載せたとき、
A
、
B
との段差が左右で均等になるように位置を調整します。
4.
ネジ
F
で、ピアノ本体とスタンドを固定します。
1.
Sostenga la parte inferior del piano al menos a 10 cm desde cada extremo. Coloque el
cuerpo del piano en el stand, a unos 5 cm desde la parte posterior del mismo.
2.
Mueva el cuerpo del piano de forma que los tornillos
L
situados en la base del piano
encajen en los herrajes.
3.
Con el cuerpo del piano colocado en el stand, ajuste su posición de modo que la
diferencia de nivel entre
A
y
B
sea igual en ambos lados.
4.
Utilice los tornillos
F
para asegurar el cuerpo del piano al stand.
1.
Halten Sie die Piano-Einheit mindestens 10 cm vom jeweiligen Ende an der Unterseite.
Setzen Sie die Piano-Einheit so auf den Ständer, dass hinten auf dem Ständer 5 cm frei
bleiben.
2.
Platzieren Sie die Piano-Einheit so, dass sie mit den Schrauben
L
am Pianoboden in
den Haltern liegt.
3.
Gleichen Sie bei auf den Ständer aufgesetzter Piano-Einheit den Höhenunterschied
zwischen
A
und
B
auf beiden Seiten so ab, dass beide die gleiche Höhe haben.
4.
Sichern Sie die Piano-Einheit mit den Schrauben
F
auf dem Ständer.
1.
Tenez le dessous du piano à au moins 10 cm de chaque extrémité. Placez le piano sur le
stand de manière à ce quʼil soit à 5 cm de lʼarrière du stand.
2.
Déplacez le piano de façon à ce que les vis
L
situées à la base du corps du piano
sʼinsèrent dans les ferrures.
3.
Le piano étant placé sur le stand, ajustez sa position afin dʼégaliser la différence de
niveau
A
et
B
de part et dʼautre.
4.
Utilisez les vis
F
pour fixer le piano au stand.
1.
Взяться за корпус пианино снизу не менее чем в 10 см от каждого из концов. Корпус
пианино опустить на стойку, оставляя между ним и ее тыльной частью просвет в 5 см.
2.
Корпус пианино сдвинуть так, чтобы винты
L
в его основании совпали с
отверстиями на уголках.
3.
После помещения корпуса пианино на стойку отрегулировать его положение так,
чтобы выступы за боковые панели
A
и
B
были одинаковы.
4.
Закрепить корпус пианино на стойке винтами
F
.
1.
Segure o lado inferior da unidade do piano a pelo menos 10 cm de cada extremidade. Coloque
a unidade do piano no stand de modo que fique 5 cm afastada da parte traseira do stand.
2.
Mova a unidade do piano de modo que os parafusos
L
na base do corpo do piano se
encaixem nos braços.
3.
Com a unidade do piano colocada no stand, ajuste sua posição para igualar a diferença
no nível de
A
e
B
em cada lado.
4.
Use os parafusos
F
para apertar a unidade do piano no stand.
4
2.
4.
3.1.
J
J
1.
Insert the pedal unit plug into the pedal jack on the underside of the piano unit and secure
it in place with the hook. Secure the pedal cord using the 3clips
J
.
2.
Insert the AC adapter plug into the power supply jack (DC 24V) on the underside of the
piano unit and secure it in place with the hook. Secure the power cable using
J
. Plug
the power cord provided into the AC adapter and plug the other end into a household
power socket.
1.
ペダルユニットのプラグを、ピアノ本体底面のペダル端子に差し込んで、フックにかけて固定
します。
J
3個でペダルコードを固定します。
2.
ACアダプターのプラグを、ピアノ本体底面の電源端子(DC24V)に差し込んで、フックにかけ
て固定します。
J
で電源ケーブルを固定します。ACアダプター本体と付属の電源コードを接続
して、家庭用コンセントに差し込みます。
1.
Inserte la clavija de la unidad de pedal en la toma de pedal situada en la parte inferior
del piano y asegúrela con el gancho. Asegure el cable del pedal con las 3 presillas
J
.
2.
Inserte la clavija del adaptador de CA en la toma de alimentación (24 V CC) situada en
la parte inferior del piano y asegúrela con el gancho. Asegure el cable de alimentación
mediante
J
. Conecte el cable de alimentación suministrado al adaptador de CA y
conecte el otro extremo a una toma de corriente doméstica.
1.
Schließen Sie den Pedaleinheit-Stecker an die Pedalbuchse auf der Unterseite der Piano-
Einheit an und sichern Sie ihn mit dem Haken. Sichern Sie das Pedalkabel mit 3 Clips
J
.
2.
Schließen Sie den Netzadapterstecker an die Stromversorgungsbuchse (DC24V) auf
der Unterseite der Piano-Einheit an und sichern Sie ihn mit dem Haken. Sichern Sie das
Stromkabel mit
J
. Schließen Sie das mitgelieferte Netzkabel an den Netzadapter und
mit dem anderen Ende an eine Haushaltssteckdose an.
1.
Insérez la fiche du bloc pédale dans la prise de pédale située sur le dessous du piano et
fixez-la en place à lʼaide du crochet. Attachez le cordon de la pédale avec les 3 clips
J
.
2.
Insérez la fiche de lʼadaptateur secteur dans la prise dʼalimentation (DC24V) située sur
le dessous du piano et fixez-la à lʼaide du crochet. Fixez le cordon dʼalimentation à lʼaide
de
J
. Branchez le cordon dʼalimentation fourni sur lʼadaptateur secteur et branchez
lʼautre extrémité sur une prise dʼalimentation domestique.
1.
Штекер шнура педального блока вставить в гнездо для подключения педалей
на нижней стороне корпуса пианино и зафиксировать его с помощью крючка.
Педальный шнур зафиксировать тремя прижимами
J
.
2.
Штекер шнура адаптера переменного тока вставить в гнездо питания («DC 24V»)
на нижней стороне корпуса пианино и зафиксировать его с помощью крючка.
Сетевой кабель зафиксировать прижимом
J
. Прилагаемый сетевой шнур вставить
одним концом в адаптер переменного тока, а другим — в бытовую сетевую розетку.
1.
Insira o plugue da unidade do piano no jaque de pedal no lado inferior da unidade do
piano e fixe-o em posição com o gancho. Fixe o cabo dos pedais com os 3 grampos
J
.
2.
Insira o plugue do adaptador de CA no jaque de fornecimento de energia (DC 24V) no
lado inferior da unidade do piano e fixe-o em posição com o gancho. Fixe o cabo de
alimentação com
J
. Conecte o cabo de alimentação fornecido no adaptador de CA e
conecte a outra extremidade em uma tomada elétrica doméstica.
5
1. 2.