EN/ES English LK-190 LK-265 LK-266 USER’S GUIDE This recycle mark indicates that the packaging conforms to the environmental protection legislation in Germany. Esta marca de reciclaje indica que el empaquetado se ajusta a la legislación de protección ambiental en Alemania. Español Please keep all information for future reference. Safety Precautions Before trying to use the Digital Keyboard, be sure to read the separate “Safety Precautions”.
NOTICE This equipment has been tested and found to comply with the limits for a Class B digital device, pursuant to Part 15 of the FCC Rules. These limits are designed to provide reasonable protection against harmful interference in a residential installation. This equipment generates, uses and can radiate radio frequency energy and, if not installed and used in accordance with the instructions, may cause harmful interference to radio communications.
Connecting External Devices General Guide EN-2 Timeout . . . . . . . . . . . . . . . . . . . . . . . . . . . . . . . . . . EN-4 Using the 10-key Pad (bq) . . . . . . . . . . . . . . . . . . . EN-4 Using the FUNCTION Button (3) . . . . . . . . . . . . . EN-4 Getting Ready to Play EN-7 Preparing the Music Stand . . . . . . . . . . . . . . . . . . . EN-7 Power Supply . . . . . . . . . . . . . . . . . . . . . . . . . . . . . EN-7 Playing the Digital Keyboard EN-8 Turning on Power and Playing . . . . .
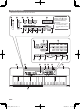
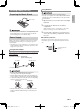
General Guide • Illustrations in this User’s Guide show the LK-265. 1 2 3 4 5 7 8 9 bk bl bn br cn co The following explains the meaning of the $ symbol that appears on the product console and with the key names below. $ : Indicates a function that is enabled by holding down the button for some time. 6 bm bo bp bs bt cp cq bq ck cr cs cl cm cn ct EN-2 LK265_190-ES-1A.
1 P(Power) button ☞EN-8 bo TONE button ☞EN-9, 14 2 VOLUME slider ☞EN-8 bp SONG BANK button ☞EN-13, 21 3 FUNCTION, $APP (LK-265/266 only) button ☞EN-4, 20 English General Guide bq Number buttons, [–]/[+] keys ☞EN-4 br DANCE MUSIC button ☞EN-12 4 VIRTUAL HALL, $KEY LIGHT button ☞EN-8, 10 KEY LIGHT button ☞EN-8 5 METRONOME, $BEAT button ☞EN-8 bs EASY MODE button ☞EN-15 bt LISTEN button ☞EN-16 ck FOLLOW button ☞EN-16 cl sBACK button ☞EN-16 6 TEMPO buttons ☞EN-9, 14 cm dNEXT butt
General Guide Timeout If you do not perform any operation for a while configuring settings, the display will return to the previous screen automatically. Using the 10-key Pad (bq) Use the number buttons and the [–] and [+] keys to change displayed numbers and settings. • Negative values cannot be input using the number buttons. Use [+] (increase) and [–] (decrease) instead. [–] and [+] Keys You can use the [+] (increase) and [–] (decrease) keys to change the displayed number or value.
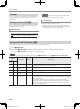
General Guide Parameter Display Description LK-265/ 266 LK-190 6 6 Dance Music Tempo Setting DM Tempo Specifies whether or not the performance tempo changes to the value that is preset for each pattern. on: When the pattern is switched, the performance tempo changes to the tempo suggested for the selected pattern. Since the tempo changes, melody can be completely changed. oFF: Even if the pattern is switched, the performance tempo remains at its current setting, without changing.
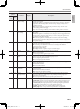
General Guide 3 key presses Parameter Display Description LK-265/ 266 LK-190 15 14 Power On Alert Demo2 Keyboard keys will light to remind you that power is on if you do not perform any operation for about six minutes. You can disable power on alert to ensure that keyboard keys do not light during a concert, etc. on: Keyboard keys light after six minutes of non-operation. oFF: Keyboard keys do not light after six minutes of non-operation.
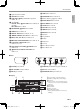
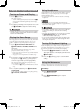
Preparing the Music Stand Music stand Using Batteries • Be sure to turn off power before loading batteries. • It is up to you to prepare six commercially available AA-size batteries. Do not use oxyride batteries or any other nickel based batteries. 1. Open the battery cover on the bottom of the Digital English Getting Ready to Play Keyboard. 2. Load six AA-size batteries into the battery compartment.
Playing the Digital Keyboard Turning on Power and Playing 1. Press 1P (Power). This turns on power. • To turn off the Digital Keyboard, hold down the 1P (Power) button until the Digital Keyboard’s display goes blank. 2. Try playing something on the keyboard. You could Using Headphones Using headphones cuts off output from the built-in speakers, which means you can practice playing even late at night without disturbing others. • Be sure to turn down the volume level before connecting headphones.
1. Hold down 5$ BEAT until the beats per measure setting screen appears on the display. 2. Use bq (10-key) to enter the number of beats per measure. • The bell will not sound if you specify 0 for this setting. In this case, all beats are indicated by a click sound. This setting lets you practice with a steady beat, without worrying how many beats there are in each measure. Changing the Metronome Tempo Use the following procedure to change the tempo of the metronome. 1. Press 6 TEMPO.
Controlling the Keyboard Sounds Using VIRTUAL HALL (LK-265/266 only) Turning on the VIRTUAL HALL function lets you play with the acoustics of a concert hall. 1. Press 4 VIRTUAL HALL to turn on the VIRTUAL HALL function. 2. To turn off the VIRTUAL HALL function, press 4 VIRTUAL HALL again. • The reverb setting turns off automatically whenever the VIRTUAL HALL function is turned on.
Playing in the Dance Music Mode English Dance Music Mode In the Dance Music Mode, you can combine and play multiple type of pattern phrases, and apply effects to songs that are playing, in order to enjoy dance music. Pattern phrases of each part can be combined, making it possible to enjoy dance music like a DJ. Entering the Dance Music Mode (page EN-12) changes the functions of the keyboard keys as shown below.
Playing in the Dance Music Mode Track reset switch Pressing this key while playback is in progress returns playback to the beginning of the currently playing phrase. Auto build up switches These keyboard keys can be used to apply build up effects that are a characteristic of dance music. See “Creating a Build Up” (page EN-12). Using the Dance Music Mode 1. Press br DANCE MUSIC. 2.
Dance Music Volume (DM Vol.) Setting See “Using the FUNCTION Button (3)” (page EN-4). Dance Music Sync Type (DM Sync) Setting See “Using the FUNCTION Button (3)” (page EN-4). Dance Music Tempo (DM Tempo) Setting See “Using the FUNCTION Button (3)” (page EN-4). Dance Music Tone (DM Tone) Setting See “Using the FUNCTION Button (3)” (page EN-4). Playing Built-in Songs With this Digital Keyboard, built-in music data is referred to as “songs”.
Playing Built-in Songs ■ Skip Back 1. Press 8s REW. This skips song playback back to the previous measure. Each press of 8s REW skips back one measure. Holding down 8s REW skips back at high speed until you release it. • Pressing 8s REW while song playback is stopped performs lesson function phrase skip back (page EN-16).
The methods you can use for practice with this Digital Keyboard are described below. ● Easy Mode Press keyboard keys as they light. The melody plays as keys are pressed, regardless of which keys are pressed. This is a good way for beginners to master key press timing while enjoying playing on the keyboard. ● Step Up Lesson Lets you practice a song step-by-step until you can master the entire song. Lesson 1: Listen to the song. Lesson 2: Play with display guide.
Using Built-in Songs to Master Keyboard Play Selecting the Song, Phrase, or Part You Want to Practice First, select the song, phrase, or part you want to practice. 1. Select the song you want to practice (page EN-13). 2. Play notes on the keyboard in accordance with the instructions provided on the display and by Voice Fingering Guide. Guidance will appear on the display to show you which keyboard keys to press. Voice Fingering Guide uses a simulate voice to announce which finger you should use.
Turning Off Voice Fingering Guide (Speak) See “Using the FUNCTION Button (3)” (page EN-4). Turning Off Note Guide (NoteGuid) See “Using the FUNCTION Button (3)” (page EN-4). Turning Off Performance Evaluation (Scoring) See “Using the FUNCTION Button (3)” (page EN-4). Playing without Phrase Repeat For Lesson 1 or 2, you can disable repeat of the phrase you are practicing. 1. Press 7 REPEAT. This disables phrase repeat.
Using Auto Accompaniment Playing All Parts Auto Accompaniment with Chords Playing a chord with your left hand automatically adds bass and harmony accompaniment parts to the currently selected rhythm. It is just like having your own personal back up group on call. 1. Start play of the Auto Accompaniment rhythm part. 2. Press bm ACCOMP. This enables chord input on the accompaniment keyboard. Accompaniment keyboard 3. Use the accompaniment keyboard to play chords.
Using Auto Accompaniment Auto Accompaniment Pattern Variations Use the following procedures to play intro and ending patterns, to play fill-in patterns, and to play variations of basic Auto Accompaniment patterns. Using One-Touch Preset With One-Touch Preset, the Digital Keyboard automatically configures optimal tone, tempo, and other settings in accordance with the rhythm pattern you select. 1.
Linking with an Application (APP Function) (LK-265/266 Only) APP Function Your Digital Keyboard can connect with a smartphone, tablet, or other smart device, which can then use a special app to playback songs from other than Digital Keyboard memory. You can play along with song playback on the keyboard. Preparing the APP Function for Use You need to perform the steps below to prepare the APP function for use in either the Play Mode or the Store Mode. 1.
Linking with an Application (APP Function) (LK-265/266 Only) 1. Prepare the APP function for use (page EN-20). 2. Use bq (10-key) [–] and [+] keys to select the song bank number where you want the song transferred from the app to be stored. If you do not select a song bank number here, the Digital Keyboard will select an available storage location automatically, so you can skip this step if you do not need to specify a particular song bank number.
Connecting External Devices Error Messages This section explains the meanings of the error messages that appear on the display if the data transfer operation fails or if some other problem occurs. To clear an error message, pressing any button other than the power button. Note that the “EnterApp” message will disappear automatically after a few seconds if you do not perform any operation.
Connecting External Devices Connecting a Microphone English Connect a commercially available dynamic microphone to the dm MIC IN jack. When connecting a microphone, be sure to first adjust the dl MIC VOLUME knob to a low setting. Keyboard microphone input jack: See “Specifications” (page EN-26). • Turn off the microphone and the Digital Keyboard before connecting them. • It will take a few seconds before you can use the microphone after you turn on the Digital Keyboard. EN-23 LK265_190-ES-1A.
Reference Troubleshooting Symptom Action Included Accessories I can’t find something that should be here. Carefully check inside all of the packing materials. Power Requirements Power will not turned on. • Check the AC adaptor or make sure that the batteries are facing correctly (page EN-7). • Replace the batteries with new ones or switch over to AC adaptor power (page EN-7).
Symptom Action Notes keep sounding, without stopping. • Turn power off and then back on to initialize all Digital Keyboard settings (page EN-8). • Replace the batteries with new ones or switch over to AC adaptor power (page EN-7). Some notes are cut off while they are playing. Notes are cut off whenever the number of notes being sounded exceeds the maximum polyphony value of 48 (24 for some tones). This does not indicate malfunction. The volume or tone setting I made has changed.
Reference Specifications Model LK-190/LK-265/LK-266 Keyboard 61 keys Touch Response (LK-265/266 only) 2 types, Off Key Lighting Maximum number of keys simultaneously lit: 4 Maximum Polyphony 48 notes Tones Preset Tones 400; 1 stereo piano tone Effects Reverb (10 types, Off), Dance Music effects, Virtual Hall (LK-265/266 only) Metronome Beat Off, 1 to 9 beats Tempo 20 to 255 Song Bank Preset Songs 60 User Songs (LK-265/266 only) Up to 30/Total Memory Capacity: Approximately 32 kilobytes
Speakers 10cm × 2 (Output: 2.0W+2.0W) Power Consumption 9.5V = 5.5W Dimensions 94.6 (W) × 30.7 (D) × 9.2 (H) cm (37 1/4 × 12 1/8 × 3 5/8 inch) Weight (Excluding batteries) Approximately 3.6 kg (7.9 lbs) English Reference • Design and specifications are subject to change without notice. Operating Precautions Be sure to read and observe the following operating precautions. ■ Location Avoid the following locations for this product.
Appendix/Apéndice Tone List/Lista de tonos No./ Nº Tone Name/ Nombre del tono PIANO 001 STEREO GRAND PIANO 002 GRAND PIANO 003 BRIGHT PIANO 004 MODERN PIANO 005 DANCE PIANO 006 MELLOW PIANO 007 STRINGS PIANO 008 HONKY-TONK 009 OCTAVE PIANO 010 BASS/PIANO 011 ELEC.GRAND PIANO 012 MODERN E.G.PIANO 013 HARPSICHORD 014 HARPSICHORD & STRINGS ELECTRIC PIANO 015 ELEC.PIANO 016 FM E.PIANO 017 60’S E.PIANO 018 CHORUS E.PIANO 1 019 CHORUS E.PIANO 2 020 MODERN E.PIANO 021 SOFT E.PIANO 022 SYNTH-STR.E.
Appendix/Apéndice No./ Nº Tone Name/ Nombre del tono 128 FRENCH HORN SECTION 129 BRASS 130 BRASS SECTION 1 131 BRASS SECTION 2 132 BRASS SECTION 3 133 MELLOW BRASS 134 HARD BRASS 135 BRASS SFZ 136 BRASS & STRINGS 137 SYNTH-BRASS 1 138 SYNTH-BRASS 2 139 ANALOG SYNTH-BRASS 1 140 ANALOG SYNTH-BRASS 2 REED/PIPE 141 ALTO SAX 1 142 ALTO SAX 2 143 HARD A.SAX 144 BREATHY A.
Appendix/Apéndice No./ Nº Tone Name/ Nombre del tono 266 KOTO GM TONES 267 GM PIANO 1 268 GM PIANO 2 269 GM PIANO 3 270 GM HONKY-TONK 271 GM E.PIANO 1 272 GM E.PIANO 2 273 GM HARPSICHORD 274 GM CLAVI 275 GM CELESTA 276 GM GLOCKENSPIEL 277 GM MUSIC BOX 278 GM VIBRAPHONE 279 GM MARIMBA 280 GM XYLOPHONE 281 GM TUBULAR BELL 282 GM DULCIMER 283 GM ORGAN 1 284 GM ORGAN 2 285 GM ORGAN 3 286 GM PIPE ORGAN 287 GM REED ORGAN 288 GM ACCORDION 289 GM HARMONICA 290 GM BANDONEON 291 GM NYLON STR.
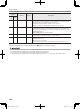
Appendix/Apéndice Drum Assignment List/Lista de asignación de batería Key/ Clave C-1 D-1 E-1 F-1 G-1 A-1 B-1 C0 D0 E0 F0 G0 A0 B0 C1 D1 E1 F1 G1 A1 B1 C2 D2 E2 F2 G2 A2 B2 C3 D3 E3 F3 G3 A3 B3 C4 D4 E4 F4 G4 A4 B4 C5 D5 E5 F5 G5 A5 B5 C6 D6 E6 F6 G6 A6 B6 C7 D7 E7 F7 G7 A7 B7 C8 D8 E8 F8 G8 A8 B8 C9 D9 E9 F9 G9 Note No.
Appendix/Apéndice Rhythm List/Lista de ritmos Rhythm name/ Nombre del ritmo No.
Appendix/Apéndice Song List/Lista de canciones No.
Appendix/Apéndice Fingering Guide/ Guía de digitación *1 With Fingered 2, interpreted as Am7. *2 With Fingered 2, interpreted as Am7b5. *3 Inverted form not supported in some cases. Fingered 1, Fingered 2 Chords/ Acordes Fingered 1, Fingered 2 *1 Con Fingered 2, se interpreta como Am7. *2 Con Fingered 2, se interpreta como Am7b5. *3 En algunos casos no se puede usar la forma invertida.
LK265_190-ES-1A.indd Root 65 C C#/(Db) D (D#)/Eb E F F#/(Gb) G (G#)/Ab • Debido a que el rango de entrada de acordes es limitado, es posible que este modelo no admita algunos de los acordes mostrados arriba. • Since the chord input range is limited, this model may not support some of the chords shown above.
EN/ES English LK-190 LK-265 LK-266 USER’S GUIDE This recycle mark indicates that the packaging conforms to the environmental protection legislation in Germany. Esta marca de reciclaje indica que el empaquetado se ajusta a la legislación de protección ambiental en Alemania. Español Please keep all information for future reference. Safety Precautions Before trying to use the Digital Keyboard, be sure to read the separate “Safety Precautions”.