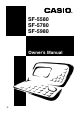
SF-5580 SF-5780 SF-5980 Owner’s Manual Q
GUIDELINES LAID DOWN BY FCC RULES FOR USE OF THIS UNIT IN THE U.S.A. (not applicable to other areas). NOTICE This equipment has been tested and found to comply with the limits for a Class B digital device, pursuant to Part 15 of the FCC Rules. These limits are designed to provide reasonable protection against harmful interference in a residential installation.
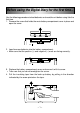
Before using the Digital Diary for the first time... Use the following procedure to load battereis and reset the unit before using it for the first time. 1. Remove the screw that holds the main battery compartment cover in place and open the cover. RESET 2. Load two new batteries into the battery compartment. • Make sure that the positive (+) and negative (–) ends are facing correctly. RESET 3. Replace the battery compartment cover and secure it with its screw.
–2– 5. Press the RESET button on the back of the Digital Diary with a thin, pointed object. RESET button RESET 6. Press Y. 7. Press OK to reset the Digital Diary or ESC to abort. • At this time the message “SET TIME!” appears. • After about two seconds, the Home Time screen appears. 8. Press FUNC, select “Time set”, and then use the procedure on page 18 to set the Home Time. • If you turn power off without setting the Home Time, the “SET TIME!” message appears the next time you turn power on.
■ Turning Power On and Off Press ON/OFF to turn power on and off. Important! • If nothing appears on the display when you turn on power, it means that the main batteries are low. Replace the batteries (page 13) and press the RESET button to resume normal operation. • Be sure to press the RESET button (page 2) after loading main batteries for the first time or if the previous set of batteries went dead.
Contents Before using the Digital Diary for the first time... ............... 1 Turning Power On and Off ........................................................... 3 Before using the Digital Diary... ............................................ 8 Introduction ................................................................................... 8 Write down important data somewhere! .................................... 8 Important Precautions .................................................................
Inputting Dates and Times ......................................................... 25 Display Formats .......................................................................... 26 Telephone Directory Mode .................................................. 27 Record Summary ........................................................................ 28 Memo Mode .......................................................................... 29 Record Summary ........................................................
–6– Expense Manager Mode ...................................................... 44 Expense Type Labels and Icons ................................................ 45 Payment Type Labels ................................................................. 46 Exchange Rate ............................................................................ 46 Periodic Expense Report ........................................................... 47 Record Summary .............................................................
Data Communications ......................................................... 66 Setting Up for Data Communications ....................................... 66 Sending Data ............................................................................... 68 Sending All Data Items In a Mode ............................................. 69 Technical Appendix ............................................................. 71 Memory Capacity ........................................................................
Before using the Digital Diary... Introduction Congratulations on your selection of CASIO’s new SF-5580/SF-5780/SF-5980 (referred to as Digital Diary in this manual). Please keep your manual and all information handy for future reference. Write down important data somewhere! The memory of your Digital Diary holds information only while power is supplied by the batteries. Always write down important data somewhere.
Getting Started Make sure you read this part of the manual.
– 10 – ■ Display When lighting is dim, you can turn on an EL (electro-luminescent) backlight for easier viewing. To turn on the EL backlight Pressing the LIGHT key turns on the backlight of the display. If you do not perform any operation for about 15 seconds, the backlight automatically turns off. However, note that once the backlight is lit, it will stay on as long as you continue to operate the Digital Diary.
■ All-Reset Use the following procedure to reset the unit to its initial settings. Important! • Do not use a very sharp pencil or other object to press the RESET button. • Be sure to reset the unit before using it for the first time. • Perform the reset operation only after main batteries and back-up battery are correctly installed. • Be sure to press the RESET button (page 2) after loading main batteries for the first time or if the previous set of batteries went dead.
– 12 – 3. Press FUNC, select “Time set”, and then use the procedure on page 18 to set the Home Time. • If you turn power off without setting the Home Time, the “SET TIME!” message appears the next time you turn power on. The Digital Diary will not operate properly until you set the Home Time. When to press N for “no” • After replacing the main batteries. • When you are not resetting the unit to clear all data and settings. • When you are not resetting the unit after a data error (page 73). 1.
Note, however, that pressing the RESET button on the back of the unit and then performing steps 1 and 2 of the procedure under “When to press N for “no”” above can sometimes restore normal operation. When the low battery message appears on the display even if you perform these steps, it means you should replace the main batteries as soon as possible. Note • Take care that you do not make a mistake and delete memory contents at this time.
– 14 – To replace the main batteries Important! • Do not remove the main batteries from the Digital Diary while the back-up battery is removed. • Be sure to replace both batteries with two new ones. Do not mix an old battery with a new one. • Be sure to press the RESET button (page 2) after loading main batteries for the first time or if the previous set of batteries went dead.
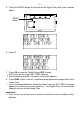
• Be sure to replace the back-up battery at least once every 5 years. Otherwise, you run the risk of losing data stored in memory. 1. Press OFF to turn power off. 2. Remove the screw that holds the back-up battery compartment cover in place and open the cover. RESET 3. Insert a thin, pointed object into (A) and remove the old battery. RESET (A) 4. Load a new battery into the compartment, making sure that its positive side is facing up (so you can see it). 5.
– 16 – ■ Function Menus • Pressing FUNC displays a function menu, whose contents differs depending on the mode. • Pressing SHIFT FUNC displays a function menu of general system settings (system function menu). • Input the number of the left of the function you want to use to select it. • To exit from a function menu, press ESC. ■ System Language Your Digital Diary is capable of producing messages in any one of three languages (English, French, Spanish). To select the system language 1. 2.
To turn key input sound on and off 1. Press SHIFT FUNC and then select “Key tone”. Currently selected setting 2. Use H and J to turn the key input sound on and off. • The KEY indicator is on the display while the key input sound is on. 3. Press OK to quit. ■ Destructive Backspace When destructive backspace is turned on, the character at the cursor position is deleted when you press the BS key. To turn destructive backspace on and off 1. Press SHIFT FUNC and then select “Backspace”. 2.
Home Time Mode The time kept in the Home Time Mode is used for control of various time based functions. To enter the Home Time Mode Press the HOME/WORLD key once. To set your Home Time zone 1. In the Home Time Mode, press FUNC and then select “Time zone change”. 2. Use K and L to scroll through the city names. • See page 23 for a complete list of time zones. 3. When the city you want is displayed, press OK. • You can change your Home Time zone later if you like.
To switch between standard time and daylight saving time In the Home Time Mode, press FUNC and then select “Daylight savings”. • This toggles to the opposite setting and returns to the Home Time Mode screen. indicates daylight saving time. To switch between 12-hour and 24-hour timekeeping In the Home Time Mode, press FUNC and then select “12/24 hours”. • This toggles to the opposite setting and returns to the Home Time Mode screen. The AM/PM indicator indicates 12-hour timekeeping.
– 20 – How the Daily Alarm works The daily alarm sounds at the alarm time you set. A snooze feature sounds the alarm more than once, helping to make sure you don’t oversleep or miss an appointment. About the snooze feature The snooze feature activates (and the SNOOZE indicator appears on the display) if you do not press any key or if you press the SPACE key after the Daily Alarm starts to sound. • If you do not press any key, the alarm stops after 20 seconds, and sounds two more times every 10 minutes.
World Time Mode With World Time you can view the current time in time zones around the world. To enter the World Time Mode Press the HOME/WORLD key twice. From the Home Time Mode, press HOME/ WORLD only once. Hours different from Home Time zone Current World Time setting • Every time you press HOME/WORLD, the Digital Diary switches between the Home Time Mode and World Time Mode. To scroll through World Time Mode zones In the World Time Mode, use K and L to scroll from zone-to-zone.
– 22 – ■ Zone Information Screen The zone information screen shows the name of a major city and the time difference from your Home Time for each World Time zone. To display the zone information screen In either the World Time Mode or Home Time Mode, press DISP CHNG to change to the zone information screen for the displayed zone. Time difference from your Home Time zone City in zone • To exit the zone information screen, press DISP CHNG, ESC, or HOME/ WORLD.
City List City Name Time Difference Midway Honolulu Anchorage Los Angeles Denver Chicago New York Santiago R. de Janeiro F. de Noronha Azores London Rome Jerusalem Moscow Abu Dhabi Karachi Dhaka Bangkok Hong Kong Tokyo Sydney Noumea Auckland – 06 – 05 – 04 – 03 – 02 – 01 + 00 + 01 + 02 + 03 + 04 + 05 + 06 + 07 + 08 + 09 + 10 + 11 + 12 + 13 + 14 + 15 + 16 + 17 Other Cities in Zone San Francisco, Seattle, Las Vegas El Paso Dallas, Mexico City, Houston Washington D.C.
Data Bank Operations This part of the manual tells you how to input and edit text, and how to protect your personal data with a password. ■ Inputting Text Input or correction is performed at the current cursor location. About “data items” and “entries” Data item Name entry Phone 1 entry Phone 2 entry Phone 3 entry Company entry Email entry Note/Title entry Address entry The above shows a typical Telephone Directory data item, which is made up of a number of entries.
To shift the keyboard Press SHIFT to temporarily shift the keyboard. The indicator “S” on the screen shows that the keyboard is shifted. If the keyboard is set for upper-case letters (by the CAPS key), pressing SHIFT changes to lower-case. As soon as you input one character, the keyboard unshifts. To input punctuation marks and other symbols Press CODE and then any key marked with the punctuation or symbol you want to input. The “CODE” indicator shows that the CODE key was pressed.
– 26 – Times • Use the 12-hour/24-hour format setting of the Home Time. • With 12-hour format, press A for AM or P for PM. Dates • Use the preset date format (page 19). • The year input range is 1901 through 2099. • You can enter 20th century years using only two digits (96 = 1996). 21st century years must be entered in four digits. ■ Display Formats Two display formats (data display format and index display format) are used. Press DISP CHNG to switch between the index and data display formats.
Telephone Directory Mode Telephone Directory data is automatically sorted according to name entries. To enter the Telephone Directory Mode 1. Press TEL to display the initial Telephone Directory Mode screen. File title Number of records stored in area Memory usage Initial prompt 2. Press TEL again to change to another telephone file. • Each press of TEL changes the file in the following sequence. TEL-1 TEL-2 TEL-3 To input Telephone Directory data 1.
– 28 – Cursor Current file title 3. Input up to 13 characters for the title. • See page 24 for details on how to input characters. 4. Press OK to quit. To specify Telephone Directory Mode index display contents 1. Press TEL to display the initial Telephone Directory Mode screen, and then press K, L, “, or ‘ to change to the index display. 2. Press FUNC and then select “List type”. 3. Press the number key that corresponds to the entry you want to appear on the index display.
Memo Mode Memo data is stored in the sequence it is input, without sorting. To enter the Memo Mode 1. Press MEMO to display the initial Memo Mode screen. File title Number of records stored in area Memory usage Initial prompt 2. Press MEMO again to change to another Memo Mode file. • Each press of MEMO changes the file in the following sequence. MEMO-1 MEMO-2 MEMO-3 To input Memo Mode data 1. Use MEMO to display the initial screen of a Memo Mode file. 2. Input the first line and press B.
Calendar Mode The Calendar displays calendars from January 1901 through December 2099. • Pressing SCHEDULE in the Calendar Mode enters the Schedule Keeper Mode for the date selected on the Calendar Mode Screen. • If the date cursor is located at a date that includes Reminder Mode data, pressing REMINDER enters the Reminder Mode for that date. To enter the Calendar Mode Press CALENDAR.
2. Input the month, day and year and then press OK. To jump a specific number of days 1. In the Calendar Mode, move the date cursor to the start date. 2. Press ! (forward) or @ (backward). 3. Input the number of days you want to jump and then press OK. • You can input a value in the range of 0 to 999. 4. Press Y to include holidays or N to exclude holidays. • A holiday is any highlighted date. About the “active” calendar The calendar on the left side of the display is the “active” calendar.
– 32 – ■ Highlighting Calendar Dates You can highlight calendar dates to indicate holidays or other special events to remember. To highlight and unhighlight individual dates 1. Move the date cursor to the date. 2. Press SPACE to highlight or unhighlight the date. To highlight days of the week for multiple weeks Example: To highlight all Sundays from July 1996 to December 1997. 1. In the Calendar Mode, press FUNC and then select “Weekly holiday set”. Starting month Ending month 2.
■ Working Day Count Use the following procedures to count the number of working days. To count working days 1. Move the date cursor to the start day. 2. Press FUNC and then select “Working day count”. Starting date Currently selected date Count 3. Use the K, L, H and J to move the date cursor. • The count changes whenever you move the date cursor. • The date cursor does not stop at highlighted dates, and highlighted dates are never counted.
Schedule Keeper The Schedule Keeper lets you input the time and a description of your appointment and set Schedule Alarms. • Pressing REMINDER in the Schedule Keeper Mode enters the Reminder Mode for the date that is currently selected in the Schedule Keeper Mode. Pressing CALENDAR displays the month with the date cursor located at the Schedule Keeper date. To enter the Schedule Keeper Mode Press SCHEDULE to display the initial Schedule Keeper Mode screen.
• Note that this procedure cannot be started from the daily schedule screen. 2. Input the month, day and year, and then press OK. To scroll from one date to another While the Schedule Keeper screen for a date is already displayed, press K or “ to scroll back to the previous date. Pressing L or ‘ scrolls to the following date. • If the date that is displayed contains more than one Schedule Keeper data entry, the above keys scroll through the data one-by-one.
– 36 – • While the alarm time is selected, pressing K and L selects one of three alarm types. Same-day alarm. This type of alarm is indicated when the first alarm time that appears is the same as the appointment start time input by you in step 7. This is the only type of alarm that allows you to set a time. Previous-day alarm. This type of alarm is indicated when the first alarm time that appears is “-24:00”.
To change schedule type labels and icons 1. 2. 3. 4. • Press SCHEDULE to display the initial Schedule Keeper Mode screen. Press FUNC and then select “Define type”. Use K and L to move the pointer to the schedule type you want to change. Input up to 13 characters for the new label you want to use. Skip this step if you don’t want to change the label or if you want to wait until after you change the schedule type icon. 5. Press DISP CHNG to display the menu of schedule type icons.
– 38 – ■ Daily Schedule Screen The daily schedule screen provides a quick overview of appointments scheduled for the day. Multiple-day appointment Appointment without time Normal appointment (includes time and description) You should use the daily schedule screen to input multiple-day appointments. To display the daily schedule screen 1. In the Schedule Keeper Mode, display the screen for the date whose schedule you want to view. 2. Press DISP CHNG to change to the daily schedule screen.
Reminder Mode The Reminder Mode helps you keep track of anniversaries, birthdays, and other important events. To enter the Reminder Mode Press REMINDER to display the initial Reminder Mode screen. Mode Number of records stored in mode Memory usage Initial prompt • Pressing REMINDER in the Calendar Mode or Schedule Keeper Mode enters the Reminder Mode for the date selected in the Calendar Mode or Schedule Keeper Mode. To input Reminder data 1. 2. 3.
– 40 – Note • You must input a description. After that, you can skip any input by pressing OK without inputting anything. ■ Reminder Alarms When a Reminder Alarm time is reached, an alarm sounds for 20 seconds and the corresponding Reminder data appears on the display. Press any key to stop the alarm and return to the screen that was shown before the alarm began to sound. Note the following important points when you are using a Reminder Alarm.
To Do Mode You can classify items according to priority, and even input a To Do message and icon. To enter the To Do Mode 1. Press TO DO to display the initial To Do Mode screen. File title Number of records stored in area Memory usage Initial prompt 2. Press TO DO again to change to another To Do file. • Each press of TO DO changes the file in the following sequence. TO DO-1 TO DO-2 TO DO-3 To input To Do data 1. 2. 3. 4. 5. 6. Use TO DO to display the initial screen of a To Do file.
– 42 – 2. Press FUNC and then select “File title”. Cursor Current file title 3. Input up to 13 characters for the title. 4. After you finish, press OK. To specify To Do Mode index display contents 1. Press TO DO to display the initial To Do Mode screen, and then press K, L, “ or ‘ to change to the index display. 2. Press FUNC and then select “List type”. Pointer (selected type) Marker (current setting) 3.
■ How To Do Data is Sorted To Do data is sorted into chronological order when it is stored in memory. ■ Priority Icons To Do Mode priorities are assigned icons that appear on the screen whenever you assign a priority. To priority icons 1. Press TO DO to display the initial To Do Mode screen. 2. Press FUNC and then select “Define type”. Pointer 3. Use K and L to move the pointer to the priority whose icon you want to change. 4. Press DISP CHNG to display the menu of priority icons. 5.
Expense Manager Mode With the Expense Manager you can store expense data and produce a report that shows totals for any specific period. To enter the Expense Manager Mode 1. Press EXPENSE to display the initial Expense Manager Mode screen. File title Number of records stored in area Memory usage Initial prompt 2. Press EXPENSE again to change to another Expense Manager file. • Each press of EXPENSE changes the file in the following sequence.
To change a file title 1. Use EXPENSE to display the initial screen of an Expense Manager file. 2. Press FUNC and then select “File title”. Cursor Current file title 3. Input up to 13 characters for the title. 4. Press OK to quit. ■ Expense Type Labels and Icons Expense type data includes an icon and a label. To change expense type labels and icons 1. Press EXPENSE to display the initial Expense Manager Mode screen. 2. Press FUNC and then select “Expense types”. Pointer 3.
– 46 – 8. Press OK to store all your changes and return to the initial Expense Manager Mode display. • You could change the expense type label before pressing OK in step 8 if you have not already done so. To specify Expense Manager Mode index display contents 1. Press EXPENSE to display the initial Expense Manager screen, and then press K, L, “, or ‘ to change to the index display. 2. Press FUNC and then select “List expense type”. Pointer (selected type) Marker (current setting) 3.
To set the exchange rate 1. Press EXPENSE to display the initial Expense Manager Mode screen. 2. Press FUNC and then select “Exchange rate”. Current setting 3. Input an exchange rate. • The exchange rate can have an integer part up to 12 digits and a decimal part up to 12 digits. 4. Press OK to quit. ■ Periodic Expense Report The following procedure produces an on-screen report of all your expenses. To produce a periodic expense report 1.
Searching for Data This section explains everything you need to know about searching for and recalling data. ■ Scroll Search Scroll search can be used in the Telephone Directory, Memo, Schedule, Reminder, To Do, and Expense Manager modes. To recall data using scroll search 1. 2. 3. 4. Display the initial screen of the mode where you want to search. Press “ or ‘ to change to the index display (page 26). Use K and L to scroll line-by-line. Use “ and ‘ to scroll screen-by-screen.
■ Wild Card Search Wild card search can be used in the Telephone Directory, Memo, Schedule, Reminder, and To Do modes. To recall data using wild card search 1. Enter the mode where you want to search for data. • Wild card search can be started from the initial screen, the index display, or the data display. 2. Press FUNC and then select “Wild card search”. 3. Input some characters and press OK.
Editing Data The procedures described here can be used in the Telephone Directory, Memo, Schedule, Reminder, To Do, and Expense Manager modes. To edit data 1. Enter the mode that contains the data you want to edit, and recall the data (page 48). 2. Change to the data display. 3. Press FUNC and then Select “Edit record”. 4. Make any changes in the data that you want. 5. Press OK to quit.
Deleting Data Use these procedures to delete data. ■ Deleting a Single Data Item This procedure can be used in the Telephone Directory, Memo, Schedule, Reminder, To Do, and Expense Manager modes. To delete a single data item 1. Enter the mode that contains the data you want to delete, and recall the data (page 48). • If you are using the index display (page 26), move the data item into the first line of the index display. • If you are using the data display (page 26), simply display the item. 2.
– 52 – 3. Use K and L to move the pointer to the file whose setting you want to change, and then use H and J to change the setting. • Files set to “Yes” will be deleted, while those set to “No” will not. 4. Press OK. • At this time the message “Are you sure (Y/N)?” appears. 5. Press Y to delete or N to abort. To delete all data items from a single file mode (Schedule Keeper, Reminder) 1. Display the initial screen of the mode that contains the data you want to delete. 2.
To delete all marked data items 1. While the index display of the To Do or Expense Manager Mode is on the screen, press FUNC and then select “Delete marked records”. • At this time the message “DELETE MARKED RECORDS (Y/N)?” appears. 2. Press Y to delete or N to abort. ■ Deleting All Data Items In Specific Modes Use this procedure to delete all data items in selected modes. To delete all data items in specific modes 1. From any screen, press SHIFT FUNC and then select “Delete all”.
Secret Function Your Digital Diary lets you protect data you store in the Telephone Directory, Memo, Schedule, Reminder, To Do, and Expense Manager modes (protected modes) with a password. To register a password 1. Press SHIFT FUNC and then select “Password”. • At this time, “ENTER PASSWORD” appears on the display. 2. Input the password and press OK to register it. • A password can be up to 6 characters long. You can use any alphabetic characters or numerals, /, @, or spaces inside a password.
3. Press SHIFT FUNC and then select “Password”. 4. Select “Modify password”, which causes the currently registered password to appear. 5. Make any changes to the password you want, and then press OK to store the new password. To delete the password 1. Turn on the Digital Diary. • “INPUT PASSWORD” appears on the display. 2. Input the correct password and press OK. 3. Press SHIFT FUNC and then select “Password”. 4.
Conversion Modes Your Digital Diary actually gives you two conversion modes, one for metric conversion and one for currency conversion. To enter the Conversion Modes 1. Press CONV to display the initial Unit Conversion Mode screen. Unit Conversion direction Equivalent (1 inch = 2.54cm) Input/result area 2. Press CONV again to change to the Currency Conversion Mode (page 57) and display the initial Currency Conversion Mode screen.
■ Metric Conversions All conversion values in this mode are preset and cannot be changed. inches — centimeters miles — kilometers knots — kilometers/h US tons — kilograms ounces — grams UK gallons — liters calories — joules Fahrenheit — Celsius yards — meters feet — yards UK tons — kilograms pounds — kilograms carats — grams US gallons — liters horsepower — kilowatts To perform a metric conversion 1. 2. 3. 4. Enter the Unit Conversion Mode. Use K and L to find the one you want to use.
– 58 – 3. Press FUNC to change to the editing screen. 4. Input up to five characters for the name of the first currency, and press OK. 5. Input up to five characters for the name of the second currency, and press OK. 6. Input up to 12 digits for the integer and 12 digits for the decimal part for the rate of the first currency, and press OK. 7. Input up to 12 digits for the integer and 12 digits for the decimal part for the rate of the second currency, and press OK to complete the procedure.
Game Modes The Game Modes give you a choice between poker and blackjack. To enter the Game Modes 1. Press GAME to display the initial Poker Mode screen. Mode name Game over indicator Your points Bet amount You win indicator Bet indicator Your hand 2. Press M to change to the Blackjack Mode (page 61) and display the initial Blackjack screen.
– 60 – Type of Hand Bet 10 Bet 20 Bet 30 Bet 40 Bet 50 Royal Flush 2500 5000 7500 10000 12500 Straight Flush 500 1000 1500 2000 2500 Four of a Kind 250 500 750 1000 1250 Full House 80 160 240 320 400 Flush 50 100 150 200 250 Straight 40 80 120 160 200 Three of a Kind 30 60 90 120 150 Two Pair 20 40 60 80 100 One Pair (Jacks or better) 10 20 30 40 50 Note that no points are awarded for anything less than a pair of Jacks.
• If you win, the “Win” indicator appears and the number of points based on your hand and the amount you bet are added to your point total (see the table). • If you lose, the “Win” indicator does not appear and your point total remains unchanged. 6. To play the next hand, continue from step 2, above. • Repeat the above procedure until you run out of points or until you score 999,999 points. ■ Blackjack Game The following describe rules and procedures for playing the blackjack game.
– 62 – Type of Hand Bet 10 Bet 20 Bet 30 Bet 40 Bet 50 Double Down 40 80 120 160 200 Blackjack 25 50 75 100 125 Win 20 40 60 80 100 Insurance 15 30 45 60 75 5 10 15 20 25 Surrender (Fold) To play the blackjack game 1. 2. 3. • • Enter the Blackjack Mode. Use B to declare the bet amount if you want. Press H to start the game. Two cards are dealt to the player and one to the dealer.
Calculator Mode The Calculator Mode provides you with all the tools you need to perform a variety of calculations throughout the day. It also includes a calculation editing feature that lets you recall the steps of a calculation and make changes. Calculator Mode key MRC CAC M + % 9 7 8 4 5 6 1 2 3 0 M+ Memory keys, number keys, operator keys, etc. + Cursor keys • • • • • • • • C/AC — clears the last value input. Press twice to clear a calculation on the screen and start a new calculation.
– 64 – To correct errors in calculations If you enter a wrong value, press C/AC once and then enter the correct value. If you press the wrong arithmetic operator key ( !, @, #, $), simply press the correct key before entering anything else. About calculation errors... Whenever an error occurs, the indicator “ERROR” appears on the display. • When the number of digits in the mantissa of an intermediate or a final result exceeds 12 digits.
To use the calculation edit feature 1. After inputting a calculation, press DISP CHNG to change to the calculation edit screen. • You can also display the calculation edit screen by pressing FUNC and then selecting “Edit calculation”. 2. Use K and L to scroll through the steps of the calculation. • The Digital Diary stores up to 99 lines of a calculation for editing. 3. When any step you want to edit is on the screen, make the changes you want. 4.
Data Communications You can transfer data between two CASIO SF-5580, SF-5780, or SF-5980 units, or between your Digital Diary and a personal computer only. You cannot exchange data with any other CASIO Digital Diary model. Data communications can be performed while in the Telephone Directory, Memo, Schedule Keeper, Calendar, To Do, Reminder, or Expense Manager Mode.
Performing data communications between a Digital Diary unit and a personal computer You must purchase an optional CASIO Data Communication Package in order to perform data communication between your Digital Diary unit and a personal computer. Please note that there are a number of different CASIO Data Communication packages to suit various computers and Digital Diary types. Because of this, you should note the following important points when purchasing a Data Communication Package.
– 68 – ■ Sending Data This section tells you how to operate the Digital Diary to send data to another unit or to a personal computer. About data transfer types... There are a number of ways you can transfer data. All Data Items With this method, you can send all data items stored in the Telephone Directory, Memo, Schedule Keeper, Calendar, To Do, Reminder, or Expense Manager Mode.
To send all data items in specific modes 1. Press SHIFT FUNC and then select “Send all”. Pointer (selected file) Marker (current setting) 2. Use Kand Lto move the pointer to the mode whose data items you want to send, and then use Hand Jto change the setting. • Data in modes set to “Yes” will be sent, while data in modes set to “No” will not. 3. Press OK. • A message appears asking if you are ready to send. 4. Press Y to start the send operation, or N to abort.
– 70 – To send all data items from a multiple file mode (Telephone Directory, Memo, To Do, Expense Manager) 1. Display the initial screen of the mode that contains the data you want to send. • You can display the initial screen for any file. 2. Press FUNC and then select “Send all files”. 3. Use K and L to move the pointer to the file whose data you want to send, and then use H and J to change the setting. • Files set to “Yes” will be sent, while those set to “No” will not. 4. Press OK.
Technical Appendix ■ Memory Capacity Memory capacity differs according to model. Model SF-5580: SF-5780: SF-5980: Memory 128K bytes 256K bytes 512K bytes The following shows the number of items that can be stored in each model.
– 72 – ■ How the Digital Diary sorts data Sorting Sequence The following table shows the sequence used for sorting data in the Telephone Mode. 1 2 3 4 5 6 7 8 9 10 11 12 13 14 15 16 17 18 19 20 21 22 23 24 25 26 27 28 29 30 (space) ! ” # $ % & ’ ( ) * + , — .
■ Error Messages Data Error Message The data error message appears whenever the Digital Diary’s internal check discovers a problem with data stored in memory. Appearance of the data error message indicates that you must perform the all-reset procedure to correct the problem. Start out with the procedure under “To start the allreset operation” on page 11, and continue with the procedure under “When to press Y for “yes”” on page 11.
– 74 – ALARM TIME ALREADY Attempt to set an alarm for a Set a different alarm PASSED! time or date that is already time. passed. DATA COMM. ERROR, PRESS ANY KEY. Error during data communications. Cancel the operation and try again. ARE YOU USING A NEW UNIT FOR THE FIRST TIME (Y/N)? The reset procedure has started. See page 11. CLEAR MEMORY AND SET UP THE UNIT FOR OPERATION? YES (OK)/NO (ESC) The reset procedure is in progress. See page 11.
Clock: World time; reminder alarm; schedule alarm; daily alarm; accuracy under normal temperatures: ±3 seconds average Calculation: 12-digit arithmetic calculations; independent memory; percentages; square roots; other mixed calculations General: Display element: 26-column × 8-line LCD Memory capacity: SF-5580: 128KB SF-5780: 256KB SF-5980: 512KB Main component: LSI Power supply: Main: Two AAA-size alkaline batteries (Type: LR03 (AM4)) Back-up: One CR2032 lithium battery Battery life: Main: In Telephon
CASIO ELECTRONICS CO., LTD. Unit 6, 1000 North Circular Road London NW2 7JD, U.K.
CASIO COMPUTER CO., LTD.