
User's Manual


74
7
After configuring all of the settings you want, click the [Register] button.
z This will register your settings as a new connection profile and return to the connection
profile switching dialog box in step 1.
8
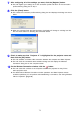
Click the [Close] button.
z This closes the connection profile switching dialog box and displays the dialog box shown
below.
z When the computer finds the Data Projector, the display will change to a dialog box like
the one shown below for selecting the connected device.
9
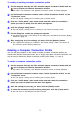
Check to make sure that “Projector A” is highlighted for the projector name and
then click the [OK] button.
z This will establish a wireless LAN connection between the computer and Data Projector.
z This will close the connected device selection dialog box and display the Wireless
Connection dialog box on the computer screen.
10
On the Wireless Connection window, click the button.
z This will cause the contents of the computer screen to be projected so they fill the
entire projection area.
z For details about Wireless Connection window operations and Data Projector remote
controller operations you can perform after establishing a connection, see “Using Wireless
LAN for Projection” (
page 88).