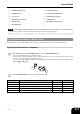
ES USER’S GUIDE GUÍA DEL USUARIO Please keep all information for future reference. Guarde toda información para tener como referencia futura. Safety Precautions Before trying to use the piano, be sure to read the separate “Safety Precautions”. Precauciones de seguridad Antes de intentar usar el piano, asegúrese de leer las “Precauciones de seguridad” separadas.
TO REDUCE THE RISK OF FIRE OR ELECTRIC SHOCK, REFER SERVICING TO QUALIFIED SERVICE PERSONNEL. IMPORTANT SAFETY INSTRUCTIONS 1. 2. 3. 4. 5. 6. 7. 8. 9. 10. 11. 12. Read these instructions. Keep these instructions. Heed all warnings. Follow all instructions. Do not use this apparatus near water. Clean only with dry cloth. Do not block any ventilation openings. Install in accordance with the manufacturer’s instructions.
Contents General Guide .......................... E-2 Attachment of the Score Stand .................. E-2 Company and product names used in this manual may be registered trademarks of others. Playing Back the Built-in Demo Tunes ....... E-3 Power Supply ........................... E-4 Using the AC Adaptor ................................. E-4 Connections ............................. E-5 Connecting Headphones ............................ E-5 Connecting to a DAMPER PEDAL Jack .....
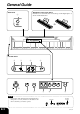
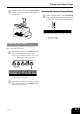
General Guide Back Panel Attachment of the Score Stand Insert the score stand into the slot at the top of the digital piano as shown in the illustration. 1 Left Side Panel 2 6 3 4 7 5 8 9 0 A NOTE • Each chapter of this manual starts with an illustration of the piano’s console, which shows the buttons and other controllers you need to operate.
General Guide 1 DAMPER PEDAL jack 7 FUNCTION button 2 POWER button 8 PLAY/STOP, DEMO button 3 DC 12V jack 9 SONG SELECT buttons 4 MIDI OUT/IN terminals 0 TONE buttons 5 PHONES jack A REVERB CHORUS button 6 VOLUME knob NOTE • Key, button, and other names are indicated in the text of this manual using bold type. Playing Back the Built-in Demo Tunes This digital piano comes with 5 built-in demo tunes, each of which features one of the built-in tones.
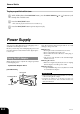
General Guide To play a specific built-in tune 1 While holding down the FUNCTION button, press the SONG SELECT [ through the available tunes. 2 Press the PLAY/STOP button. 3 Press the PLAY/STOP button again to stop tune play. ] or [ ] button to cycle • This starts the playback of the tune in an endless loop. Power Supply You can power this digital piano by plugging it into a standard household power outlet.
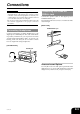
Connections IMPORTANT! • Whenever connecting external equipment, first set the VOLUME knob of the digital piano and the volume controller of the external equipment to relatively low volume settings. You can later adjust volume to the level you want after connections are complete. • Be sure also to refer to the documentation that comes with the external equipment for its proper connection procedures. Connecting to a DAMPER PEDAL Jack Connect the pedal’s cable to the digital piano’s DAMPER PEDAL jack.
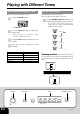
Playing with Different Tones Selecting and Playing a Tone The piano comes with 5 built-in tones. 1 Using Tone Effects Reverb: Makes your notes resonate Chorus: Adds more breadth to your notes Press the POWER button. 1 • You can find out the current reverb/chorus configuration by looking at the REVERB and CHORUS indicator lamps. POWER button 2 Press the REVERB CHORUS button to cycle through the effect settings as shown below. Use the VOLUME knob to adjust the volume level.
Playing with Different Tones 1 While holding down the FUNCTION button, press one of the keyboard keys shown above. Adjusting the Volume of Layered Tones 1 While holding down the FUNCTION button, use the keyboard keys shown below to adjust the volume of the layered tones. + – ▲ C1 ▲ C2 ▲ C3 ▲ C4 ▲ C5 ▲ C6 ▲ C7 ▲ C8 + : Raises the volume – : Lowers the volume Layering Two Tones Use the following procedure to layer to two tones, so they sound at the same time.
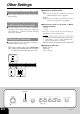
Other Settings Changing the Keyboard Touch 1 This setting changes the relative touch of the keyboard keys. Changing the Pitch of the Piano to Match Another Instrument 2 Use this setting to raise or lower the overall pitch of the piano. The setting range is plus or minus 50 cents (100 cents = 1 semitone) from the standard pitch of A4 = 440.0Hz. 1 Changing the Keyboard Touch Off Weak (Strong sound is produced even when relatively light pressure is applied.
Other Settings MIDI Settings Using MIDI 1 Send Channel Use this setting to specify one of the MIDI channels (1 through 16) as the Send Channel for sending MIDI messages to an external device. What is MIDI? The letters MIDI stand for Musical Instrument Digital Interface, which is the name of a worldwide standard for digital signals and connectors that makes it possible to exchange musical data between musical instruments and computers (machines) produced by different manufacturers.
Troubleshooting Symptom Possible Cause Action Reference No sound produced when 1. VOLUME knob set to MIN. 1. Move the VOLUME knob more Page E-6 keyboard keys are pressed. towards MAX. 2. Headphones connected to the 2. Disconnect the headphones Page E-5 from the digital piano. digital piano. 3. Turn on Local control. 3. Local Control turned off. Page E-9 Keyboard out of tune. 1. The piano key is set to a value 1. Change the piano key setting to Page E-8 other than C.
Specifications Models: CDP-100 Keyboard: 88 piano keys (with touch response) Polyphony: 32 notes, maximum Tones: 5; with layer Digital Effects: Reverb (4 types), Chorus (4 types) Built-in Tunes: 5 Pedal: Damper Other Functions: • Touch: 3 types, off • Transpose: 1 octave (F to C to F) • Tuning: A4 = 440.0Hz ±50 cents (adjustable) MIDI: 16 multi-timbre receive Input/Output: • Headphones: Stereo mini jack Output Impedance: 170Ω Output Voltage: 4.
Operational Precautions Locating the Unit Avoid the following locations. • Areas exposed to direct sunlight and high humidity • Areas subjected to very low temperatures • Near a radio, TV, video deck, or tuner (unit can cause interference with audio or video signals) You may notice lines in the finish of the case of this product. These lines are the result of the molding process used to shape the plastic of the case. They are not cracks or breaks in the plastic, and are no cause for concern.
MIDI Implementation Chart Model CDP-100 Function ...
This recycle mark indicates that the packaging conforms to the environmental protection legislation in Germany. Esta marca de reciclaje indica que el empaquetado se ajusta a la legislación de protección ambiental en Alemania. CASIO COMPUTER CO.,LTD.