Cover CDP-S360 EN USER’S GUIDE Preparing a Power Supply Turning Power On or Off Using a Pedal Using Headphones Playing on the Keyboard Splitting the Keyboard for Duet Play Changing the Pitch in Semitone Steps (Transpose) Fine Tuning a Pitch (Tuning) Changing the Pitch in Octave Units (Octave Shift) Using Auto Accompaniment Selecting a Built-in Song for Playback Using Chorus Using Reverb Linking with a Smart Device (APP Function) • When the Digital Piano is being operated on battery power o
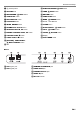
Included and Optional Accessories Use only accessories that are specified for use with this Digital Piano. Use of unauthorized accessories creates the risk of fire, electric shock, and personal injury. • You can get information about accessories that are sold separately for this product from the CASIO catalog available from your retailer, and from the CASIO website at the URL below. https://support.casio.
Playing a Built-in Song or a Song on a USB Flash Drive Contents EN-26 EN-4 Selecting a Built-in Song for Playback . . . . . . . . . .EN-26 General Guide. . . . . . . . . . . . . . . . . . . . . . . . . . . . . EN-4 Looping Playback of Specific Song Measures (A-B Repeat) . . . . . . . . . . . . . . . . . . . . . . . . . . . .EN-28 Overview and Setup Preparing a Power Supply . . . . . . . . . . . . . . . . . . . EN-7 Turning Power On or Off . . . . . . . . . . . . . . . . . . . . .
Contents Configuring Function Settings EN-45 To configure function settings . . . . . . . . . . . . . . . . EN-45 Function Setting Item List . . . . . . . . . . . . . . . . . . . EN-46 Using Operation Lock . . . . . . . . . . . . . . . . . . . . . . EN-48 Deleting All Data in Digital Piano Memory . . . . . . EN-48 USB Flash Drive EN-49 USB Flash Drive and USB Type A Port Handling Precautions . . . . . . . . . . . . . . . . . . . . . . . . . . . .
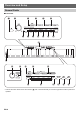
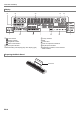
Overview and Setup General Guide ■ Front Panel 1 2 3 7 8 4 9 5 bk bl 6 bm bn cp cq bo bp bq br bt bs ck cl cm cn co • Some of the button names shown here include a $ mark. This indicates that you need to long-press the button to perform its operation.
Overview and Setup 1 P (Power) button bp FUNCTION, ENTER/$ EXIT button 2 VOLUME knob bq TONE, $ DUET button 3 METRONOME, $ BEAT button br RHYTHM button 4 TEMPO/TAP button bs SONG BANK button 5 RECORD/STOP button bt BANK, $ FREEZE button 6 CATEGORY button ck Area 1 - Area 4 button 7 INTRO, REPEAT button cl STORE button 8 NORMAL FILL-IN, A-B button cm A.HAR./ARPEG.
Overview and Setup Display * Tone indicator Rhythm indicator Song Bank indicator Music Preset indicator Keyboard part indicators Number/setting value display (left), name display (right) * * Tempo, measure Beat Chord name Auto Accompaniment indicators Playback part indicators Registration indicators, record indicators * Other indicators Preparing the Music Stand Music stand EN-6
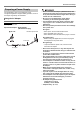
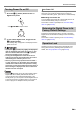
Overview and Setup Preparing a Power Supply Your Digital Piano uses an AC adaptor for power. Though the Digital Piano supports battery operation, use of an AC adaptor is generally recommended. Using the AC Adaptor Make sure that you use only the AC adaptor specified for this Digital Piano. Use of a different type AC adaptor can cause smoking or malfunction.
Overview and Setup Using Batteries • Be sure to turn off power before loading batteries. • It is up to you to prepare six commercially available alkaline batteries. • Note the precautions below while the Digital Piano is turned upside down to load batteries. − Take care to avoid injury due to pinching your fingers under the Digital Piano. − Do not allow the Digital Piano to tip over or otherwise be subjected to strong impact. Impact can damage the volume knob and keyboard keys.
Overview and Setup Turning Power On or Off 1. Press the 1P (Power) button to turn on Digital Piano power. Auto Power Off If you do not perform any operation on the Digital Piano for about four hours under AC adaptor power or about six minutes under battery power, power will turn off automatically. ■ Disabling Auto Power Off You can disable Auto Power Off to ensure that power is not turned off automatically during a concert, etc.
Overview and Setup Using Headphones Using headphones cuts off output from the built-in speakers, which means you can practice playing even late at night without disturbing others. • Be sure to turn down the volume level before connecting headphones. Connecting the Wireless MIDI & audio adaptor (Option) To pair this product with a Bluetooth® wireless technologycapable external device, you need to plug the Wireless MIDI & audio adaptor into the Digital Piano’s cr USB Type A port.
Overview and Setup Adjusting Display Contrast 1. Press bp FUNCTION and then use the bo dial to display “Other”. Ot he r 2. Press bp ENTER. 3. Use the bo dial to display “Contrast”. Co n t r a s t 4. Press bp ENTER. This displays the NUM indicator. 5. Use the bo dial to adjust display contrast. Listening to Demo Play 1. Press br RHYTHM and bs SONG BANK at the same time. This causes (song bank indicator) and (rhythm indicator) to flash on the display and starts playing of the demo song.
Operations Common to All Modes • Unless otherwise specifically noted, all of the procedures in this manual assume that the Digital Piano is in its initial power on state (immediately after you turn on power). If you run into problems with a procedure, turn Digital Piano power off and back on, and then try performing the procedure again. • Note that turning off Digital Piano power during a procedure causes any pending unsaved data to be deleted.
Operations Common to All Modes ■ To select a menu item (NUM indicator not displayed) If a menu appears while you are configuring a setting and the NUM indicator is not displayed, you can use the bo dial to select the menu item you want. ■ To change a character 1. Use the bo dial to move the cursor to the position of the character you want to change, and then press bp ENTER. Example: Function setting screen Tou c h This displays the NUM indicator. 2.
FUNCTION Indicator The FUNCTION indicator is either flashing or not flashing when you perform a Digital Piano function setting (page EN-45) or other special setting operation. The meanings of the text that appears along with a non-flashing or flashing FUNCTION indicator are described below. Indicator Not flashing Flashing Indicates this: Item name* Playing on the Keyboard Your Digital Piano lets you select tones for a wide variety of musical instrument sounds, including violin, flute, orchestra, and more.
Playing on the Keyboard ■ Versatile Tones ■ To layer two tones The Digital Piano’s built-in tones include “versatile tones” (three guitar tones, two bass tones, and two brass tones) that can be used for creating computer music. Versatile tones assign performance sounds that are characteristic of a particular musical instrument (such as a guitar glissando, fret noise, etc.) to each keyboard key (note) and velocity.
Playing on the Keyboard ■ To split the keyboard between two different tones 1. Select the tone for the Upper1 part (page EN-14). • Press bq TONE and then use the bo dial to select the tone you want. Example: 312 FLUTE 1 Flute 1 ■ To change the split point 1. Keep cn SPLIT depressed until you finish step 2 of this procedure. This will cause the key name at the currently set split point to appear on the display. 2. Press the keyboard key where you want the split point to be.
Playing on the Keyboard Changing Keyboard Response to Touch Pressure (Touch Response) Touch Response alters tone volume in accordance with keyboard pressure (speed). This provides you some of the same expressivity you get on an acoustic piano. Using Reverb 1. Press bp FUNCTION and then use the bo dial to display “Reverb”. Re v e r b ■ To change touch response sensitivity 1. Press bp FUNCTION. This displays the “Touch” setting name along with the FUNCTION indicator. Tou c h 2. Press bp ENTER.
Playing on the Keyboard Using Chorus Using the Metronome Chorus is a function that adds depth and breadth to notes. 1. Press bp FUNCTION and then use the bo dial to display “Chorus”. Ch o r u s 2. Press bp ENTER. The metronome lets you play and practice along with a steady beat to help keep you on tempo. ■ To start or stop the metronome 1. Press 3 METRONOME. This starts the metronome. This displays the NUM indicator. 3. Use the bo dial to select the chorus type you want.
Playing on the Keyboard Changing the Tempo Setting There are two ways to change the tempo (beats per minute) setting: using buttons to change the tempo value and tapping a beat on a button. ■ To adjust the tempo (beats per minute) value 1. Press 4 TEMPO/TAP to make “TEMPO” appear on the display. 2. Use the bo dial to change the tempo value. • You can specify a tempo value in the range of 20 to 255.
Playing on the Keyboard ■ To select an arpeggiator type 1. Perform the procedure under “To turn on the arpeggiator” (page EN-19) and confirm that the ARPEG. indicator is displayed. 2. Long-press cm A.HAR./ARPEG. until the FUNCTION indicator flashes on the display. This displays the currently selected arpeggiator type number and name. The NUM indicator is also displayed.
Playing on the Keyboard To play a duet 1. Long-press bq TONE until an indicator mark (K) appears next to “DUET” on the right side of the display. • This indicates the Duet Mode. Changing the Octaves of the Duet Keyboards You can change the ranges of the left and right keyboards in octave units from their initial default settings. This comes in handy, for example, if the initial default range is not enough when one person is playing the left hand part and another person is playing the right hand part. 1.
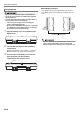
Adjusting the volume of the keyboard Adjusts the volume of keyboard play relative to the overall volume level within the range of 0 (muted) to 127 (maximum). 1. Press bp FUNCTION and then use the bo dial to display “KeybdVol”. Controlling Sounds Using a Pedal Connect the supplied pedal (SP-3) to the ct DAMPER/ ASSIGNABLE jack. Back ct DAMPER/ASSIGNABLE jack (Standard jack (6.3mm)) Ke y bdVo l 2. Press bp ENTER. This displays the NUM indicator. 3. Use the bo dial to change the setting.
Controlling Sounds 4. Use the bo dial to select a pedal effect type. • Available pedal effects are shown in the table below. Setting Number 1 Parameter (Display) Sustain (Sustain) Description Sustains notes played while the pedal is depressed, even if the keyboard key is subsequently released. Organ and other tones that are sustained as long as keyboard key are depressed continue to sound as long as the pedal is depressed.
Controlling Sounds Fine Tuning a Pitch (Tuning) Use the tuning feature when you need to adjust the pitch slightly to play along with another musical instrument. Also, some artists perform their music with slightly altered tuning. • The tuning feature specifies the frequency of the A4 note. You can set a frequency within the range of 415.5 to 465.9 Hz. The initial default setting is 440.0 Hz. • You can change the frequency in 0.1 Hz steps. 1.
Controlling Sounds Changing the Scale Tuning (Temperament) of the Keyboard You can use the procedure below to select from among 17 preset scales, including the standard Equal Temperament. 1. Press bp FUNCTION and then use the bo dial to display “Scale”. Sca l e ■ Scale List No.
■ To use the current scale notes for Auto Accompaniments 1. Press bp FUNCTION and then use the bo dial to display “Scale”. Sca l e 2. Press bp ENTER. 3. Use the bo dial to display “AcompScl”. A c ompS c l 4. Press bp ENTER to enable the accompaniment scale. • Each press of bp ENTER toggles the setting between enabled and disabled. 5. To exit the setting screen, press bq TONE.
Playing a Built-in Song or a Song on a USB Flash Drive 3. Press bma. • This starts song playback. The playback tempo, current measure, and current beat are shown in the upper right corner of the display. Tempo Measure ■ To select a tone for keyboard play along with song playback 1. While (song bank indicator) is displayed, press bq TONE. This displays (tone indicator). 2. Use the bo dial to select the number of the tone you want to assign to keyboard play.
Playing a Built-in Song or a Song on a USB Flash Drive Looping Playback of Specific Song Measures (A-B Repeat) To loop a range of measures in a song, you need to specify the start measure and end measure of the section you want to repeat. Start End Playing Back with One Hand’s Part Muted You can mute one of the hand parts of a song for playback. Then you can practice by playing the muted part on the keyboard.
Playing a Built-in Song or a Song on a USB Flash Drive ■ Part Channel Information In built-in songs and CMF format songs, parts where left-hand play is recorded and parts where right-hand play is recorded are separate. These songs have “part channel information”, which is information that controls to which Digital Piano parts left-hand and right-hand play should be assigned. The part channel information contained in built-in songs and general CMF format songs is described below.
Using Auto Accompaniment With Auto Accompaniment, simply select an accompaniment pattern. Each time you play a chord with your left hand the appropriate accompaniment will play automatically. It’s like having a personal backup group along with you wherever you go. • Auto Accompaniments are made up of the three parts below. – Rhythm – Bass – Harmony You can have only the rhythm part play, or you can have all three parts play at the same time.
Using Auto Accompaniment Playing Auto Accompaniment with Chords Playing a chord with your left hand automatically adds bass and harmony accompaniment parts to the currently selected rhythm. It is just like having your own personal back up group on call. 1. Press bn [ACCOMP]. This enables chord input on the accompaniment keyboard. ■ To select a chord input mode 1. Press bp FUNCTION, and then use the bo dial to display the “ChordMod” setting name. Ch o r dMo d 2. Press bp ENTER.
Using Auto Accompaniment CASIO CHORD FINGERED With CASIO CHORD, you can use simplified fingerings to play the four types of chords described below. Accompaniment keyboard With these input modes, you play chords on the accompaniment keyboard using their normal chord fingerings. Some chord forms are abbreviated, and can be fingered with one or two keys. See page EN-67 for information about chords that are supported and how they are fingered on the keyboard.
Using Auto Accompaniment ● FINGERED ASSIST Produces an effect that is different from FINGERED 1 when two or three keys are pressed. Pressing a root key and any key to the left of the root key plays a seventh chord, while a black key plays a minor chord. Pressing both a white and black key together plays a minor seventh chord. • In addition to FINGERED 1, you can also use the methods below to play the three types of chords described below.
Using Auto Accompaniment Auto Accompaniment Pattern Variations Use the procedure below to play intro and ending patterns, to play fill-in patterns, and to play variations of basic Auto Accompaniment patterns. ■ Auto Accompaniment Variation Each Auto Accompaniment pattern has a basic “normal pattern” as well as a “variation pattern”. 1. Press 9 VARIATION FILL-IN. This starts the variation pattern. ■ Auto Accompaniment Fill-in Use the procedures below to play a fill-in pattern during a performance.
Using Auto Accompaniment ■ Auto Accompaniment Ending ■ Synchro Stop Use the procedure below to play an ending of a few measures. With synchro stop, Auto Accompaniment stops as soon as you release all of the keys on the accompaniment keyboard. The Digital Piano automatically enters synchro start standby at this time. 1. While an Auto Accompaniment is playing, press bk ENDING/SYNCHRO START. This will play the ending pattern and then stop Auto Accompaniment play automatically. 1. Press bl SYNCHRO STOP.
Using Auto Accompaniment Using Auto Harmonize Auto Harmonize lets you add harmony to melody notes you play with your right hand for more melodic depth. You can select any one of 12 Auto Harmonize types. • A single button is used to control auto harmonize and the arpeggiator (page EN-19). Because of this, the arpeggiator cannot be used while auto harmonize is in use. ■ To turn on Auto Harmonize 1. Press br RHYTHM. 2. If there is no ACCOMP indicator displayed, press bn [ACCOMP] to display it. 3.
Using One-Touch Preset With One-Touch Preset, the Digital Piano automatically configures optimal tone, tempo, and other settings in accordance with the rhythm pattern you select. 1. Hold down br RHYTHM until the current tone screen appears on the display. This will automatically apply the One-Touch Preset settings in accordance with the rhythm pattern that is currently selected. At this time, the Digital Piano will go into Auto Accompaniment synchro start standby (page EN-35).
Registering and Restoring a Setup (Registration) You can use the registration function to register the setup of the Digital Piano (tone, rhythm, and other settings). You can recall a registered setup as required to perform a particular song, etc. • Registration can be used in the Rhythm Mode (page EN-30).
Registering and Restoring a Setup (Registration) Recalling a Setup from Registration Memory 1. If required, use bt BANK to toggle the freeze function between enabled and disabled. • Each long-press bt BANK toggles freeze between enabled and disabled. The FREEZE indicator is displayed while freeze is enabled. Displayed • For details about the freeze function, see “Freeze Function” (page EN-39). 2. Press bt BANK to select the bank that contains the setup you want to recall. Bank 6 3.
Recording Your Keyboard Play 5. To stop recording, press 5 RECORD/STOP. A simple operation records your keyboard play, Auto Accompaniment, and other Digital Piano operations you perform while playing. • You can have up to six recorded songs in memory (five multi-track songs and one Part Practice Recording). • Recording memory capacity is approximately 12,000 notes per song.
Recording Your Keyboard Play ■ To play back a recorded performance Use the procedure under “Selecting a Built-in Song for Playback” (page EN-26), selecting one of the songs in the range of 163 to 168. ■ To change the recording destination song number during recording standby 1. While in record standby, long-press 5 RECORD/STOP. This causes “Rec Trk” to appear on the display. 2. Use the bo dial to select “MltRec X” (X is a value from 1 to 5), and then press bp ENTER. 3.
Recording Your Keyboard Play 7. Press bma. This will start playback of what you recorded up to this point in other tracks and record what you play on the keyboard to the currently selected track. Play the notes you want on the keyboard. • If you want to record from the beginning of a track, press 5 RECORD/STOP and then start playing. Displayed 8. To stop recording, press 5 RECORD/STOP. • To play back what you have recorded, press bma. Each press of bma starts and stops playback.
Recording Your Keyboard Play 4. Use bn PART SELECT to select the part whose playback you want to mute during recording. • Each press of bn PART SELECT cycles between the mute settings as shown below. On-screen indicators show the currently muted part(s). Right-hand part muted Configuring Precount and Metronome Settings The precount and metronome settings shown below are available for recording.
Recording Your Keyboard Play Muting a Track You can use the procedure below to mute a recorded track and then record to or play back the other track. 1. Press bs SONG BANK. 2. Use the bo dial to select a song you recorded. 3. Press bn PART SELECT. This causes “Tr 1Mute” to appear on the display. 4. Use the bo dial to select the track you want to mute. 5. Press bp ENTER. • Each press of bp ENTER toggles the selected track between mute and unmute.
Configuring Function Settings To configure function settings 1. Press bp FUNCTION. This displays the FUNCTION indicator and the main menu item. Current setting number Main menu item Tou c h • For information about main menu and submenu items for each function, see “Function Setting Item List” (page EN-46). 2. Use the bo dial to select the menu item whose setting you want to change. • If the setting item you are configuring has a submenu, perform steps (1) and (2) below.
Configuring Function Settings Function Setting Item List • For information about changing the settings in the list below, see “To configure function settings” (page EN-45). • If “(ENTER)” is shown at the end of a function name, it means that pressing bp ENTER will display a submenu. No. Function Display Setting Range 1 Touch Response Touch 1-4 2 Transpose Trans. –12 - 12 3 Duet (ENTER) Duet 4 Upper Octave Shift U Oct. –2 - +2 5 Lower Octave Shift L Oct.
Configuring Function Settings No.
Configuring Function Settings Using Operation Lock Operation Lock disables button operations, except for the 1P (Power) button and the button operations required to unlock operations. ■ To lock operations 1. Press bp FUNCTION, and then use the bo dial to display the “Other” setting name. 2. Press bp ENTER. 3. Use the bo dial to display the “Op Lock” setting name, and then press bp ENTER. This displays “Sure?” 4. To lock operations, press bp ENTER.
USB Flash Drive Your Digital Piano supports the use of a commercially available USB flash drive to perform the operations below. • Formatting the USB flash drive • You can use a USB flash drive to store songs that were recorded with the Digital Piano and registration setups. • Data saved to a USB flash drive by this Digital Piano, as well as compatible data (user rhythms, user songs, etc.) copied to a USB flash drive from a computer can be imported to Digital Piano memory.
USB Flash Drive ■ To connect a USB flash drive to the Digital Piano ■ To format a USB flash drive 1. As shown in the illustration below, insert the 1. Insert the USB flash drive to be formatted into USB flash drive into the Digital Piano’s cr USB Type A port. • Carefully push the USB flash drive in as far as it will go. Do not use undue force when inserting the USB flash drive. cr USB Type A port the Digital Piano’s cr USB Type A port. 2. Press bp FUNCTION. 3.
USB Flash Drive USB Flash Drive Operations This section provides information about the operations below.
USB Flash Drive ■ To load data from a USB flash drive to Digital Piano memory 1. Perform steps 1, 2, and 3 under “To save Digital Piano data to a USB flash drive” (page EN-51). 2. Use the bo dial to display “Load”, and then press bp ENTER. 3. Use the bo dial to display a sub-menu item of options that correspond to the type of data being imported. • See “Sub Menu Item/File Name Extension List” (page EN-51). 4. Press bp ENTER. This displays a file name of data that can be imported. 5.
USB Flash Drive ■ To rename USB flash drive data 1. Perform steps 1, 2, and 3 under “To save Digital Piano data to a USB flash drive” (page EN-51). 2. Use the bo dial to display “Rename”, and then press bp ENTER. 3. Use the bo dial to display a sub-menu item of options that correspond to the type of data being renamed. • See “Sub Menu Item/File Name Extension List” (page EN-51). 4. Press bp ENTER. 5. Use the bo dial to select the data to be renamed.
Connecting External Devices ■ Connecting the Digital Piano to Your Computer Connecting to a Computer • Make sure you follow the steps of the procedure below exactly. Connecting incorrectly can make data send and receive impossible. You can connect the Digital Piano to a computer and exchange MIDI data between them. You can send play data from the Digital Piano to music software running on your computer, or you can send MIDI data from your computer to the Digital Piano for playback.
Connecting External Devices Connecting to Audio Equipment • Once you are able to connect successfully, there is no problem with leaving the USB cable connected when you turn off or turn on your computer and/or Digital Piano. • For detailed specifications and connections that apply to MIDI data send and receive by this Digital Piano, see the latest support information provided by the website at the URL below. https://support.casio.
Connecting External Devices ■ Playing an External Device from the Digital Piano Connection requires commercially available connecting cords, supplied by you. • The connecting cords should have a 3-pole stereo mini plug on one end and a plug that matches the configuration of the external device on the other end. • When sounding audio on the Digital Piano that is input from an external device, use the external device to adjust the volume level. You cannot adjust the volume level on the Digital Piano.
Connecting External Devices Connecting with a Smart Device There are two ways to connect with a smart device: connect via the Bluetooth function and/or use a commercially available USB cable. • If you are using a CASIO smart device app, do not have the Digital Piano connected with the smart device using the Bluetooth function and a USB cable at the same time.
Connecting External Devices Sounding a Bluetooth Audio Capable Device (Bluetooth Audio Pairing) You can use the Wireless MIDI & audio adaptor (Option: WUBT10) to pair the Digital Piano with a Bluetooth audio device and sound the playback of the external device from the Digital Piano’s speakers. • Before performing the pairing operation, turn down the volume levels of the Digital Piano and the external device.
Connecting External Devices ■ Deleting Bluetooth Audio Capable Device Pairing Registration • Performing the procedure below will delete the pairing registration between this Digital Piano and its currently paired Bluetooth audio capable device. If you are experiencing connectivity problems with a Bluetooth audio capable device, perform the procedure below and then perform the procedure under “Sounding a Bluetooth Audio Capable Device (Bluetooth Audio Pairing)” (page EN-58).
Connecting External Devices Enabling and Disabling the Digital Piano’s Wireless Function 1. Connect the Wireless MIDI & audio adaptor to the cr USB Type A port. 2. Press bp FUNCTION. 3. Use the bo dial to display “Wireless” and then Adjusting the Notification Tone Volume Level 1. Press bp FUNCTION. 2. Use the bo dial to display “Wireless” and then press bp ENTER. 3. Use the bo dial to display “NotifVol” and then press bp ENTER. press bp ENTER. 4.
Reference Troubleshooting Symptom Action Included Accessories I can’t find something that should be here. Carefully check inside all of the packing materials. Power Requirements Power will not turned on. • Check the AC adaptor or make sure that the batteries are facing correctly (page EN-7). • Replace the batteries with new ones or switch over to AC adaptor power (page EN-7). The display lights up momentarily but power does not turn on when I press the 1P (Power) button.
Reference Symptom Action Some notes are cut off while they are playing. Notes are cut off whenever the number of notes being sounded exceeds the maximum polyphony value of 64 (32 for some tones). This does not indicate malfunction. The volume or tone setting I made has changed. • Adjust the volume setting (page EN-9). • Turn power off and then back on to initialize all Digital Piano settings (page EN-9). • Replace the batteries with new ones or switch over to AC adaptor power (page EN-7).
Reference Error Messages Display Cause Action Err Limit You are attempting to record more than 999 measures. Make your recordings up to 999 measures long. Err Mem Full You are attempting a recording that exceeds the allowable per-song limit. Keep song recordings with the allowable per-song limit. Err DataFull You are attempting to record more than 5 multi-track songs. Delete some of the songs in memory. Err No Media The USB flash drive is not plugged correctly into the cr USB Type A port.
Reference Specifications Model Keyboard Touch Response Maximum Polyphony CDP-S360BK 88-key piano keyboard 3 types, Off 128 notes Tones Built-in Tones Functions 700 Layer, Split Reverb 1 to 10, Off Chorus 1 to 4, Tone Metronome Beat bell Off, 1 to 9 (beats) Tempo Range 20 to 255 Song Bank Demo Song 1 Built-in Songs 152 User Songs 10*1 User-recorded Songs 6 (See “Recorder” below.
Reference Inputs/Outputs USB Port Type A, Type B DAMPER/ASSIGNABLE Jack Standard jack (6.3mm) (sustain, sostenuto, soft, rhythm) PEDAL UNIT Jack Proprietary jack (sustain, sostenuto, soft) PHONES/OUTPUT Jack Stereo mini jack (3.5mm) Output Impedance: 3Ω, Output Voltage: 1.3V (RMS) MAX AUDIO IN Jack Stereo mini jack (3.
Reference Versatile Tone Map 168 VERSATILE NYLON GUITAR Key Velocity C-1 - B6 1-30 31-60 61-75 76-90 91-105 106-120 121-127 C7 1-127 C{7 1-127 D7 1-127 E}7 1-127 E7 1-127 F7 1-127 F{7 1-127 G7 1-127 A}7 1-127 A7 1-127 B}7 1-127 B7 1-127 C8 1-127 C{8 1-127 D8 1-127 E}8 1-127 E8 1-127 F8 1-127 F{8 1-127 G8 1-127 A}8 1-127 A8 1-127 B}8 1-127 B8 1-127 C9 1-127 C{9 1-127 D9 1-127 E}9 1-127 E9 1-127 F9 1-127 F{9 1-127 G9 1-127 Sound Normal mp Normal mf Ghost Note Mute Hammering Glissando Open Harmonics Strum 1
Reference Fingering Guide Cadd9 ■ FINGERED 1, FINGERED 2 Chords Cmadd9 *4 C *4 C69 *3 *4 Cm Cm69 *3 Cdim *1 *2 *3 *4 Caug *3 C 5 Csus4 *3 Csus2 *4 ■ FINGERED ON BASS, FULL RANGE CHORD In addition to the chords that can be fingered with FINGERED 1 and FINGERED 2, the chords below also are recognized.
Reference Chord Example List *1 *2 C C /(D ) D (D )/E E F M m dim aug sus4 sus2 7 m7 M7 m7 5 7 5 7sus4 add9 madd9 mM7 dim7 69 6 m6 • You can use the split point to change the size of the accompaniment keyboard range (page EN-16).
Reference *1 *2 F /(G ) G (G )/A A (A )/B B M m dim aug sus4 sus2 7 m7 M7 m7 5 7 5 7sus4 add9 madd9 mM7 dim7 69 6 m6 • You can use the split point to change the size of the accompaniment keyboard range (page EN-16).
Key’s Ch’s After Touch Control Change Pitch Bender Note ON Note OFF Velocity True voice 0 1 5 6, 38 7 10 11 64 65 66 67 71 72 73 O X X X O O X O X O O X X X O *4 *4 *2 *4 *4 *4 *3 *4 *3 *3 *4 *4 *4 O O O O *2 O O O O O O O O O O O X O O 9nH v = 1 - 127 O 8nH v = 0 - 127, 9nH v = 0 O 9nH v = 1 - 127 O 8nH v = 0 - 127 X X 0 - 127 0 - 127 *1 Mode 3 X 1 - 16 1 - 16 Recognized 12 - 120 Mode 3 X Default Messages Altered Mode Note Number 1 1 - 16 Default Changed Transmitted MIDI Implemen
:True # X X X X O X : All sound off : Reset all controller : Local ON/OFF : All notes OFF : Active Sense : Reset Aux Messages Mode 1 : OMNI ON, POLY Mode 3 : OMNI OFF, POLY *4 *4 *4 O O X O O X X X X X X O *2 O 0 - 127 O O O O O O O O O *2 Filter cutoff Vibrato rate Vibrato depth Vibrato delay Portamento Control Reverb send level Chorus send level Delay send level RPN LSB, MSB Mode 2 : OMNI ON, MONO Mode 4 : OMNI OFF, MONO *1: Depends on tone.
MA2109-A