ES USER’S GUIDE GUÍA DEL USUARIO Please keep all information for future reference. Guarde toda información para tener como referencia futura. Safety Precautions Before trying to use the piano, be sure to read the separate “Safety Precautions”. Precauciones de seguridad Antes de intentar usar el piano, asegúrese de leer las “Precauciones de seguridad” separadas.
IMPORTANT SAFETY INSTRUCTIONS 1. 2. 3. 4. 5. 6. 7. 8. 9. 10. 11. 12. Read these instructions. Keep these instructions. Heed all warnings. Follow all instructions. Do not use this apparatus near water. Clean only with dry cloth. Do not block any ventilation openings. Install in accordance with the manufacturer’s instructions. Do not install near any heat sources such as radiators, heat registers, stoves, or other apparatus (including amplifiers) that produce heat.
NOTICE This equipment has been tested and found to comply with the limits for a Class B digital device, pursuant to Part 15 of the FCC Rules. These limits are designed to provide reasonable protection against harmful interference in a residential installation. This equipment generates, uses and can radiate radio frequency energy and, if not installed and used in accordance with the instructions, may cause harmful interference to radio communications.
Any reproduction of the contents of this manual, either in part or its entirety, is prohibited. Except for your own, personal use, any other use of the contents of this manual without the consent of CASIO is prohibited under copyright laws.
Assembling the Stand.................................................................................E-56 Unpacking ..........................................................................E-56 To connect cables ..............................................................E-59 To assemble the stand.......................................................E-56 To install the music stand and headphones hook ..............E-60 General Guide ...............................
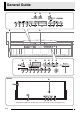
General Guide 8 2 3 4 5 6 9 7 bl bk 1 bm bn bo bp bq do br ck bs cl Bottom cm bt cn co cp cs ct cq cr dk dl dm dn dr dp dq* ds dt ek el * With the AP-620BK and AP-6BP, the power cord is hard-wired to the Digital Piano.
General Guide POWER button ELEC PIANO button INTRO/REPEAT button VIBES/CLAVI button NORMAL/FILL-IN, sREW button ORGAN button VARIATION/FILL-IN, dFF button STRINGS/SYNTH-PAD button SYNCHRO/ENDING, PAUSE button BASS/GUITAR button START/STOP, PLAY/STOP button VARIOUS/GM TONES button ACCOMP ON/OFF, PART button REVERB, REV TYPE, EXIT button METRONOME button CHORUS, CHOR TYPE, u button RECORDER button SPLIT, SPLIT POINT, i button TEMPO buttons
General Guide Saving Settings and Using Panel Lock Your Digital Piano lets you save its current settings, and lock its buttons to protect against operation errors. For details, see “Setting Backup” (page E-42) and “Panel Lock” (page E-42). Returning the Digital Piano to Its Factory Default Settings Perform the following procedure when you want to return the Digital Piano’s stored data and settings to their initial factory defaults. 1. 2. Turn off the Digital Piano.
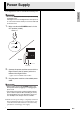
Power Supply English Your Digital Piano runs on standard household power. IMPORTANT! • Be sure to turn off power whenever you are not using the Digital Piano. Placing the cover on the Digital Piano while power is on can cause internal circuitry to over heat and lead to the risk of fire. 1. Make sure that the POWER button is in the OFF position (raised). POWER button ON (Power lamp on) OFF (Power lamp off) Front Power lamp 2.
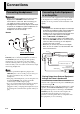
Connections Connecting Headphones Connecting Audio Equipment or an Amplifier IMPORTANT! • Before connecting headphones, be sure to use the Digital Piano’s VOLUME controller to turn the volume down to a low level. After connecting, you can adjust the volume to the level you want. • The Digital Piano automatically adjusts sound output to optimize for headphones (when headphones are connected) or the built-in speakers (when headphones are not connected).
Connections Use commercially available cables to connect the external audio equipment to the piano’s LINE OUT jacks as shown in Figure . LINE OUT R jack output is right channel sound, while LINE OUT L/MONO jack output is left channel sound. It is up to you to purchase connecting cables like the ones shown in the illustration for connection of audio equipment.
Using Built-in Tones btw, q 8METRONOME blMUSIC LIBRARY bsFUNCTION ctCHORUS, u csREVERB brTONE dkSPLIT, i dlENTER 7PART –Tone groups bkTEMPO Turning on the Digital Piano and Playing Something 1. Press the (POWER) button. This turns on power. • To turn off the Digital Piano, press the button again. Left Side button Selecting a Tone Your Digital Piano has 250 tones, divided into eight groups. • For more information, see the “Tone List” (page A-1).
3. Use the to (tone groups) buttons to select the group you want. 2. Example: To select the ORGAN group This will layer the tones currently selected in the two groups. Lit 4. Hold down the button of the group that contains the tone you want to select as the layered tone until “LAYER: ON” appears on the display as shown below for a few moments. Use the (w, q) buttons to select the tone you want.
Using Built-in Tones Moving the Keyboard Split Point Splitting the Keyboard between Two Tones You can split the keyboard so the left side (lower range) plays one tone and the right side (upper range) plays a different tone. You can use the procedure below to specify the location on the keyboard where it splits between the left side and the right side. That location is called the “split point”.
Using Built-in Tones After you split the keyboard (page E-10), you may find out that the lower range notes on the left are too low or that the upper range notes on the right are too high. You can use octave shift to shift the octaves of the upper range and lower range upwards or downwards in octave units. 1. Adjusting the Brilliance of a Tone 1. Press the (FUNCTION) button. The FUNCTION lamp will light and the function screen will appear on the display.
Using Built-in Tones Adding Reverb to the Tone 1. Press the (REVERB) button to toggle reverb on and off. Adding the Chorus Effect to the Tone 1. Lit when on Press the (CHORUS) button to toggle chorus (which adds depth to a tone) on and off. Lit when on Selecting the Reverb Type You can select from among the following four types of reverb. 1: Room 2: Hall 3: Large Hall 4: Stadium 1. 2. 3.
Using Built-in Tones Using the Metronome 1. Your Digital Piano comes equipped with three pedals: damper, soft, and sostenuto. Soft pedal Press the (METRONOME) button. English Using the Digital Piano’s Pedals This will start the metronome. Damper pedal Sostenuto pedal Pedal Functions Damper Pedal Pressing the damper pedal while playing will cause the notes you play to reverberate for a very long time.
Using Built-in Tones Changing the Tempo Setting Adjusting the Metronome Volume There are two different methods you can use to change the tempo setting: by pressing q (faster) and w (slower) buttons or by tapping a beat with a button. You can use the following procedure to adjust the volume level of the metronome, without affecting the volume of Digital Piano output. ■ To adjust the tempo using q and w buttons 1. 1. While holding down the (FUNCTION) button, press the (METRONOME) button.
Using Built-in Tones 1. Press the (MUSIC LIBRARY) button so its lower lamp is lit. Changing the Octave of a Duet Mode Keyboard You can use the following procedure to change the octave of the left and right Duet Mode keyboards. 1. This displays the Duet Mode on/off screen shown in step 2 under “Configuring the Digital Piano for Duet Play” (page E-15). If the Duet Mode is currently turned off, press the (q) button to turn it on.
Using Auto Accompaniment 5SYNCHRO/ENDING btw/NO, q/YES boBALLAD/PIANO RHYTHMS bpUSER RHYTHMS 6START/STOP csEXIT brTONE dlENTER blRHYTHM –Accompaniment patterns bkTEMPO 7ACCOMP ON/OFF –Rhythm groups With Auto Accompaniment, simply select the accompaniment rhythm you want and the matching accompaniment (drums, guitar, etc.) will play automatically when you play a chord with your left hand. It’s like having your own personal backup group along with you wherever you go.
Using Auto Accompaniment Press the (ACCOMP ON/OFF) button so its lamp is lit. This turns ACCOMP on, so all accompaniment parts sound. • Turning ACCOMP off so the ACCOMP lamp is unlit causes only the percussion instrument parts to sound. • Each press of the (ACCOMP ON/OFF) button toggles ACCOMP on and off. Lit 9. Play other chords with left hand as you play the melody with your right hand. • You can use “CASIO Chord” or other simplified chord fingering modes to play chords.
Using Auto Accompaniment Selecting a Chord Fingering Mode You can select from among the following five chord fingering modes. 1: Fingered 1 2: Fingered 2 3: Fingered 3 4: CASIO Chord 5: Full Range 1. ■ CASIO CHORD With “CASIO Chord”, you can use simplified fingerings to play the four types of chords described below. Chord keyboard Hold down the (ACCOMP ON/OFF) button until the chord type selection screen appears on the display.
Using Auto Accompaniment There are six different Auto Accompaniment patterns, shown below. You can switch between patterns during accompaniment play and even modify patterns. Use buttons through to select the pattern you want. Intro *1 Normal Normal fill-in *2 Variation Using One-Touch Presets One-Touch Preset gives you one-touch access to tone and tempo settings that go well with the currently selected Auto Accompaniment rhythm pattern. 1.
Using Auto Accompaniment 3. Use the (w, q) buttons to select the Auto Harmonize type you want. Type Number Type Name Description 00 Off Turns off Auto Harmonize. 01 Duet 1 Adds close (separated by two to four degrees) one-note harmony below the melody note. 02 Duet 2 Adds open (separated by more than 4 to 6 degrees) 1-note harmony below the melody note. 03 Country Adds country style harmony. 04 Octave Adds the note from the next lower octave. 05 5th Adds the fifth degree note.
Using Auto Accompaniment Use the instrument part buttons ( through ) to select the part (drums, bass etc.) you want to edit. The name of the part you select will appear on the display. Rhythm patterns are made up of the eight parts shown below. ck Drums cl Percussion cm Bass cn co cp cq Parameter Description Rhythm Select: Rhythm Replaces the part (drum, bass, etc.) accompaniment data with that of the specified rhythm number.
Using Auto Accompaniment 6. 7. Repeat steps 3 through 5 to edit all of the accompaniment patterns and parts you want. After editing is complete, adjust the tempo of the rhythm as desired. • The tempo you set here becomes the initial default tempo of the rhythm. 8. Press the (EXIT) button. 10. Decide on the user rhythm number where you want to save the rhythm and a rhythm name.
Playing Back Built-in Songs dlCARD/INTERNAL English btw, q blMUSIC LIBRARY 6PLAY/STOP 2REPEAT 7PART –Song groups A to D Playing Back All of the Built-in Songs Your Digital Piano comes with a total of 68 built-in songs: eight demo songs that are arranged to highlight the characteristics of the tones in each of the tone groups, and 60 classics in the Music Library. You can configure the Digital Piano to play back these songs in sequence. • See “Song List” (page A-6) for a list of built-in songs. 1.
Playing Back Built-in Songs Playing Back a Specific Music Library Song 5. This starts playback of the song. • Press the (FF) button to perform a fast forward operation or the (REW) button for rewind. Pressing and releasing either button moves one measure, while holding down a button scrolls at high speed. • Pressing the (PAUSE) button pauses playback. Press again to resume song playback. You can use the procedure below to select a Music Library song for listening or practice.
Playing Back Built-in Songs You can use the following procedure to adjust the volume level of the song’s Auto Accompaniment, without affecting the volume of keyboard tone output. For details, see “Song Volume” (page E-41). Repeating Playback of a Specific Section (Repeat) You can configure the Digital Piano to repeat the section of a song you want to practice. You could, for example, specify repeat play from measure 5 to measure 8.
Music Presets 6START/STOP btw/NO, q/YES blRHYTHM –Music Preset groups csEXIT dlENTER dki –Tone groups 4FF 3REW 7ACCOMP ON/OFF ctu bmbnMUSIC PRESET Music Presets provide you with one-touch tone, rhythm, chord, and other settings that are optimized for specific musical genres and songs. In addition to built-in presets, you can create your own original Music Presets (user presets). Selecting a Music Preset 1.
Music Presets Press the (START/STOP) button to start Auto Accompaniment with the chord progression of the Music Preset. Play the melody on the keyboard. • The preset chord progression repeats until you stop it by pressing the (START/STOP) button again. • Pressing the (ACCOMP ON/OFF) button so the ACCOMP ON/OFF lamp is lit (not flashing) or unlit will turn off the chord progression of the Music Preset and play the normal Auto Accompaniment pattern.
Music Presets 4. Edit the Music Preset parameters. 8. 4-1. To edit the chord progression Press the (w) down button to display “CHORD” and then press the (ENTER) button to advance to the chord progression editing screen. Next, perform the editing operation described under “To edit the chord progression” (page E-29). After you finish the editing operation, press the (EXIT) button to return to the screen for selecting the type of editing operation, above. 4-2.
■ To edit the chord progression 1. On the editing operation selection screen (page E-27), select “CHORD” and then press the (ENTER) button to display the chord progression editing screen shown below. (1) Step (timing and chord) (2) Cursor (3) Resolution (1) Step (timing and chord) The timing of a chord progression is expressed as a series of three values separated by colons (such as 001:1:00) indicating measure*1 (001), beat (1), and tick (00).
Music Presets 4. Repeat the above steps to edit all of the steps you want. • You can playback the Music Preset you are currently editing by pressing the (START/STOP) button. • The table below describes other Music Preset editing operations you can perform. Press the (FUNCTION) button, use the (u) and (i) buttons to select the editing operation you want, perform the required operation, and then press the (ENTER) button to apply the edit and return to the chord progression editing screen.
Music Presets ■ To edit Auto Accompaniment parameters On the editing operation selection screen (page E-27), select “Parameter” and then press the (ENTER) button to display the Auto Accompaniment parameter editing screen shown below. Setting 2. English 1. Parameter Use the (u) and (i) buttons to select a parameter, and the (w, q) buttons to change its setting.
Registering Tone and Rhythm Setups btw, q brREGISTRATION –Tone and accompaniment areas dmSTORE –Tone areas Registrations let you save Digital Piano setups (tone, rhythm, tempo, etc.) and for quick and easy recall when you need them. Registrations are stored using eight banks of 12 areas each as shown in the illustration below, for a total of 96 setups.
Registering Tone and Rhythm Setups Recalling a Registration 1. Configure the Digital Piano with the tone, rhythm, and other settings you want to save. 2. While holding down the (STORE) button, use the (w, q) buttons to select the bank where you want to save the registration. 1. Press the (REGISTRATION) button so its lower lamp is lit. This enters the registration recall mode. Example: Bank 4 Lit 3.
Recording Your Keyboard Play btw/NO, q/YES 6START/STOP 9RECORDER bsFUNCTION You can record your music as you play and store up to five songs in Digital Piano memory for later playback. You can divide a song into parts (by instrument, by left hand and right hand, etc.) and record each part separately. You can even use “punch-in recording” to edit specific parts of existing recordings. 3. csEXIT 4. Play something on the keyboard. When you are finished, press the (START/ STOP) button.
NOTE • Recorder memory capacity is approximately 10,000 notes per song. When remaining capacity is 100 notes or less, the (RECORDER) button lamp will flash at high speed. Recording will stop automatically when memory becomes full. • Repeat, fast reverse, fast forward, pause, and tempo adjustment during playback are the same as when playing back songs. See “Playing Back a Specific Music Library Song” (page E-24) for more information.
Recording Your Keyboard Play ■ Supported Track Data The following describes the data that can be recorded to each type of track. System Track, Tracks 01 through 16 Keyboard notes, keyboard tone setting (main), and pedal operations System Track only Layer, split, octave shift, reverb, chorus, keyboard temperament, tempo, Auto Accompaniment play, auto harmonize, one-touch preset, Music Preset,*1 registration*1*2 4. Select the tone of the part you want to record to the track. 5.
Recording Your Keyboard Play You can use the procedures below to delete an entire recorder song or to delete a specific track of a recorder song. Deleting a Recorder Song 1. Use the (RECORDER) button to cycle through the recorder modes until the RECORDER lamp is lit (playback mode). Lit: Playback mode 2. Deleting a Recorder Song Track 1. Perform steps 1 through 3 of the procedure under “Deleting a Recorder Song” to select the recorder song that contains the track you want to delete. 2.
Recording Your Keyboard Play 3. Press the (START/STOP) button. This will start playback of the selected track. 4. When playback reaches the point you want to re-record, play the notes and perform the other operations you want. This automatically starts punch-in recording, which will continue until step 5, below. • Any one of the following also will start punch-in recording: a pedal operation; pressing the (RECORDER) button;*1 changing the tone setting; changing the rhythm or tempo setting*2.
Recording Your Keyboard Play ■ Performing Punch-in Recording for Areas Smaller than One Measure English Use the procedure below to specify a punch-in recording area that includes a part of a measure. Example: To re-record from beat 3 of measure 2 up to beat 1 of measure 4 To re-record this section 1. Start playback of the song that contains the section you want to re-record. 2. When playback reaches the beginning of the section you want to re-record, press the (REPEAT) button. 3.
Other Settings btw, q bsFUNCTION You can use the settings in this section to adjust the tuning and touch of the keyboard, to configure pedal and MIDI settings, and to configure other parameters in order to tailor Digital Piano operation to your particular needs. Configuring Settings 1. Press the (FUNCTION) button. The FUNCTION lamp will light and the function screen will appear on the display. (See table below.) Parameter or group 2.
Other Settings Parameter Display Name Description Settings Shortcut Button* 1 Keyboard Key (Transpose) Transpose Adjusts keyboard tuning by semitone units. –12 to 00 to 12 semitones 2 Keyboard Fine Tuning (Tuning) Tune Adjusts keyboard tuning by cent (1 semitone = 100 cents) units. –99 to 00 to 99 cents 3 Keyboard Touch (Touch Response) Touch Adjusts keyboard touch.
Other Settings No. 6 7 Parameter Settings Shortcut Button* Play/CARD 6-1 Pre-count PreCount Turn on this setting for an audible count before starting playback of a song. Off, On 6-2 Song Repeat SongRepeat Turn on this setting to repeat play a song. Off, On 6-3 Card Folder CARD Folder See page E-53. (Folder Name) 6-4 Formatting a Memory Card CARD FORMAT See page E-45. – 6-5 Card File Delete File DELETE See page E-47. – – 6-6 Card File Rename File RENAME See page E-47.
btw/NO, q/YES 6PLAY/STOP 7PART bsFUNCTION –Folders dlCARD/INTERNAL, ENTER ctu dki dnSD CARD SLOT You can use the procedures in this section to transfer edited Auto Accompaniment data, recorder data, and other data from the Digital Piano to a commercially available SD memory card for storage. You also can use a memory card to transfer standard MIDI files (SMF), and accompaniment data you downloaded from the CASIO website from your computer to Digital Piano memory.
Using a Memory Card Card and Card Slot Precautions IMPORTANT! • Be sure to observe the precautions provided in the documentation that comes with the memory card. • Memory cards have a write-protect switch. Use it when you want to protect the data on the card from accidental deletion. • Avoid using a memory card under the following conditions. Such conditions can corrupt data stored on the memory card.
Using a Memory Card Formatting a Memory Card Saving Digital Piano Data to a Memory Card Use the following procedure to save Digital Piano data to a memory card. • Recorder songs can be saved as a standard MIDI file (SMF format 0). • User songs (downloaded songs, etc.) cannot be saved to a memory card. 1. Insert a memory card into the Digital Piano’s memory card slot. 1. 2. Select the data you want to save to the memory card.
Using a Memory Card 5. Use the (w, q) buttons to select the file number (01 to 99) you want to assign to the data when it is saved to the memory card. • The file number is the final two characters of the file name* that appears on the display. By changing this within the range of 01 to 99 for each save, up to 99 files of the same data type can be stored on the memory card. * The first six characters of the file name indicate the data type as shown below.
Using a Memory Card Renaming a Memory Card File Use the following procedure to delete memory card data (files). Use the following procedure to change the file name of a file on a memory card. 1. Insert the memory card into the Digital Piano’s memory card slot. 1. Insert the memory card into the Digital Piano’s memory card slot. 2. While holding down the (FUNCTION) button, press the (CARD/INTERNAL) button. 2. While holding down the (FUNCTION) button, press the (CARD/INTERNAL) button.
Using a Memory Card Playing Back a Song from a Memory Card You can use the procedure below to play back a user song (page E-24) stored on a memory card without loading the song into Digital Piano memory. Playing Back All of the Songs in a Folder Use the procedure below to select one of the four folders on a memory card and play back all of the songs in the folder in succession. 1. ■ Memory Card Folders This will start tone demo tune playback (page E-23).
Using a Memory Card English Saving Data to Digital Piano Memory (Internal Area) Instead of a Memory Card Even when you do not have a memory card loaded in the Digital Piano’s memory card slot, you can save up to about 16MB of data in the Digital Piano’s internal memory area. You also can load and delete internal memory area data using the same procedures that you use with a memory card. 1. Remove the memory card from the Digital Piano’s memory card slot (page E-44).
Using a Memory Card Error Messages One of the error messages below appears on the display when a problem occurs. • All mentions of “memory card” in the following table refer to an SD memory card. Display Message Cause Required Action Convert Reduce the size of the recorder song data by deleting unneeded There is not enough Digital Piano memory available to convert a recorder song (page E-34) to SMF data and store tracks (page E-37), if there are any. it on the memory card.
You can connect the Digital Piano to a computer and exchange MIDI data between them. You can send play data from the Digital Piano to music software running on your computer, or you can send MIDI data from your computer to the Digital Piano for playback. Minimum Computer System Requirements The following shows the minimum computer system requirements for sending and receiving MIDI data. Check to make sure that your computer complies with these requirements before connecting the Digital Piano to it.
Connecting to a Computer NOTE • Once you are able to connect successfully, there is no problem with leaving the USB cable connected when you turn off your computer and/or Digital Piano. • This Digital Piano conforms to General MIDI Level 1 (GM). • For detailed specifications and connections that apply to MIDI data send and receive by this Digital Piano, see the latest support information provided by the website at the following URL. http://world.casio.
Connecting to a Computer 3. While holding down the (FUNCTION) button, press the (USB DEVICE MODE) button. 5. Double-click “PIANO”. You now should see five data folders, one for each data type. English This will enter the storage mode, which enables data transfer with the connected computer. The (FUNCTION) button lamp will flash and the display will appear as shown below. This folder is not a data folder. You should not try to use it for normal Digital Piano operation.
Connecting to a Computer 7. File name extensions (.MID, .CM2, etc.) are not displayed under initial default Windows settings. Perform the procedure below to turn on display of file name extensions. (1) Open any one of the folders shown on page E-53. (2) Perform one of the following operations to display folder information. • Windows XP: On the [Tools] menu at the top of the folder window, select [Folder Options].
Connecting to a Computer You can use the procedure below at any time to copy user song data to the PIANO drive (without putting it in the MUSICLIB folder) for simplified playback on the Digital Piano. • When you copy a user song data file to the MUSICLIB folder, you need to rename it according to specified format (page E-53, step 6). You do not need to rename the file if you use the procedure below.
Assembling the Stand *CAUTION Unpacking PREPARATION • This stand does not include any of the tools required for assembly. It is up to you to prepare a large Philips head (+) screwdriver for assembly. C A B • Assembly of the stand should be performed by at least two people working together. • This stand should be assembled on a flat surface. • Do not remove the tape securing the keyboard cover in place until assembly is complete.
Assembling the Stand 3. Slide the back panel into the grooves of the side panels. 4. English C Attach the right side of the back panel to the bracket of the side panel . • Secure the back panel in place with a screw . C 5 A I 4 IMPORTANT! • Be sure to check that the back panel bracket engages correctly with the side panel bracket as shown in the nearby illustration marked “O”.
Assembling the Stand 6. 7. Place the piano onto the stand. IMPORTANT! • In order to ensure you do not get your fingers pinched between the piano and the stand, grasp the piano on its sides (not its ends) at the locations marked with stars () in the illustration. First, use the two butterfly bolts to secure the back of the piano to the stand. Next, use the two screws to secure the front of the piano.
Assembling the Stand Next, secure the bottom of the back panel with the six screws . To connect cables 1. Orienting the pedal plug as shown in the illustration, plug it into the pedal connector on the bottom of the piano. • Secure the pedal cord with the clip . C Pedal plug F G 10. Adjust the height adjustment screw to provide support so the crosspiece does not bow downwards when the pedals are pressed. 2. Check to make sure that the POWER button is in the OFF position (raised).
Assembling the Stand 4. Plug the power cord into a household power outlet. To install the music stand and headphones hook 1. Insert music stand into the groove on the Digital Piano console as shown in the figure below. N Household power outlet *CAUTION • The screws of the stand can work loose due to the effects of temperature and humidity changes, vibration, etc. Because of this, you need to periodically check the screws for proper tightness. Retighten any loose screws you find.
Troubleshooting Problem No sound is produced when I press a keyboard key. The pitch of the Digital Piano is off. Tones and/or effects sound strange. Turning power off and then back on again does not eliminate the problem. Cause Action See Page 1. The VOLUME controller is set to “MIN”. 1. Rotate the VOLUME controller more towards “MAX”. E-8 2. Headphones or an adaptor plug is plugged into one of the PHONES jacks. 2. Disconnect whatever is connected to the PHONES jack. E-6 1.
Reference Product Specifications All of the items in these specifications apply to the AP-620BK, AP-620BKV, AP-6BP, and AP-6BPV, unless specifically noted otherwise.
Reference Operating Precautions English Be sure to read and observe the following operating precautions. ■ Location Avoid the following locations for this product. • Areas exposed to direct sunlight and high humidity • Areas subjected to temperature extremes • Near a radio, TV, video deck, or tuner • The above devices will not cause malfunction of the product, but the product can cause interference in the audio or video of a nearby device.
Appendix/Apéndice Tone List/Lista de tonos Group Name/ Nombre del grupo Group Number/ Número de grupo Sequential Number/ Número secuencial GRAND PIANO MODERN 001 001 002 002 003 003 004 004 005 005 006 006 GRAND PIANO CLASSIC 001 007 002 008 003 009 004 010 005 011 006 012 ELEC PIANO 001 013 002 014 003 015 004 016 005 017 006 018 007 019 008 020 009 021 VIBES/CLAVI 001 022 002 023 003 024 004 025 005 006 026 027 Tone Name/ Nombre del tono Program Change/ Cambio de programa Bank Select MSB/ MSB d
Appendix/Apéndice Group Name/ Nombre del grupo A-2 Group Number/ Número de grupo Sequential Number/ Número secuencial 062 063 064 065 066 067 068 069 070 071 072 073 074 075 076 077 078 079 080 081 082 083 084 085 086 087 088 089 090 091 092 093 094 095 096 097 098 099 100 101 102 103 104 105 106 107 108 109 110 111 112 113 114 115 116 117 118 119 120 121 122 123 124 125 126 127 128 129 130 131 132 133 134 135 136 137 138 139 134 135 136 137 138 139 140 141 142 143 144 145 146 147 148 149 150 151 152
E b 6 87 C # 6 85 B b 5 82 A b 5 80 F # 5 78 E b 5 75 C # 5 73 High Q Slap Scratch Push Scratch Pull Sticks Square Click Metronome Click Metronome Bell Standard1 Kick 2 Standard1 Kick 1 Side Stick Standard1 Snare 1 Hand Clap Standard1 Snare 2 Low Tom 2 Closed Hi-Hat Low Tom 1 Pedal Hi-Hat Mid Tom 2 Open Hi-Hat Mid Tom 1 High Tom 2 Crash Cymbal 1 High Tom 1 Ride Cymbal 1 Chinese Cymbal Ride Bell Tambourine Splash Cymbal Cowbell Crash Cymbal 2 Vibraslap Ride Cymbal 2 High Bongo Low Bongo Mute High Cong
Appendix/Apéndice Rhythm List/Lista de ritmos Group Name/ Nombre del grupo Group Number/ Número de grupo Sequential Number/ Número secuencial Rhythm name/ Nombre del ritmo POPS/JAZZ POPS 001 002 003 004 005 006 007 008 009 010 8 BEAT/16 BEAT 011 012 013 014 015 016 017 018 019 020 021 DANCE 022 023 024 025 026 027 028 029 ROCK 030 031 032 033 034 035 036 037 038 039 040 041 042 043 044 045 JAZZ 046 047 048 049 050 051 052 053 054 055 EUROPEAN 056 057 058 A-4 001 002 003 004 005 006 007 008 009 010 P
Appendix/Apéndice Group Sequential Number/ Number/ Número de Número grupo secuencial WORLD II INDIAN 050 116 051 117 052 118 053 119 054 120 055 121 056 122 CHINESE 057 123 058 124 059 125 060 126 061 127 062 128 063 129 064 130 065 131 066 132 067 133 068 134 069 135 070 136 SOUTHEAST ASIAN 071 137 072 138 JAPANESE 073 139 BALLAD/PIANO RHYTHMS BALLAD 001 140 002 141 003 142 004 143 005 144 006 145 007 146 008 147 009 148 010 149 011 150 012 151 013 152 014 153 015 154 016 155 VARIOUS 017 156 018 157 019 1
Appendix/Apéndice Song List/Lista de canciones Tone Demo Songs/ Canciones de demostración de tonos Song Name/ Nombre de la canción Music Library/Biblioteca musical Group Name/ Nombre del grupo Group Number/ Número de grupo Sequential Number/ Número secuencial Song Name/ Nombre de la canción Tone Group Name/ Nombre del grupo de tonos Number/ Número GRAND PIANO MODERN 001 Prélude [Suite bergamasque] 001 001 Nocturne Op.
Appendix/Apéndice Music Preset List/Lista de preajustes musicales Group Name/ Nombre del grupo Group Number/ Número de grupo Sequential Number/ Número secuencial Preset Name/ Nombre de preajuste Group Name/ Nombre del grupo Group Number/ Número de grupo Sequential Number/ Número secuencial 75 76 77 78 79 80 81 82 83 84 85 86 87 88 89 90 75 76 77 78 79 80 81 82 83 84 85 86 87 88 89 90 Funky Clavi Earth Disco 70’s Disco Disco Lady Staying Upside 80’s Disco Give You Up Bb Girl Blv Disco Lady M Out Of
Appendix/Apéndice Group Name/ Nombre del grupo Group Number/ Número de grupo 30 31 32 33 34 35 TRAD 36 37 38 39 40 41 42 43 44 45 46 47 48 49 50 51 52 53 54 55 56 57 58 59 60 LATIN 61 62 63 64 65 66 67 68 69 70 71 72 73 74 75 76 77 78 79 80 81 82 83 84 85 86 87 88 89 90 COUNTRY 91 92 93 94 95 96 97 98 99 100 Sequential Number/ Número secuencial Preset Name/ Nombre de preajuste 150 151 152 153 154 155 Nutcracker Liebestraume Gymnopedies Jupiter Entertainer MapleLeafRag 156 157 158 159 160 161 162 163
Appendix/Apéndice Fingering Guide/ Guía de digitación Fingered 1, Fingered 2 Chords/ Acordes Fingered 1, Fingered 2 C Cm Cdim Fingered 3, Full Range Chords/ Acordes Fingered 3, Full Range In addition to the chords that can be fingered with Fingered 1 and Fingered 2, the following chords also are recognized. Además de los acordes que se pueden digitar con Fingered 1 y Fingered 2, también se pueden reconocer los siguientes acordes.
A-10 Root C C#/(Db) D (D#)/Eb E F F#/(Gb) G (G#)/Ab A (A#)/Bb • Debido a que el rango de entrada de acordes es limitado, es posible que este modelo no admita algunos de los acordes mostrados arriba. • Since the chord input range is limited, this model may not support some of the chords shown above.
MIDI Implementation Chart Model AP-620/AP-6 Function Transmitted Recognized Basic Channel Default Changed 1 - 16 1 - 16 1 - 16 1 - 16 Mode Default Messages Altered Mode 3 X Mode 3 X 0 - 127 0 - 127 0 - 127*1 O 9nH v = 1 - 127 X 8nH v = 64 O 9nH v = 1 - 127 X 9nH v = 0, 8nH v =** X X X O X O O X X X O X X X X X X O X O O X X X X X X X X O O X O O O O O O O O O O O O O O O O O O O O O O O O O O O O O O Note Number True voice Velocity Note ON Note OFF After Touch Key’s Ch’s Pitch B
This recycle mark indicates that the packaging conforms to the environmental protection legislation in Germany. Esta marca de reciclaje indica que el empaquetado se ajusta a la legislación de protección ambiental en Alemania.