
User Manual


3-17
Setup
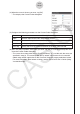
(5) In the [Value 1] box, input the reference value for the first sample, and then tap [OK].
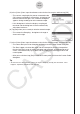
• This restarts sampling by the sensor connected to the
CH1 channel and displays a Sampling... dialog box like
the one shown to the right. This is how the dialog box
appears during standby prior to the second sample.
• If this dialog box is left on the display, sampling will
terminate and the dialog box will close automatically
after about five hours.
(6) Tap [Set] when you are ready to take the second sample.
• This causes the Sampling... dialog box to change as
shown to the right.
(7) In the [Value 2] box, input the reference value for the second sample, and then tap [OK].
• This closes the Input Value dialog box and returns to the Custom Probe dialog box.
• The Data Logger calculates the slope and the intercept for the linear interpolation
formula from the first set of values (reference and sampled), and the second set of
values, and automatically inputs them into the [Slope] and [Intercept] values of the
custom probe.
• After you are finished, tap [Set] to save the custom probe and close the Custom Probe
dialog box.
Tip
• An error occurs if the reference values you input in steps (4) and (6) are not correct. If this
happens, repeat the procedure from step (3).