Cover EN CT - S1 USER’S GUIDE Preparing a Power Supply Turning Power On or Off Connecting Headphones (Option) Selecting a Musical Instrument Tone Changing the Pitch in Semitone Units (Transpose) Fine Tuning (Tuning) Sustaining Notes After Keyboard Keys Are Released Saving and Recalling a Setup (MY SETUP) Configuring Settings Troubleshooting CTS1-E-2A
Included and Optional Accessories Use only accessories that are specified for use with this Digital Keyboard. Use of unauthorized accessories creates the risk of fire, electric shock, and personal injury. • You can get information about accessories that are sold separately for this product from the CASIO catalog available from your retailer, and from the CASIO website. https://support.casio.
Contents General Guide EN-4 Getting Ready to Play EN-6 Preparing a Power Supply . . . . . . . . . . . . . . . . . . . . . . . . . . . . . . . . . . . . . . . . . . . . . . . . . . . EN-6 Preparing the Music Stand . . . . . . . . . . . . . . . . . . . . . . . . . . . . . . . . . . . . . . . . . . . . . . . . . . EN-10 Connecting Headphones (Option). . . . . . . . . . . . . . . . . . . . . . . . . . . . . . . . . . . . . . . . . . . . . EN-10 Connecting a Pedal (Option). . . . . . . . . . . . . . . . . .
Contents Connecting with External Devices EN-59 Linking with a Smart Device (APP Function) . . . . . . . . . . . . . . . . . . . . . . . . . . . . . . . . . . . . EN-59 Connecting to a Computer and Using MIDI . . . . . . . . . . . . . . . . . . . . . . . . . . . . . . . . . . . . . EN-62 Using a Cable to Connect with an Audio Device. . . . . . . . . . . . . . . . . . . . . . . . . . . . . . . . . . EN-64 Sounding a Bluetooth Audio Capable Device (Bluetooth Audio Pairing) . . . . . . . . . . . . . . .
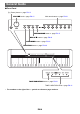
General Guide ■ Front Panel P (Power) button ☞ page EN-13 VOLUME knob ☞ page EN-15 Main tone buttons ☞ page EN-21 METRONOME button ☞ page EN-15 REC/a button ☞ page EN-42 SURROUND button ☞ page EN-31 FUNCTION button ☞ page EN-48 TONE VARIATION button ☞ page EN-21 TONE VARIATION LEDs ☞ page EN-21 • The numbers to the right of the ☞ symbol are reference page numbers.
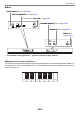
General Guide ■ Back USB TO HOST port ☞ page EN-60 USB TO DEVICE port ☞ page EN-11 Power terminal (DC 9.5V) ☞ page EN-6 PHONES/OUTPUT jack ☞ page EN-64 AUDIO IN jack ☞ page EN-65 PEDAL jack ☞ page EN-11 • The numbers to the right of the ☞ symbol are reference page numbers. ■ Keyboard note names and pitches The keyboard note names and pitches used in this manual follow the international standard. Middle C is C4, the lowest C is C2, and the highest C is C7.
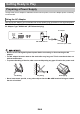
Getting Ready to Play Preparing a Power Supply Though either an AC adaptor or batteries can be used for power, use of AC adaptor power is normally recommended. Using the AC Adaptor Use only the AC adaptor (JEITA Standard with unified polarity plug) specified for this Digital Keyboard. Use of a different type of AC adaptor can cause malfunction. AC Adaptor Type: AD-E95100L (JEITA Standard plug) AC adaptor DC 9.
Getting Ready to Play Using Batteries for Power • Be sure to turn off power before loading batteries. • Use commercially available AA-size alkaline batteries or AA-size rechargeable nickel metal hydride batteries. • Low battery power can cause abnormal operation. If this happens, replace batteries with new ones. If you are using rechargeable batteries, charge them. ■ Batteries Note the precautions below when using rechargeable batteries. • Use Panasonic Group AA-size eneloop rechargeable batteries.
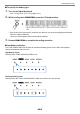
Getting Ready to Play ■ To specify the battery type 1. Turn on the Digital Keyboard. • See “Turning Power On or Off” (page EN-13). 2. While holding down FUNCTION, press the C{2 keyboard key. C2 C3 C4 C5 C6 C7 C{2 • Each press of the keyboard key sounds a tone that lets you know what setting was selected. One tone: Alkaline batteries Two tones: Rechargeable nickel metal hydride batteries 3. Release FUNCTION to complete the setting operation.
Getting Ready to Play Battery Replacement Required Indicated when the TONE VARIATION LEDs flash. • Low battery power may cause notes to become distorted, or other problems. • You can conserve battery power by using headphones and by reducing the volume level. • Continued use with low batteries may cause power to turn off suddenly. This can cause stored data to be corrupted or lost.
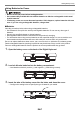
Getting Ready to Play Preparing the Music Stand Insert the music stand legs into the back of the Digital Keyboard. Music stand Connecting Headphones (Option) Plugging in headphones cuts off output from the built-in speakers, which means you can practice playing even late at night without disturbing others. • Be sure to turn down the volume level before connecting headphones. Stereo mini plug PHONES/OUTPUT jack (3.5mm stereo mini jack) • Headphones do not come with this Digital Keyboard.
Getting Ready to Play Connecting a Pedal (Option) To use a pedal, connect it to the PEDAL jack on the back of the Digital Keyboard. Pedal (option) PEDAL jack (6.3mm standard jack) • A pedal unit does not come with this Digital Keyboard. • Use the optional (SP-3, SP-20) pedal. Connecting the Wireless MIDI & audio adaptor (Option) To pair this Digital Keyboard with a Bluetooth capable external device, you need to plug the Wireless MIDI & audio adaptor into the Digital Keyboard’s USB TO DEVICE port.
Getting Ready to Play Attaching a Strap (Commercially Available) 1. Attach a strap (commercially available) to the left and right strap pins on the bottom of the Digital Keyboard. 2. Cover the strap pins with the strap locks. Strap (commercially available) Strap lock Strap pin • After attaching the strap, check to make sure that the strap is securely attached to the Digital Keyboard. • Do not pick up the Digital Keyboard by the strap alone.
Playing on the Keyboard Turning Power On or Off 1. Press the P (Power) to turn on Digital Keyboard power. The Digital Keyboard becomes operational after a few seconds. 2. To turn off the Digital Keyboard, hold down the P (Power) until all of the LEDs go out. • Turning off power normally causes the tone and other settings to return to their initial defaults. However, the settings below are remembered.
Playing on the Keyboard Auto Power Off While Auto Power Off is enabled, power will turn off automatically after about 30 minutes of nonoperation. • While the metronome is in use, power will not turn off automatically even if you do not play anything on the keyboard. ■ Disabling Auto Power Off You can disable Auto Power Off to ensure that power does not turn off automatically during a concert, etc. 1. While holding down FUNCTION, press the E}2 keyboard key.
Playing on the Keyboard Adjusting the Volume Level 1. Rotate the VOLUME knob. This changes the volume level. Using the Metronome The metronome lets you play and practice along with a steady beat to help keep you on tempo. You can also set a tempo that is suitable for your practice. Start/Stop 1. Press METRONOME. This starts the metronome. 2. Press METRONOME again to stop the metronome.
Playing on the Keyboard Specifying the Metronome Beats Per Measure You can use the procedure below to configure a setting that sounds a chime on the first beat of each measure, and a click for the remaining beats. • Select a setting of Off (0), or a value of 1 to 16 beats. A reference tone sounds whenever the setting values becomes off (0). 1. Start the metronome. 2. While holding down METRONOME, use the C{5 and E}5 keyboard keys to change the number of beats setting.
Playing on the Keyboard Changing the Metronome Tempo Use the procedure below to change the tempo of the metronome. 1. Start the metronome. 2. Holding down METRONOME, use keyboard keys C4 through E5 to change the tempo setting. C2 C3 C4 C4 B2 C4 C{4 D4 E}4 E4 − 0 F4 C5 C5 E}4 C6 G4 A4 B4 4 5 6 C5 C7 D5 E5 + 1 2 3 7 8 9 • You can specify a tempo value in the range of 20 to 255. • Each press of the – or + keyboard key raises or lowers the tempo by 1.
Playing on the Keyboard Changing the Metronome Sound Volume Level 1. Start the metronome. 2. While holding down METRONOME, use the A}4 and B}4 keyboard keys to change the metronome sound volume level. C2 C3 C4 C5 A}4 B}4 − + C6 C7 • You can specify a volume value from 0 to 10. • To return the setting to its initial default, press the – and + keyboard keys at the same time. 3. Release METRONOME to complete the setting operation.
Playing on the Keyboard Listening to Demo Play Demo songs include CASIO original tone demo songs and piano demo songs. 1. Press METRONOME and PIANO at the same time. This causes the PIANO button to flash and starts tone demo song play. • Some tone demo songs use the surround effect. The SURROUND button will light while the surround effect is in use. • Tone demo songs play in sequence, one after another. 2. To play a piano demo song, press PIANO. This will start playback of the first piano demo song.
Playing on the Keyboard 3. To select a particular piano demo song for playback, hold down PIANO as you press a keyboard key from C2 to A2. This starts playback of the piano demo song you selected. Keyboard Note Name C2 C{2 Song Name Turkish March (W.A.Mozart) Moments Musicaux 3 D2 Minuet in G Major E}2 Inventionen 1 E2 Praeludium 1 (J.S.Bach) F2 Le Coucou F{2 Arabesque (F.Burgmüller) G2 La Chevaleresque A}2 Fröhlicher Landmann A2 Von fremden Ländern und Menschen [Kinderszenen] 4.
Controlling the Sound of a Performance Selecting a Musical Instrument Tone This Digital Keyboard lets you play using tones for a wide variety of musical instrument sounds. A bank of main tone buttons are assigned piano, organ, and other tones for quick and easy selection. The same song can sound completely different when played with a different instrument type. Playing with a Main Tone 1. Press one of the main tone buttons. • The button you press lights and the keyboard changes to the button’s tone. 2.
Controlling the Sound of a Performance Selecting a Tone 1. While holding down TONE VARIATION, press a keyboard key from C2 to C7. This sounds the selected tone. C2 C3 C4 C4 C5 C5 C6 C6 C7 • A TONE VARIATION LED will light to indicate the selected tone’s category. • Each of the keyboard keys has a tone assigned to it. For tone information, see the “Tone List” (page EN-76). 2. Release TONE VARIATION to complete the setting operation.
Controlling the Sound of a Performance Registering a Tone to a Main Tone Button (Tone Memory) You can use tone memory to register tone and layer settings, octave shift settings, and other settings to main tone buttons. You will then be able to recall the registered settings when you need them to perform a particular song, etc. 1. While holding down TONE VARIATION, press the main button to which you want to register the tone settings.
Controlling the Sound of a Performance ■ To recall a registered tone 1. Check to make sure that the TONE MEMORY TONE VARIATION LED is lit. Lit • If it isn’t, press TONE VARIATION as many times as necessary until the TONE MEMORY TONE VARIATION LED is lit. 2. Press the main tone button where the tone settings are registered. This will switch to the tone settings registered to the button.
Controlling the Sound of a Performance Playing with Touch Response Touch Response alters tone volume in accordance with keyboard pressure (press velocity). This provides you some of the same expression capabilities you get on an acoustic piano. Changing Touch Response Sensitivity 1. While holding down FUNCTION, press the F5 keyboard key. C2 C3 C4 C5 C6 C7 F5 • Each press of the keyboard key sounds a tone that lets you know what setting was selected.
Controlling the Sound of a Performance ■ To adjust the volume when Touch Response is disabled (Touch off Velocity) 1. While holding down FUNCTION, press the G5 keyboard key. • Do not release FUNCTION until step 2, below. C2 C3 C4 C5 C6 C7 G5 2. Use keyboard keys C4 through E5 to set the volume level. C2 C3 C4 C4 C4 C{4 D4 E}4 E4 − 0 F4 C5 C5 C6 G4 A4 B4 4 5 6 C5 C7 D5 E5 + 1 2 3 7 8 9 • You can specify a volume value from 1 to 127.
Controlling the Sound of a Performance Using a Pedal A pedal (optional SP-3 or SP-20) can be used to apply various changes to your sound while playing. Under initial default settings, sustain is assigned to the pedal, so it can be used as a damper pedal. Changing Pedal Functions 1. While holding down FUNCTION, press the F6 keyboard key. C2 C3 C4 C5 C6 C7 F6 • Each press of the keyboard key sounds a tone that lets you know what setting was selected.
Controlling the Sound of a Performance ■ Disabling the Pedal Function Effect of Each Part You can use the procedure below to disable the pedal function effect of the main part and layer part. 1. While holding down FUNCTION, press the G6 or A6 keyboard key. C2 C3 C4 C5 C6 C7 G6 (Main part) A6 (Layer part) This disables the pedal function effect. • Each press of the keyboard key sounds a tone that lets you know what setting was selected.
Controlling the Sound of a Performance Adjusting the Sustain Time of the Parts When sustain is enabled, you can use the procedure below to make the sustain times of the main part and layered part longer or shorter. 1. While holding down FUNCTION, press the D6 or E6 keyboard key. • Do not release FUNCTION until step 2, below. C2 C3 C4 C5 C6 C7 D6 (Main part) E6 (Layer part) 2. Use keyboard keys C4 through E5 to set the sustain time.
Controlling the Sound of a Performance Playing with Reverb You can use the procedure below to add reverb to the notes you play. 1. While holding down FUNCTION, press the D2 keyboard key. • Do not release FUNCTION until step 2, below. C2 C3 C4 C5 D2 A notification tone will sound to indicate the reverb type selection mode. 2. Use keyboard keys C2 through C4 to select a reverb type. Keyboard Note Name Reverb Type C2 Depends on the tone.
Controlling the Sound of a Performance Turning off Reverb 1. While holding down FUNCTION, press the C2 keyboard key. C2 C3 C4 C5 C6 C7 C2 This turns off reverb. • Each press of the keyboard key sounds a tone that lets you know what setting was selected. High tone: On Low tone: Off 2. Release FUNCTION to complete the setting operation. Playing with a Multi-dimensional Expanded Sound (Surround) Enabling surround causes sound to expand multi-dimensionally, front, back, left, and right. 1.
Controlling the Sound of a Performance Layering Two Tones You can use the procedure below to layer two tones and output the resulting sound. The part that is played using a single tone is the main part, while the second part that is layered over the main part is the layer part. Main part Layer part 1. While holding down FUNCTION, press the C3 keyboard key. C2 C3 C4 C5 C6 C7 C3 This enables layering. • Each press of the keyboard key sounds a tone that lets you know what setting was selected.
Controlling the Sound of a Performance Adjusting the Volume Level of Each Part You can use the procedure below to adjust the volume level of the main tone and layer tone. 1. While holding down FUNCTION, press the A3 or B3 keyboard key. • Do not release FUNCTION until step 2, below. C2 C3 C4 C5 C6 C7 C6 C7 A3 (Main part) B3 (Layer part) 2. Use keyboard keys C4 through E5 to set the volume level.
Controlling the Sound of a Performance Changing the Pitch in Octave Units (Octave Shift) You can use the procedure below to raise or lower pitch in octave units. 1. While holding down FUNCTION, press the C{3 or E}3 keyboard key. C2 C3 C{3 (–) Keyboard Note Name C4 C5 C6 C7 E}3 (+) Description C{3 Lowers the pitch one octave. E}3 Raises the pitch one octave. • You can specify a value in the range of –3 to +3 octaves. • A reference tone sounds whenever the setting values becomes 0.
Controlling the Sound of a Performance Changing the Pitch of Parts in Octave Units (Part Octave Shift) You can use the procedure below to raise or lower the pitches of the main part and layer part in octave units. 1. While holding down FUNCTION, press the F3 or G3 keyboard key. • Do not release FUNCTION until step 2, below. C2 C3 C4 C5 C6 C7 C4 C5 C6 C7 F3 (Main part) G3 (Layer part) 2. Press the C{4 or E}4 keyboard key.
Controlling the Sound of a Performance Changing the Pitch in Semitone Units (Transpose) You can use the procedure below to raise the overall pitch in semitone steps. You can use this feature to raise or lower the key of the keyboard to make it easier to play a piece written in a difficult key, or to adjust to a key that better matches a vocalist, or another musical instrument. 1. While holding down FUNCTION, press the F{3 or A}3 keyboard key.
Controlling the Sound of a Performance Fine Tuning (Tuning) You can use the procedure below to adjust the overall pitch by changing the frequency of A4. (0.1 Hz units) 1. While holding down FUNCTION, press B}3 keyboard key. • Do not release FUNCTION until step 2, below. C2 C3 C4 C5 C6 C7 C6 C7 B}3 2. Use keyboard keys C4 through E5 to set the note pitch.
Controlling the Sound of a Performance Changing the Keyboard Scale Tuning You can change the scale tuning of the keyboard from the standard equal temperament to another tuning that is more suitable for playing Indian music, Arabic music, classical music, etc. You can select from among 17 preset scale tunings. ■ To change the scale tuning 1. While holding down FUNCTION, press the F2 keyboard key. • Do not release FUNCTION until step 2, below.
Controlling the Sound of a Performance ■ To specify the base note of the scale tuning 1. While holding down FUNCTION, press the G2 keyboard key. • Do not release FUNCTION until step 2, below. C2 C3 C4 C5 C6 G2 A notification tone will sound to indicate the scale tuning base note selection mode. 2. Use keyboard keys C2 through B2 to select a scale tuning base note.
Controlling the Sound of a Performance ■ To disable piano stretch tuning Piano stretch tuning, which is normally used for piano tuning, sharpens high notes and flattens low notes. 1. While holding down FUNCTION, press the A2 keyboard key. C2 C3 C4 C5 C6 C7 A2 This disables stretch tuning. • Each press of the keyboard key sounds a tone that lets you know what setting was selected. High tone: On Low tone: Off 2. Release FUNCTION to complete the setting operation.
Controlling the Sound of a Performance Using the Equalizer You can use the equalizer to configure settings that boost or cut specific frequency components. 1. While holding down FUNCTION, press the E2 keyboard key. • Do not release FUNCTION until step 2, below. C2 C3 C4 C5 C6 C7 E2 This sounds a notification tone and enters the equalizer setting mode. 2. Use keyboard keys C2 through A2 to select the equalizer setting you want.
Recording Your Keyboard Play (MIDI Recorder) You can use the procedures in this section to record and playback your keyboard play. Recording and Playing Back Keyboard Play Use the procedure below to record what you play on the keyboard. 1. Select a tone and configure the other settings you want to use for recording. 2. Press REC/a. This causes the REC/a button light to flash and enters record standby. 3. Play what you want to record.
Recording Your Keyboard Play (MIDI Recorder) 4. To stop recording, press REC/a. This causes the REC/a button light to flash and enters playback standby. After a pre-count sounds, playback of what you recorded will start. 5. To stop playback, press REC/a. This causes the REC/a button light to go out and stops playback. • Turning off the Digital Keyboard while recording is in progress will cause the recording to be deleted. • A new recording replaces (deletes) previously recorded contents.
Recording Your Keyboard Play (MIDI Recorder) Changing the Volume of a Recorded Performance 1. While holding down FUNCTION, press the C{6 keyboard key. • Do not release FUNCTION until step 2, below. C2 C3 C4 C5 C6 C7 C{6 2. Use keyboard keys C4 through E5 to set the volume level. C2 C3 C4 C4 C4 C{4 D4 E}4 E4 − 0 F4 C5 C5 C6 G4 A4 B4 4 5 6 C5 C7 D5 E5 + 1 2 3 7 8 9 • You can specify a volume value from 0 to 10.
Recording Your Keyboard Play (MIDI Recorder) To delete a recorded performance 1. Long press REC/a. This will sound a notification tone and delete the performance you recorded.
Saving and Recalling a Setup (MY SETUP) You can use MY SETUP to save the setup (tone and other settings) of the Digital Keyboard. You can recall a saved setup when you need it to perform a particular song, etc. Saving to MY SETUP 1. While holding down FUNCTION, long press the C7 keyboard key. C2 C3 C4 C5 C6 C7 C7 This sounds a notification tone and saves the setup. 2. Release FUNCTION to complete the setting operation. Savable Settings The settings listed below can be saved with MY SETUP.
Saving and Recalling a Setup (MY SETUP) Recalling From MY SETUP 1. While holding down FUNCTION, press the C7 keyboard key. • Long-pressing the C7 keyboard key will cause the setup saved in MY SETUP to be overwritten with the current setup. Do not long-press C7 unless you want to do this. C2 C3 C4 C5 C6 C7 C7 Pressing C7 will sound a notification tone and recall the setup. 2. Release FUNCTION to complete the setting operation.
Configuring Settings You can use FUNCTION in combination with keyboard keys to configure various settings. Setting Operation 1. Use “Keyboard Keys Used for Configuring Settings” on page EN-49 to find the setting item you want and the location on the keyboard for changing its setting. 2. While holding down FUNCTION, use the keyboard key or keys you looked up in step 1 of this procedure to configure the setting you want. • This sounds a notification tone in accordance with the operation you perform.
Configuring Settings Keyboard Keys Used for Configuring Settings C2 C3 C4 C5 C6 C7 6 Piano Stretch Tuning 5 Scale tuning base note 4 Scale tuning type 3 Equalizer 2 Reverb type 1 Reverb Item 1 Reverb Setting Options Description Off, On (Initial Default: On) Turns off reverb. 2 Reverb type Reverb Type Setting Value List (page EN-30) (Initial Default: Depends on the tone.) Specifies the type of reverb to be applied.
Configuring Settings 7 Octave shift 8 Transpose 9 Tuning − C2 C3 Item 7 Octave shift + − + C4 C5 Setting Options Description –3 to 0 to +3 (Initial Default: 0) Raise or lower pitch in octave units. 8 Transpose –12 to 0 to +12 (Initial Default: 0) Raises or lowers the overall pitch in semitone steps. 9 Tuning 415.5 Hz to 440.0 Hz to 465.9 Hz (Initial Default: 440.0) Fine tunes the overall pitch by changing the frequency of A4 in 0.1 Hz units.
Configuring Settings C2 C3 C4 C5 C6 C7 bq Part volume (layer) bp Part volume (main) bo Part octave shift (layer) bn Part octave shift (main) bm Layer tone bl Main tone bk Layer Item Description Remarks Off, On (Initial Default: Off) Layers or unlayers tones. • Each press of the keyboard key sounds a tone that lets you know what setting was selected. High tone: On Low tone: Off bl Main tone Tone List (page EN-76) (Initial Default: 1(C2)STAGE PIANO) Can be used to change the main tone.
Configuring Settings bs – and + keyboard keys − C2 C3 + C4 0 C5 1 2 3 4 5 6 7 C6 8 C7 9 br Keyboard keys 0 through 9 Item br bs – and + keyboard keys Keyboard keys 0 through 9 Setting Options Description – Used to input values. – Used to input values.
Configuring Settings C2 C3 C4 C5 C6 C7 bt Touch Response ck Touch off velocity cl Sustain cm Sustain time (main part) cn Sustain time (layer part) Item bt Setting Options Description Off, Light, Medium, Heavy (Initial Default: Medium) Specifies how volume changes in accordance with keyboard key pressure. (See page EN-25.) ck Touch off velocity 1 to 127 (Initial Default: 100) Adjusts volume when Touch Response is disabled.
Configuring Settings C2 C3 C4 C5 C6 C7 co Pedal cp Pedal effect part (main) cq Pedal effect part (layer) cr MY SETUP power on recall cs MY SETUP Item co Setting Options Description Remarks Pedal sustain, sostenuto, soft, metronome (Initial Default: Pedal sustain) Changes the pedal function. • Each press of the keyboard key sounds a tone that lets you know what setting was selected.
Configuring Settings ct Battery type dk Auto Power Off dl Local Control dm MIDI OUT Channel (main part) dn MIDI OUT Channel (layer part) do Program Change Send C2 C3 Item C4 Setting Options C5 Description C6 C7 Remarks ct Battery type Alkaline, Nickel metal hydride (Initial Default: Alkaline) Specifies the type of batteries being used. (See page EN-7.) • Each press of the keyboard key sounds a tone that lets you know what setting was selected.
Configuring Settings Item do Program Change Send Setting Options 0 to 127 Description Sends a program change message to the channel specified by MIDI OUT Channel (main part).
Configuring Settings el Notification tone ek Initialize dt AUDIO IN center cancel ds Recorded song volume dr Delete Bluetooth audio pairing history dq Bluetooth audio pairing dp Bluetooth C2 C3 Item dp C4 Setting Options C5 Description C6 C7 Remarks Off, On (Initial Default: On) Turns Bluetooth on or off. • Each press of the keyboard key sounds a tone that lets you know what setting was selected.
Configuring Settings Item el Notification tone Setting Options Off, On (Initial Default: On) Description Remarks When this setting is disabled, a tone does not sound when a keyboard key is pressed while holding down FUNCTION. • Turning power off and back on again returns tone and other settings to their initial defaults (page EN-13). • The settings below are retained even when power is turned off.
Connecting with External Devices Linking with a Smart Device (APP Function) You can use the APP function to connect the Digital Keyboard with a phone, tablet or other smart device and perform the operations described below. • Use the lesson functions of an app on the smart device, playing notes on the Digital Keyboard. • Use the Digital Keyboard sound source to sound music data played using an app on the smart device. • Configure the settings of your smart device (Airplane Mode, etc.
Connecting with External Devices Connecting with a Smart Device There are two ways to connect with a smart device: using a commercially available USB cable and connection via Bluetooth. ■ Using a Cable to Connect the Digital Keyboard with a Smart Device For information about the requirements for a cable used for connection, visit the website below. https://web.casio.com/app/en/play/support/connect.html 1. Referring to “Downloading the Smart Device App” (page EN-59), install the app on the smart device.
Connecting with External Devices ■ Using Bluetooth to Link the Digital Keyboard with a Smart Device You can use the Wireless MIDI & audio adaptor (Option: WU-BT10) for Bluetooth linking. 1. Referring to “Downloading the Smart Device App” (page EN-59), install the app on the smart device. 2. Plug the Wireless MIDI & audio adaptor into the Digital Keyboard’s USB TO DEVICE port (page EN-11). • After connecting the smart device to the Digital Keyboard, use the smart device app to perform operations.
Connecting with External Devices Connecting to a Computer and Using MIDI You can connect the Digital Keyboard to a computer and exchange MIDI data between them. You can record your performance using computer music software, and use the Digital Keyboard to play data sent from a computer. ■ Minimum Computer System Requirements The following shows the minimum computer system requirements for sending and receiving MIDI data. Be sure to check your computer system setup before trying to install the driver.
Connecting with External Devices ■ Connecting to a Computer • Incorrect connections can make data exchange impossible. Be sure to follow the steps of the procedure below. 1. Turn off the Digital Keyboard and then start up your computer. • Do not start up the music software on your computer yet! 2. Use a commercially available USB cable to connect your computer to the Digital Keyboard’s USB TO HOST port. • Use a USB 2.0 or 1.1 A-micro-B connector type USB cable that supports data communication. 3.
Connecting with External Devices Using a Cable to Connect with an Audio Device You can connect this Digital Keyboard to a commercially available playback device or amplifier, or to a recording device. You can also use this Digital Keyboard to sound output from a portable audio player or another device, and use that as backing for your keyboard play. ■ Sounding Output from the Digital Keyboard on an External Device Connection requires commercially available connecting cords, supplied by you.
Connecting with External Devices ■ Sounding Input From an External Device on This Digital Keyboard Connection requires commercially available connecting cords, supplied by you. The connecting cord should have a stereo mini plug on one end for connection to this Digital Keyboard and a plug that matches the configuration of the output jack of external device on the other end. When sounding input from an external device with this Digital Keyboard, use the external device controls to adjust the volume level.
Connecting with External Devices Sounding a Bluetooth Audio Capable Device (Bluetooth Audio Pairing) You can use a Wireless MIDI & audio adaptor (optional WU-BT10) to pair this Digital Keyboard with an external Bluetooth audio capable audio device and then playback from the external device through this Digital Keyboard’s speakers. • Before performing the pairing operation, turn down the volume levels of this Digital Keyboard and the external device.
Connecting with External Devices 7. Produce sound on the Bluetooth audio capable device. Output from the audio Bluetooth capable device will sound from the Digital Keyboard’s speakers. • Turn on Bluetooth on both this Digital Keyboard and on the Bluetooth audio capable device. • For information about how to change this Digital Keyboard’s Bluetooth settings, see “Turning Off Bluetooth” (page EN-70).
Connecting with External Devices Deleting Bluetooth Audio Capable Device Pairing Registration • Performing the procedure below will delete the pairing registration between this Digital Keyboard and its currently paired Bluetooth audio capable device. If you are experiencing connectivity problems with a Bluetooth audio capable device, perform the procedure below and then perform the procedure under “Sounding a Bluetooth Audio Capable Device (Bluetooth Audio Pairing)” (page EN-66).
Connecting with External Devices Connecting with a Bluetooth MIDI Capable Device You can use a Wireless MIDI & audio adaptor (optional WU-BT10) to pair this Digital Keyboard with a Bluetooth MIDI capable audio device. 1. Long-press the P (Power) button to turn off the Digital Keyboard. 2. Plug the Wireless MIDI & audio adaptor into the USB TO DEVICE port (page EN-11). 3. Press the P (Power) button to turn on the Digital Keyboard. 4.
Connecting with External Devices Turning Off Bluetooth You can use the procedure below to turn off Bluetooth if you do not need to connect via Bluetooth using the Wireless MIDI & audio adaptor (Option: WU-BT10). 1. While holding down FUNCTION, long-press the F{5 keyboard key. C2 C3 C4 C5 C6 C7 F{5 A tone will sound and Bluetooth will turn off. • Long-pressing the F{5 keyboard key again will turn Bluetooth back on.
Reference Troubleshooting Symptom Required Action Included Accessories I can’t find included items during unpacking. Carefully check inside all of the packing materials. Power Requirements Power does not turn on. • Check the AC adaptor or make sure that the batteries are facing correctly (page EN-6). • Replace the batteries with new ones. Or use AC adaptor power (page EN-6). The Digital Keyboard suddenly turns off after outputting a loud sound. • Replace the batteries with new ones.
Reference Symptom Required Action The pitch of the notes does not match other accompanying instruments or notes sound strange when played along with other instruments. • Check and adjust the transpose setting (page EN-36) and tuning setting (page EN-37). • Try turning this Digital Keyboard off and then back on again (page EN-13) to initialize settings. The reverb of notes seems to change suddenly. • Check and adjust the reverb setting (page EN-30).
Reference Product Specifications Model CT-S1BK/CT-S1WE/CT-S1RD Keyboard 61 keys Touch Response 3 levels, Off Maximum Polyphony 64 notes Tones Preset Tones 61 tones, main tone buttons, advanced tones Other Layer, Sustain, Tone Memory Effects Reverb (24 types, Tone, Off); Chorus (built into tones); Delay (built into tones); DSP (built into some tones) Master Effects Equalizer (10 presets) Active Effects Volume sync equalizer, surround External Input Effects Vocal Cut.
Reference Jacks PHONES/OUTPUT jack Stereo mini jack (3.5 mm) AUDIO IN jack Stereo mini jack (3.5 mm) (Input impedance: 10 kΩ; Input sensitivity: 200 mV) USB TO HOST port micro-B USB TO DEVICE port Type A PEDAL jack Standard jack (6.3 mm) (pedal sustain, sostenuto, soft, metronome) AC adaptor terminal 9.
Reference AC Adaptor Handling Precautions Model: AD-E95100L 1. Read these instructions. 2. Keep these instructions on hand. 3. Heed all warnings. 4. Follow all instructions. 5. Do not use this product near water. 6. Clean only with a dry cloth. 7. Do not install near radiators, heat registers, stoves, or any other source of heat (including amplifiers). 8. Use only attachments and accessories specified by the manufacturer. 9. Refer all servicing to qualified service personnel.
Reference Tone List Keyboard Key Note Name PIANO 1 C2 2 C{2 3 D2 4 E}2 5 E2 6 F2 7 F{2 8 G2 9 A}2 10 A2 E.PIANO 1 11 B}2 12 B2 13 C3 14 C{3 E.PIANO 2 15 D3 16 E}3 17 E3 18 F3 19 F{3 20 G3 21 A}3 22 A3 ORGAN 23 B}3 24 B3 25 C4 26 C{4 27 D4 28 E}4 29 E4 30 F4 31 F{4 32 G4 KEYBOARD 33 A}4 34 A4 35 B}4 36 B4 No.
Reference Keyboard Key Note Name SYNTH 37 C5 38 C{5 39 D5 40 E}5 41 E5 42 F5 OTHERS 43 F{5 44 G5 45 A}5 46 A5 47 B}5 48 B5 49 C6 50 C{6 51 D6 52 E}6 53 E6 54 F6 55 F{6 56 G6 57 A}6 58 A6 59 B}6 60 B6 61 C7 No.
Reference ■ VL-TONE (Tone List No. 50) Keyboard Key List Keyboard Key Note Name C1-B1 C2 C{2 D2 E}2 E2 F2 F{2 G2 A}2 A2 B}2 B2 C3 C{3 D3 E}3 E3 - G9 Sound - Rhythm March Waltz 4-Beat Swing Rock 1 Rock 2 Bossanova Part A Bossanova Part B Samba Part A Samba Part B Rhumba Part A Rhumba Part B Beguine “Po” “Pi” “Sha” Violin • Selecting VL-TONE assigns rhythm tones to keyboard keys C2 through E}3, and violin tones to keys E3 through G9 as shown above.
Reference Setting Item List C2 C3 C4 C5 C6 C7 C2 C{2 D2 E}2 E2 F2 F{2 G2 A}2 A2 B}2 B2 C3 C{3 D3 E}3 E3 F3 F{3 G3 A}3 A3 B}3 B3 C4 C{4 D4 E}4 E4 F4 F{4 G4 A}4 A4 B}4 B4 C5 C{5 D5 E}5 E5 F5 F{5 G5 A}5 A5 B}5 B5 C6 C{6 D6 E}6 E6 F6 F{6 G6 A}6 A6 B}6 B6 C7 Reverb Battery type Reverb type Auto Power Off Equalizer Scale tuning type Local Control Scale tuning base note MIDI OUT Channel (main part) Piano Stretch Tuning MIDI OUT Channel (layer part) Program Change Send Layer Octave shift – Main tone Octave
Model: CT-S1BK/CT-S1WE/CT-S1RD Version : 1.
MA2103-A