
User manual - User's Guide


19
E
Creating and Printing a Large Tape Label
Though your printer can print on tapes up to 24mm wide, there may be times
that you need to produce even larger labels. You can do this by printing the
large label in sections, and then assembling the sections into the final label.
Important!
• You must have a tape cartridge that is 12mm wide or wider loaded in the
printer to perform this operation.
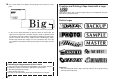
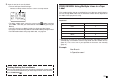
Example
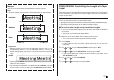
Big (printed on two pieces of 12mm tape)
1. Press to turn on the printer.
2. Use and to select TAPE, and then press SET.
• You can also press TAPE to enter the TAPE Mode.
3. Use and to select NEW, and then press SET.
4. Use the cursor keys to select , and then press SET.
• This enters the Enlarged Label Mode.
5. Input the label text and then press SET.
• While inputting text in the Enlarged Label Mode, you can also change
the DIRECTION setting (page 25) and the MIRROR setting (page 26).
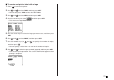
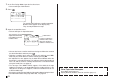
➜
Large label printed using
two pieces of tape
Arranging the printed labels
produces the large label.
6. Use and to select the size of the final label (how many pieces of
tape will be used), and then press SET.
• Since we will be using two pieces of tape here, we will select 2 PIECES.
7. Use and to select PRINT, and then press SET.
8. Use and to specify what part of the large label you wish to print,
and then press .
• Here we want to select the entire label, so we will select ALL. If you want
to print only one part of the large label, you can select 1, 2, 3, or 4,
depending on the number of pieces that make up the large label.
9. Use and to select the tape cut mode (page 38), and then press
SET.
• This starts printing.
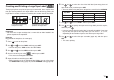
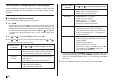
Tape Width
Character Size
2 PIECES 3 PIECES 4 PIECES
12mm 24mm (15/16") 36mm (1 7/16") 48mm (1 7/8")
18mm 30mm (1 3/16") 45mm (1 3/4") 60mm (2 3/8")
24mm 30mm (1 3/16") 45mm (1 3/4") 60mm (2 3/8")