
User Manual
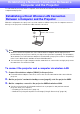
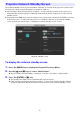
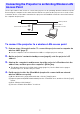
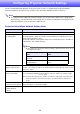
Table Of Contents
- Contents
- Establishing a Network Connection Between a Computer and the Projector
- Configuring Projector Network Settings
- Using a Computer to Configure Projector Network Settings
- Preparing for C-Connection
- Network Projecting a Computer Screen Image (Using C-Connection)
- C-Connection Details
- Advanced Operations
- Ports Used for TCP/UDP

7
Use the procedure in this section to connect the projector to an operating wireless LAN access point.
Connecting the computer to the same wireless LAN access point as the projector or to a hub, router,
or another device on the same network as the projector will establish a network connection between
the computer and projector.
To connect the projector to a wireless LAN access point
1.
Perform steps 1 through 3 under “To connect the projector and a computer via
wireless LAN” (page 5).
Use the computer connected via wireless LAN to configure projector settings.
2.
On the projector’s network standby screen (page 6), note the projector’s IP
address.
3.
Start up the computer’s web browser, input the projector’s IP address into the
address bar, and then press the computer’s [Enter] key.
This displays the projector’s Web Service page (page 12). Use the Web Service page to
perform steps 4, 5, and 6 of the procedure.
4.
Put the projector into the Client Mode (required to connect with an external
wireless LAN access point).
(1) On the Web Service page window title bar, click the [Setup] button.
(2) Input the password (Initial Default: admin) into the “Password” box, and then click the [Login]
button.
(3) Click “Wireless LAN Settings”.
(4) Select the “Enable Client Mode” check box.
Connecting the Projector to an Existing Wireless LAN
Access Point
Wireless LAN connection
Existing network
Wireless LAN or
Wired LAN connection
Wireless LAN access point
Projector